How UiPath Forms improve user interaction in automation workflows
Share at:

Introduction
In today's fast-paced world of automation, not everyone is automation savvy. Some of us still struggle with that pesky key on the keyboard! Fortunately, the UiPath Forms are here to save the day. It can turn even the most intimidating automation workflows into a user-friendly, interactive experience that anyone can navigate.
In this post, we’ll dive into the world of UiPath Forms, showing you how to create, integrate, and optimize forms so that your workflows not only run smoothly but also make users feel like automation pros.
What are UiPath Forms?
UiPath Forms are customizable user interfaces that can be integrated into your UiPath automation workflows to collect and validate user input. These forms allow you to create rich, interactive experiences within your automations, ensuring that users can easily provide the necessary information or make selections that guide the process.
Key features
Customizable layouts - You can design forms to fit your exact needs, whether you need basic text boxes or more complex tables. For example, if you're collecting contact details, you can easily set up fields for name, phone number, and address.
Data validation — The forms come with built-in checks to ensure the information entered is correct. This helps avoid mistakes, like preventing someone from submitting a form without filling in a required field.
Dynamic interaction — The form can change based on what the user selects. For instance, if a user selects a particular option, the form can show additional questions related to that choice, making the experience smoother and more user-friendly.
Integration with automation workflows — These forms can be seamlessly added to existing automation processes. This means after a form is filled out, the automation continues without any hiccups, making it easy to move from user input to automated tasks.
Benefits of using UiPath Forms in automation workflows
Enhanced user experience- one of the most significant advantages of using UiPath Forms is the improved user experience. By offering an intuitive interface for data entry, users can interact with the automation process more comfortably.
Improved data accuracy - data validation is a critical aspect of any automation process. UiPath Forms allow you to implement validation rules that ensure only correct and complete data is submitted. This reduces the likelihood of errors and rework, ultimately leading to a more reliable and efficient workflow.
Seamless integration with workflows - UiPath Forms are designed to be easily integrated into your existing automation workflows. Whether you're using them at the start of a process to collect user information or at a decision point within the workflow, the forms can be seamlessly embedded into your automation, maintaining a cohesive user experience.
Flexibility and customization—with a wide range of customizable options, UiPath Forms can be tailored to meet the specific needs of your project. From simple input fields to complex multi-page forms, you have the flexibility to design forms that suit your exact requirements.
Time-saving automation—by automating the process of collecting and validating user input, UiPath Forms can significantly reduce the time spent on manual data entry. This not only speeds up the workflow but also frees up valuable resources that can be redirected to other tasks.
How to create and integrate UiPath Forms
Step 1: Setting up your form
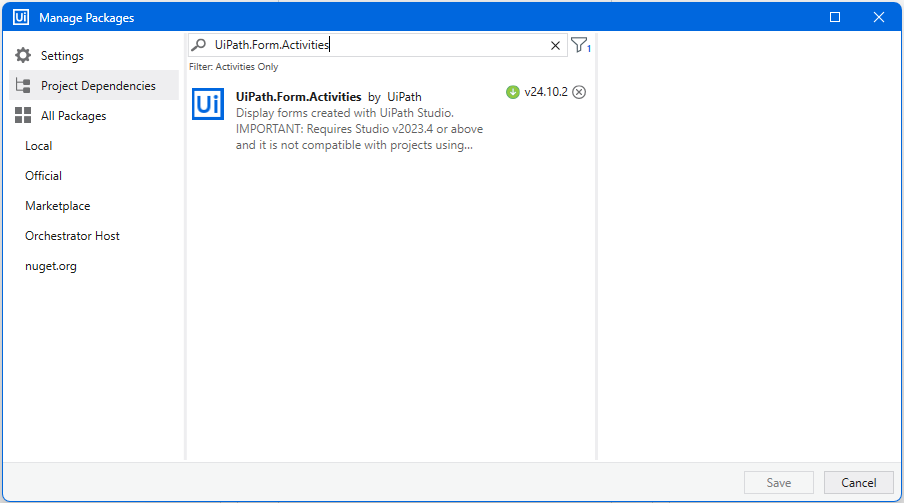
To begin, you’ll need to create a new UiPath project and add the UiPath.Form.Activities dependency for UiPath Forms in the Manage Packages window.
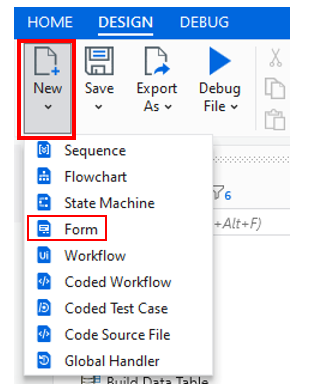
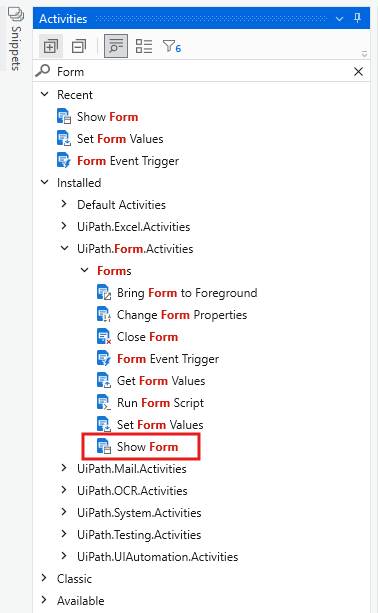
Once your environment is ready, you can either create a new form directly from the New > Form option as shown in the snap below or by using the Show Form activity, which allows for the creation of forms as part of your workflow.
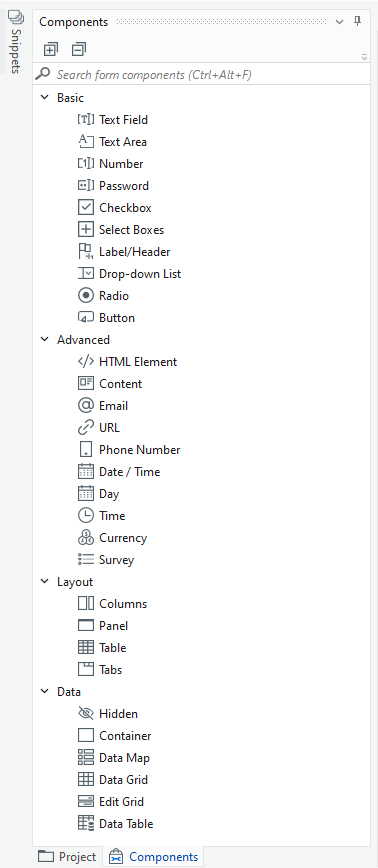
Form designer interface: the Form Designer provides a drag-and-drop interface where you can add and arrange various form components such as text fields, dropdowns, radio buttons, and more as shown below.
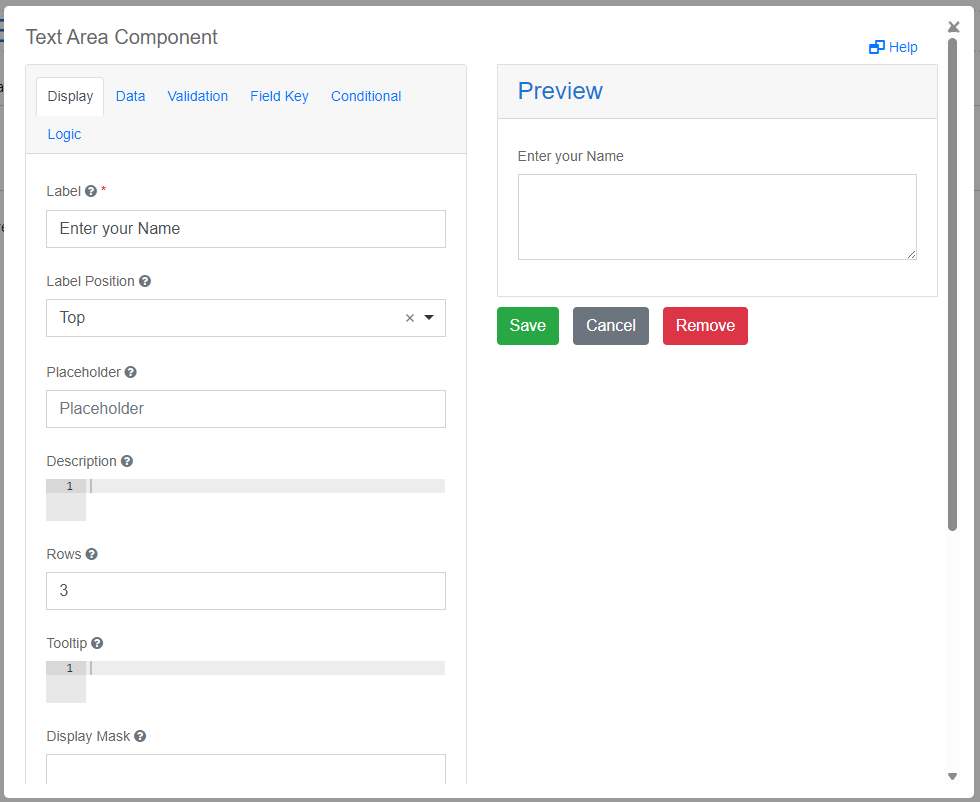
Customizing the form: You can customize the appearance and behavior of each form element. This includes setting default values, defining validation rules, and configuring event triggers based on user interactions. E.g. The configurations can be changed or added in the component for Text Area as shown below.
Understanding the Form Designer tabs: To make the most out of the Form Designer, it’s important to understand its different tabs:
Display Tab: Customize the visual properties of your form, including layouts, labels, and styles.
Data Tab: manages the data inputs and outputs, such as binding form fields to variables.
Validation Tab: set up validation rules for input fields to ensure the data entered meets specific criteria.
Field Key Tab: assign unique keys to form fields for easy reference when processing form submissions.
Conditional & Logic Tabs: Define logic-based conditions, allowing for dynamic form behavior based on user input.
For further details, you can refer to the UiPath documentation here.
Step 2: Configuring data binding
Data binding is a crucial step in ensuring that the data entered by users is correctly captured and processed within your workflow. In UiPath Forms, one can bind form fields to variables or arguments within the automation very easily with the rich User interface offered by UiPath.
Step 3: Integrating the Form into your workflow
Once your form is designed and configured, the next step is to integrate it into your automation workflow.
Using the Show Form Activity: the Show Form activity in UiPath allows you to invoke the form within your workflow. You can configure this activity to pause the automation until the user has completed the form, ensuring that the process waits for the necessary input.
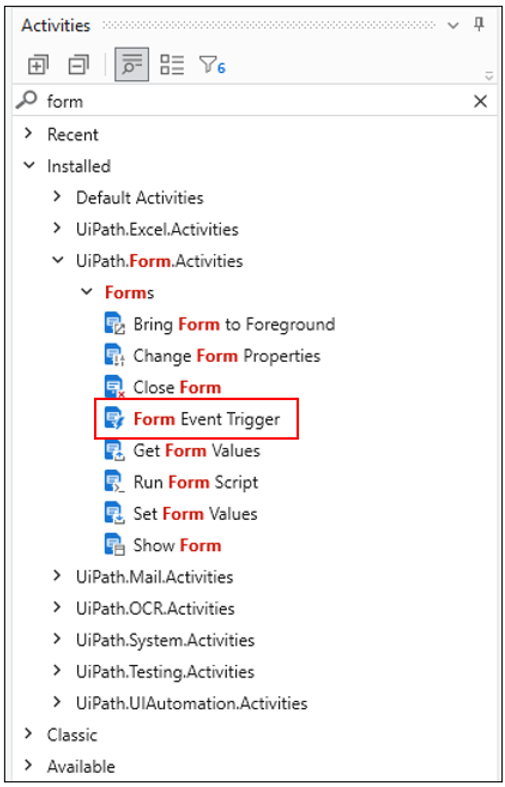
Form Event Triggers: you can use the Form Event Triggers activity to handle more advanced workflows by triggering specific actions based on user interactions or form events. This is useful for real-time updates and interactions in dynamic processes. You can read more about the triggers here.
Step 4: Handling Form submissions
After the form is submitted, you can define how the data should be processed. This might involve validating the input, saving it to a database, or using it to make decisions within the workflow.
Step 5: Testing and optimization
Before deploying your automation, it’s essential to thoroughly test the form to ensure it behaves as expected. This includes checking the data validation rules, verifying that the form integrates smoothly with the workflow, and optimizing the form's performance.
UiPath Forms offer a powerful way to enhance user interaction within automation workflows. By integrating customizable, interactive forms into your processes, you can create more user-friendly, efficient, and reliable automations. Whether you’re looking to improve data accuracy, streamline user input, or create a more dynamic workflow, UiPath Forms provides the tools you need to achieve these goals.
With the right approach, UiPath Forms can transform the way you design and implement automation workflows, leading to greater user satisfaction and more successful automation projects.
Get started to build your UiPath form.
Are you a passionate automation expert making waves in the UiPath Community? This is your moment to shine! We're searching for the next wave of Most Valuable Professionals (MVPs)—the elite group of AI automation champions leading the future of automation. Ready to make your mark? Review the criteria, apply today, and let’s drive innovation together!
Topics:
StudioTrainer, UiPath
Get articles from automation experts in your inbox
SubscribeGet articles from automation experts in your inbox
Sign up today and we'll email you the newest articles every week.
Thank you for subscribing!
Thank you for subscribing! Each week, we'll send the best automation blog posts straight to your inbox.


