Working with PowerShell - How to "Invoke Powershell" in UiPath

Microsoft PowerShell is a uniquely powerful tool in the Microsoft Windows world and can be used to control and configure almost every aspect of Windows— or can be used to automate smaller parts of an UiPath workflow.
PowerShell can be used for easy access to scripting that can help automations bridge a gap without having to rely on custom activities or custom code.
In this tutorial, we’ll look at how to use PowerShell in a UiPath context and take the first steps together from just invoking a simple command to actually using a complete script directly from within UiPath and passing back values from those scripts to UiPath.
We’ll start with an easy tutorial, which will leverage the “get-process” commandlet and use it in different contexts within UiPath.
The community tutorial for this topic in the UiPath Academy can be found here.
Requirements
Before getting started, you’ll need the following:
Microsoft Windows system (Windows 7, 8 ,10) with the ability to open either PowerShell or PowerShell Integrated Scripting Environment (ISE)
Ability to set the execution policy (set-executionpolicy) either to unrestricted or bypass. This will require administrative rights.
UiPath Studio
Step 1: The “invoke powershell” command
In this step, we will be looking at the “invoke powershell” command itself and get familiar with it. The “invoke powershell” activity is now part of the UiPath.System.Activities. There’ is another one which is called “run powershell script” which is part of the UiPath.Script.Activities but this one is deprecated and should no longer be used.
First, let’s take a look at the activity itself and explain the most important properties which we will be using in this tutorial.
All the details can be found here.
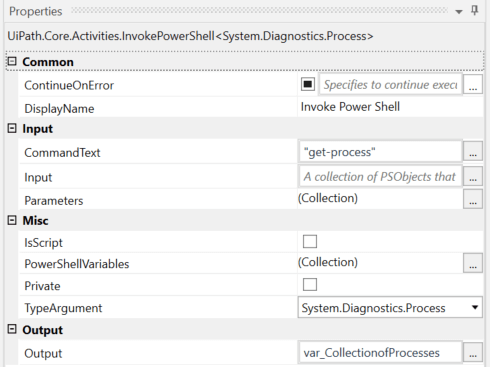
Let’s take a look at the properties:
CommandText: This is used if a single command or a “one liner” will be executed with the activity. In our example, the commandlet is “get-process” which we will be using throughout this tutorial.
Input: Can be used to parse values which are output if other PowerShell scripts to this activity. This a more advanced use and will not be covered in the blog post.
Parameters: These are the input arguments for the script we are running. In this case, we a giving in an argument called “Name” with the value “n*”

The name of the argument in this case is determined by the commandlet itself which can be checked in PowerShell.
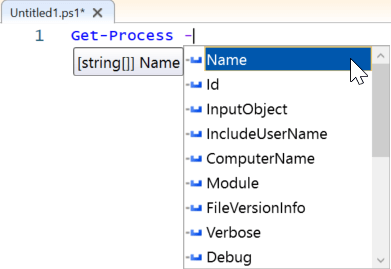
IsScript: Is not checked in our case as we don’t use a script but a commandlet at the moment
TypeArgument: If we want to use an output this TypeArgument has to match the output of the commandlet – in our case we want to get all processes with a certain name and the output for the “get-process” commandlet is System.Diagnostics.Process
Output: Is out variable to save the output of the commandlet which is a collection of System.Diagnostics.Process
Next, let’s take a look at PowershellPowerShell itself and what will happen when we let this run directly in PowershellPowerShell. For that, we start the PowershellPowerShell ISE and type in the command “get- process -name n*” and execute it.
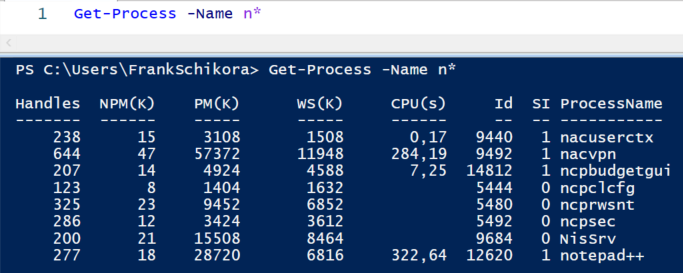
We can see that we get every process which is running at the moment and starts which is starting with an “n”.
Finally, let’s create a workflow in UiPath which displays the number of processes read out and then displays the id and the name of every process found.
This could look like this:
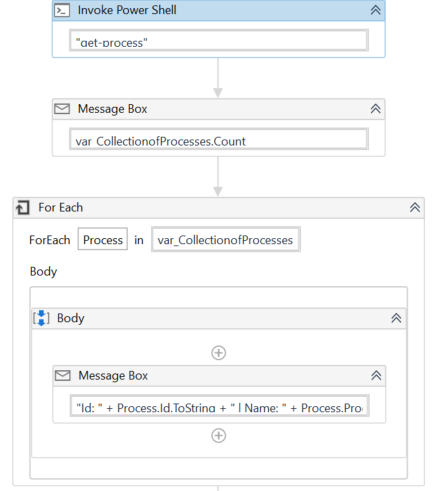
Be mindful of the TypeArgument for the ForEach as it must be set to “System.Diagnostics.Process”!
Now that we have gone through our first example, in the next step, we will learn how to use the “|” (pipe) as a means to string together more than one PowerShell command in succession.
Step 2: Using “|” (the pipe) for additional options and functionality
In this step, we will take out the first PowerShell script and enhance it. As we have seen in the first run, we’lle will get all the processes which start with an “n,” but now we only want to get those which actually have a graphical user interface (GUI) attached to them.
First, we would need to figure out how to do this and luckily the System.Diagnostics.Process types provides an attribute which is called “MainWindowTitle” and this is something we can work with.
Let’s jump back in the ISE to check out how to check this attribute for all the processes we have found.

What we can see here is that we are using “|” to signal that we want to use the output of the first commandlet in the second part. With the “Where-Object” (more information here), we can make a selection over the attributes of the objects our first commandlet provides. We use $_ to indicate that we want to use the current object and with that we can then select “MainWindowTitle” from the list.
Next, let’s us run the command in the PowerShell ISE. The output will be every process which starts with a “n” and has a MainWindowTitle.

Finally, let’s put this all together in an UiPath workflow like we did before. Not much actually has to be changed we just need to add our new condition to the expression editor for the “Invoke Power Shell” activity.
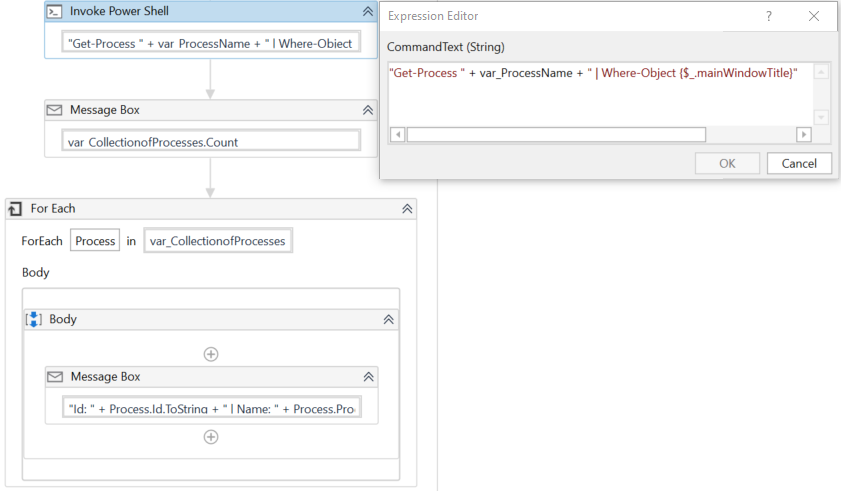
Now that we have seen how to directly invoke commandlets with the “invoke Power Shell” activity and how to use “|” we’ll take a look at more advanced use case which will directly call a complete PowerShell script from within UiPath.
Step 3: Executing entire PowerShell scripts with UiPath
In this step, we wil'll look at how to leverage an entire PowerShell script and call it directly from UiPath while giving some parameters to the script (which we can define ourselves).
Firstly, let’s understand the script we will be using for this tutorial. The script will get all processes with a certain name which we can define and save those as a CSV -file to a path we will determine.
Param
(
[Parameter(Mandatory=$true)] [string]$ProcessName,
[Parameter(Mandatory=$true)] [string]$SavePath
)
#Initialize an Array
$ProcessArray = @()
$Id = Get-Process $ProcessName | Where-Object {$_.mainWindowTitle}
ForEach ($Item in $Id) {
$MyPSObject = [PSCustomObject]@{
ProcessName = $Item.Name
ProcessId = $Item.Id
}
$ProcessArray += $MyPSObject
}
$ProcessArray | Export-Csv $SavePath -NoTypeInformation
Within the “Param” block, we are defining the parameters which we will use in this script. We see two here which are both mandatory $ProcessName and $SavePath both are of the type [string].
In $Id we will save all the processes which match our defined process name and also have a MainWindowTitle. All those processes will then be saved as a PsObject which includes a name and an Id in the array $ProcessArray. This array will then be exported to the $SavePath we give as an input.
We are using a custom PsObject here as we only want specific information (name and id) of the processes that we find.
Let’s try this out in the PowerShell ISE!
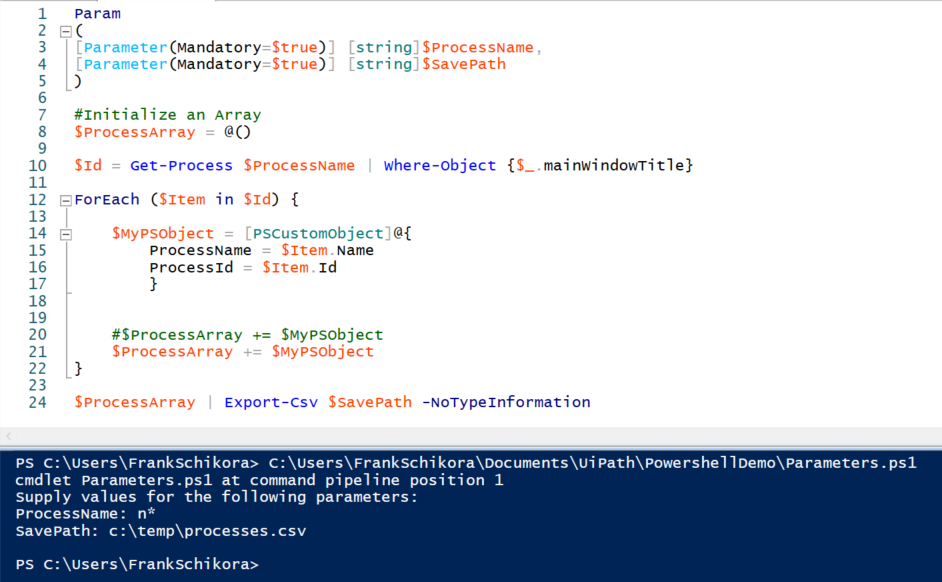
As you can see, the scripts asks us for the parameters we have defined.
Next, let’s see how we can call this script directly within UiPath. It’s a good practice to save the PowerShell script in a text file and read that text file in UiPath to save the actual script in a variable.
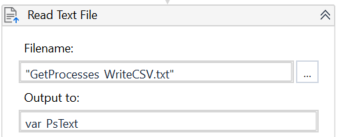
In this example, we save the script in the variable var_PsText which we will use in the next step to invoke the PowerShell script.
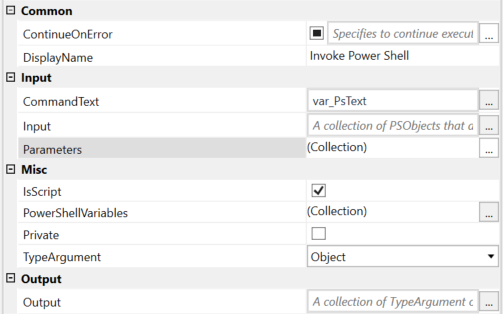
We can see here that now the “IsScript” property is set as we are no longer using a commandlet directly. One other difference to the activity we used before are the parameters we are using now.

Please be advised that the names and order of the names here does not have to match the parameters defined in the script 100%, but it is always a best practice and heavily recommended to use the same names and order as detailed in the script.
Finally, we can let the script run and check if it has written the CSV -file as expected.
Conclusion
In this blog post, we have taken a quick look a PowerShell and how to use it in the context of UiPath. We have learned how to invoke a commandlet directly, how to use the “|” operator in PowerShell to concatenate several commands into one, and how to call entire scripts directly out of UiPath the studio.
As I have mentioned in the beginning, Microsoft PowerShell is a powerful tool and might help in some sticky situations. If you want to learn more, please consider the links provided below for additional learning resources.
PowerShell overview: https://bit.ly/3g4bAWX
PowerShell DevBlog: https://bit.ly/2WJOEVs
Scripting DevBlog: https://bit.ly/2TiN4Ie
UiPath Community MVP and is the head of Delivery and DevOps, Roboyo
Get articles from automation experts in your inbox
SubscribeGet articles from automation experts in your inbox
Sign up today and we'll email you the newest articles every week.
Thank you for subscribing!
Thank you for subscribing! Each week, we'll send the best automation blog posts straight to your inbox.


