Using UiPath Apps and Data Center to Automate Test Creation
Share at:

Introduction
UiPath Apps and Data Service are relatively new to the UiPath stack and contain immense potential. Using these two products together exponentially increases the universe of automation use cases.
In an academic environment, you can delegate administrative tasks with UiPath Apps. In this tutorial you'll explore step-by-step how to automate test creation to ease teachers’ responsibilities, and save 16 days of manual work.
How's automation transforming teaching?
Digitalization is having a tremendous impact on education across the globe. The pandemic has shown us all the power of technology. The opportunity is that it helped us remove obstacles that hinder industries from achieving their deliverables.
Digitalization can also raise some challenges for academic environments. For example, students are grappling with post-pandemic complexities like the level and quality of online teaching and balancing remote learning with mandatory return-to contact lectures at certain universities.
How does this relate to UiPath?
To overcome these challenges, I leveraged the integration between UiPath Apps and Data Center to generate custom tests for students. To provide a different assessment/test for every student, a process needs to:
1. Retrieve the student’s unique identification value (or number)
2. Generate an assessment specific to the unique student identification value
3. Record the assessment and make it available to the student for completion (Figure 1.)
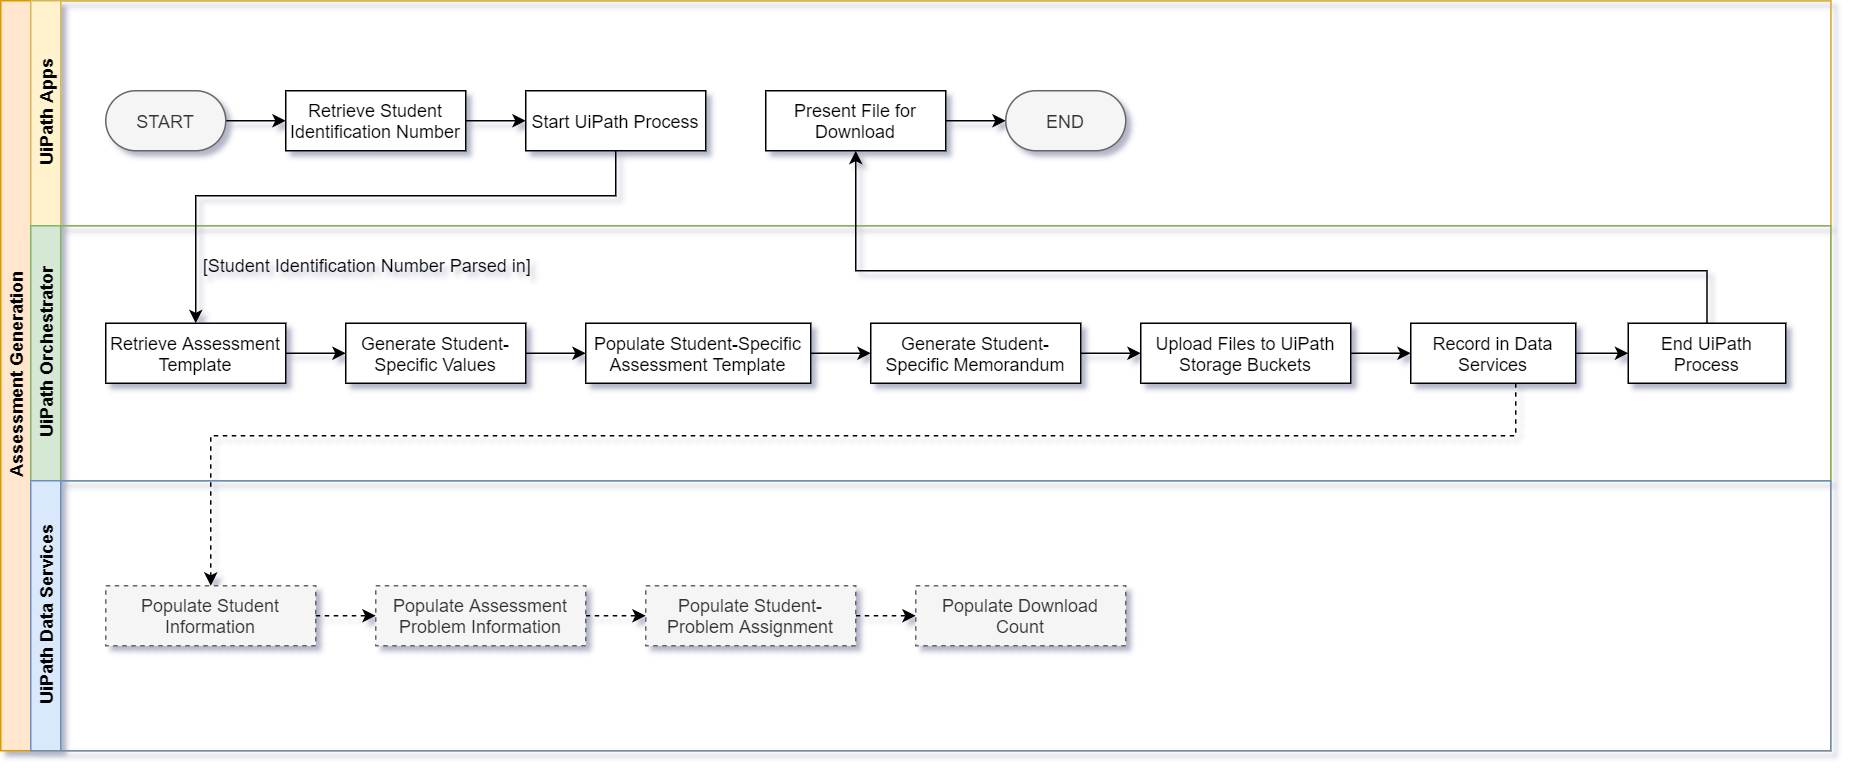
There are four core components to Figure 1.

1. The input: UiPath Apps can be used as the interface between the user and the rest of the solution that lives in the background. The user shouldn't have any access or ability to manipulate the process in any way.
2. The process: UiPath Studio can be used to develop the process that'll conduct the file manipulation and manage all storage. The process can be deployed to and run from the UiPath Orchestrator. The integration between Apps and Orchestrator allows for a process to be run from a button click from Apps
3. Storage: the storage component deals with data and files which, in this case, are stored separately. Files are stored in a UiPath Storage Bucket while all transactional data is stored on UiPath Data Service. The files could be stored in Data Service instead of Storage Buckets.
4. The output: since UiPath Apps is used as the entry point for users to interact with the solution, the output of the solution (which in this case, is the assessment) would be presented back to the student.
Based on the above, the high-level process presented in Figure 1, can be broken down further as seen in Figure 2:
The use-case presented as part of this post requires students to upload their assessment to the Learning Management System (LMS) prescribed by the university. We could extend this solution by building a test submission component, as well.
An extension on the solution in question would be to build a submission component into the Apps as well.
Requirements
This solution should decrease the opportunity for students to cheat during online assessments. Each student receives a different assessment. This is subject to the following considerations:
1. Students should be tested against the same criteria, which could limit or restrict the variety of assessment questions.
2. No student should be placed at a greater disadvantage than the larger group to maintain fairness and consistency.
3. We need separate tests for each answer key.
Reduce the likelihood of students inappropriately collaborating because each student is under pressure to complete their own assessment. This approach isn't bulletproof and has a set of considerations.
The assessment would need to be timeboxed in a way that guarantees all students will complete the assessment at the same time.
In countries where there are uncontrollable forces that may jeopardize this approach, a mitigation plan would need to be presented to students. An example of this would be the severe electricity crisis in South Africa where the electricity being generated isn't enough to sustain the whole country continuously, so the load is shed between different geographies when supply is low. In this scenario, students are encouraged to either write the assessment on campus or at a location with a backup power supply.
Prerequisites
First, make sure that UiPath Studio is installed on your machine. After this step is accomplished, follow the steps below:
a) Set up the assessment template and the memorandum template
b) Create the Data Service entities (how to)
c) Create the Storage Bucket (how to)
d) Build UiPath Apps
a) Set up the assessment and memorandum templates
The most important part of documenting a population is using appropriate tags that serve as place holders. There are multiple ways that this can be done, like using macros or the traditional: "find and replace" method. Find and replace works well and is suggested for simpler implementations. A good way to ensure the integrity of a placeholder value is to encapsulate it inside of ‘<>’ – for example, <placeholder value>.
b) Create Data Service entities
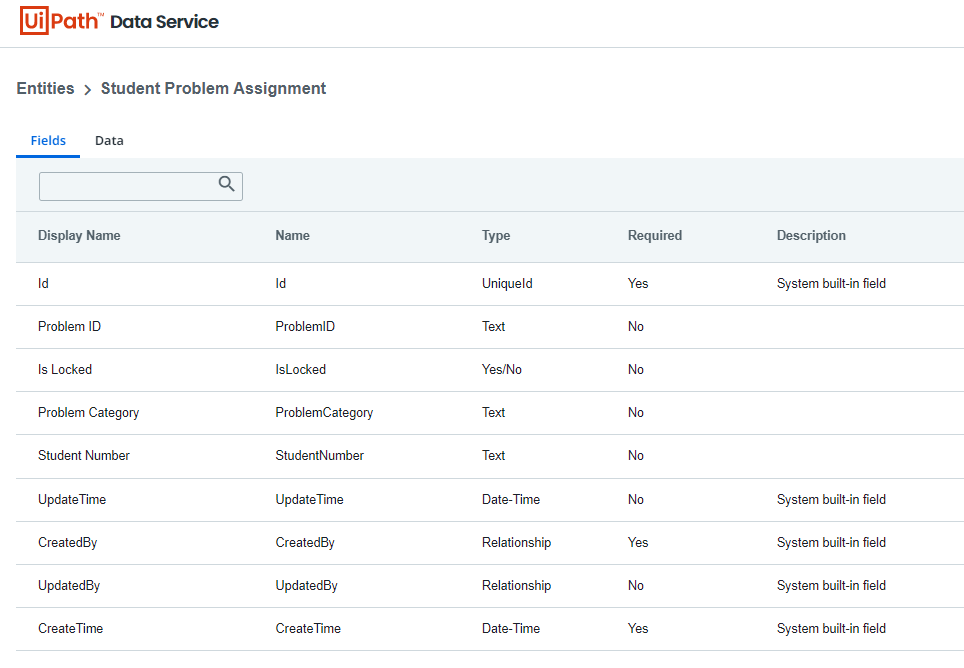
It is important to consider the balance between traditional good practices for working with relational data compared to what is required for the use case. Create an entity with the understanding that the entity should have one responsibility and represent one data entity—for example, if the assessment is made up of multiple unrelated sections, consider creating an entity to store information for each section separately. Be considerate and consistent with the naming of your entities and fields. Make sure you capture the information that's needed—nothing more and nothing less. Remain cognisant of how each entity relates to another.

uipath-data-services-creating-an-entity c) Create the UiPath process
Before creating the Apps, it is important to understand exactly how the process will work and what information it would require before it can perform the tasks it is required to perform. For this reason, it would be a good idea to start with creating the process before creating the Apps.
Start by creating a new project named ‘Student Assessment Generation Process’. Add a folder named ‘Templates’ and save the Word document templates in there. Add another folder named "Working Directory" which will contain the working documents that'll be populated with the generated placeholder values.
Add sequences that correlate with the figure below to group functionality into logical process steps.

uipath-studio-complete-student-assessment-generation
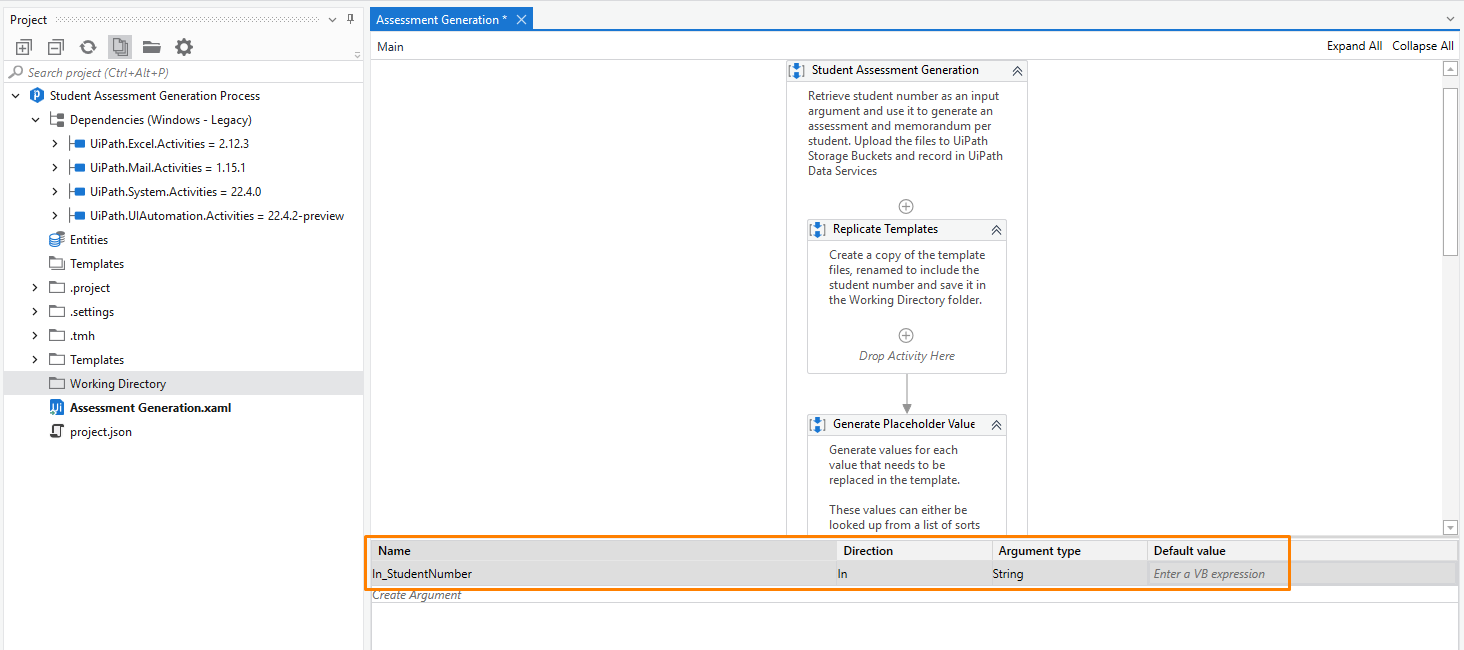
Don't forget to ingest the student number as an input number.
Now add the functionality to each of the sequences.
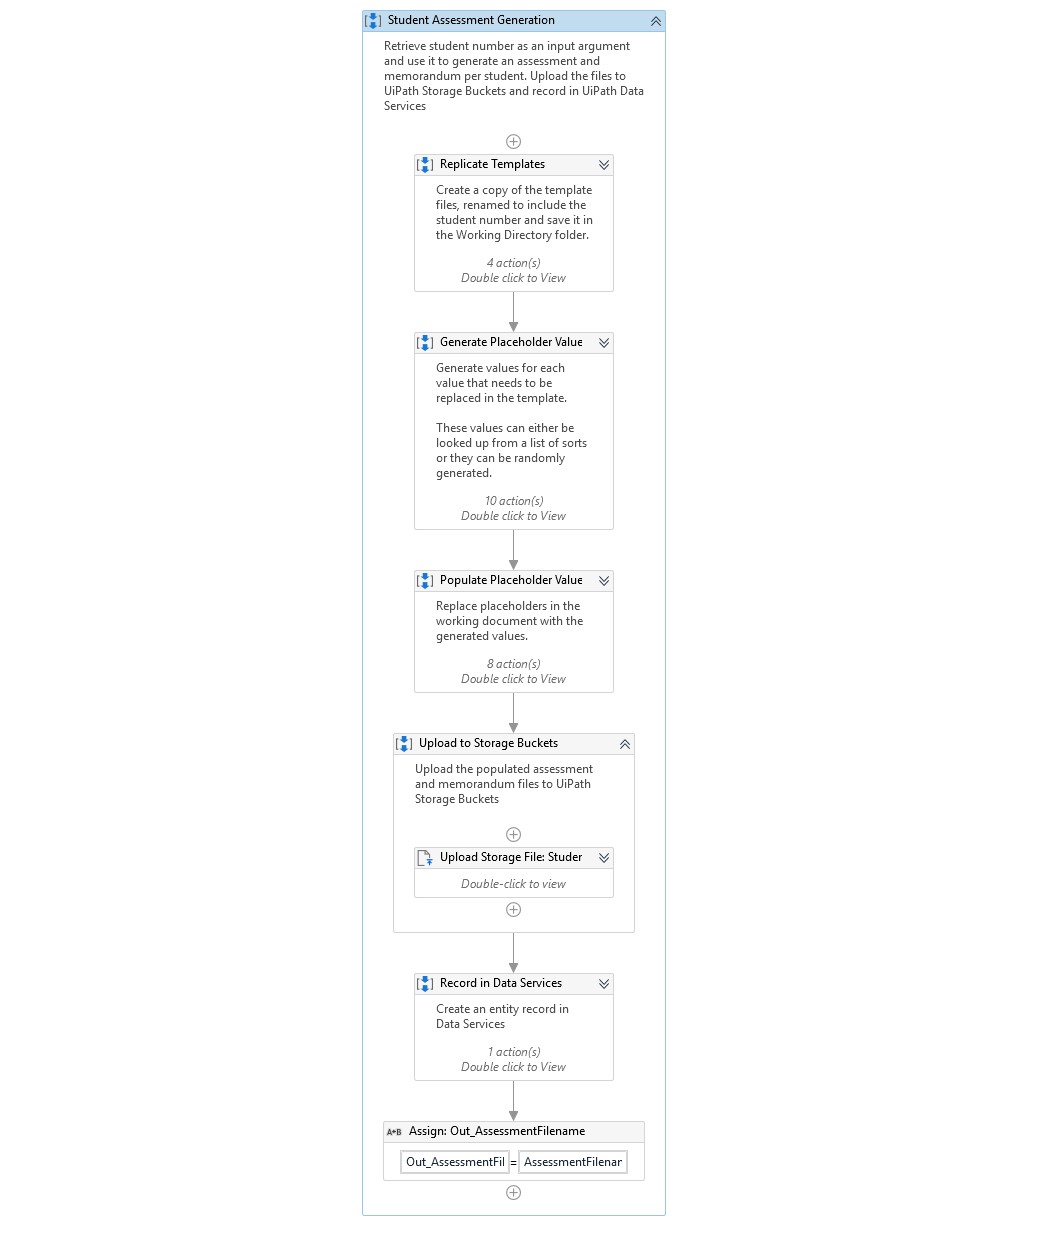
uipath-studio-complete-student-assessment-generation-collapsedMake sure that the assessment filename is returned so that the file may be downloaded by the student.
Publish the solution to the Orchestrator and create a process from the deployed package.

The process will need to be created on the Orchestrator so that it can be added to the Apps – make sure that your process is created in a modern folder and that your storage bucket is also created in a modern folder as classic folder entity creation has been deprecated.
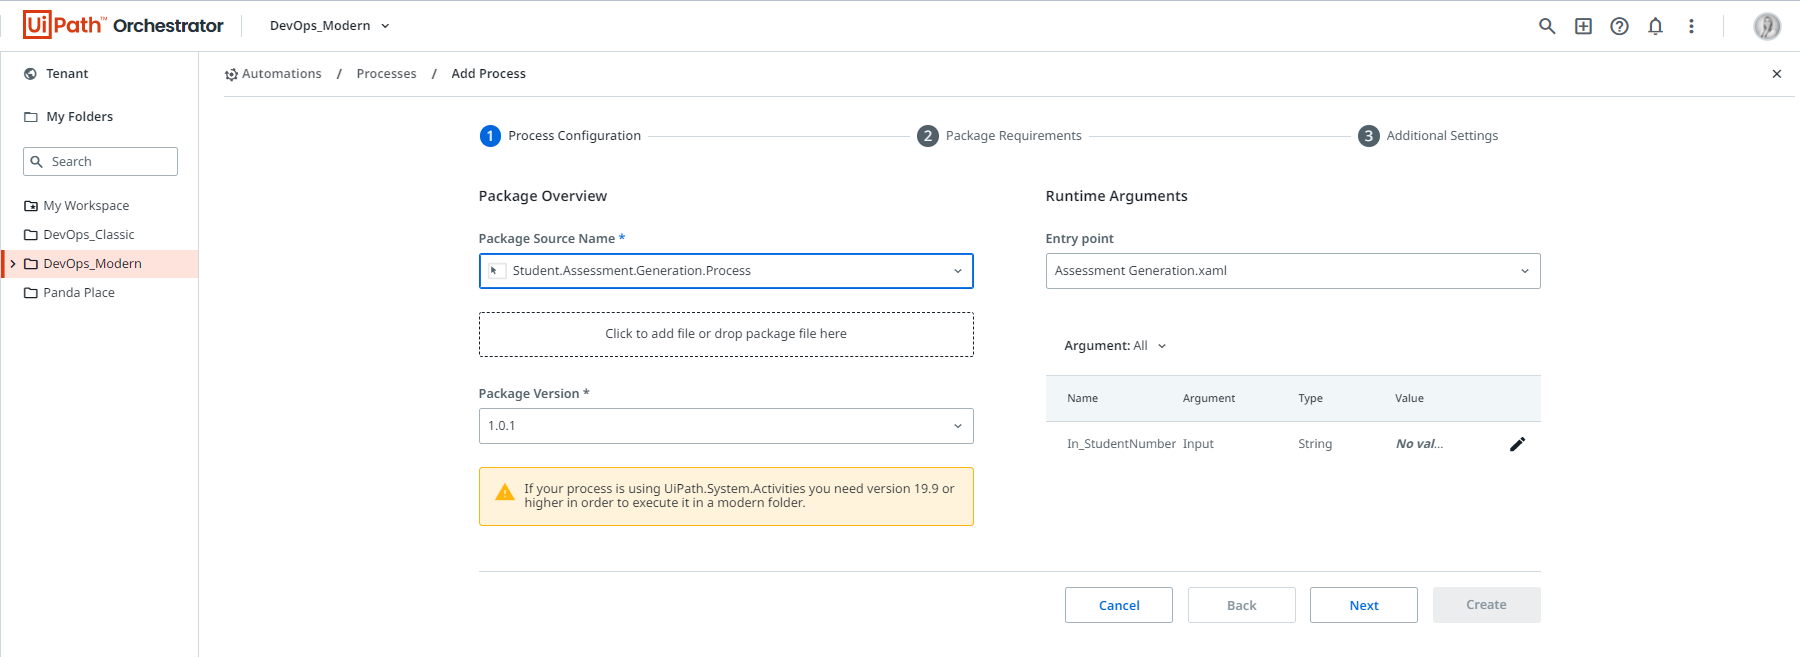
d) Build UiPath Apps
Start by creating a blank UiPath Apps named "Student Assessment Generation".
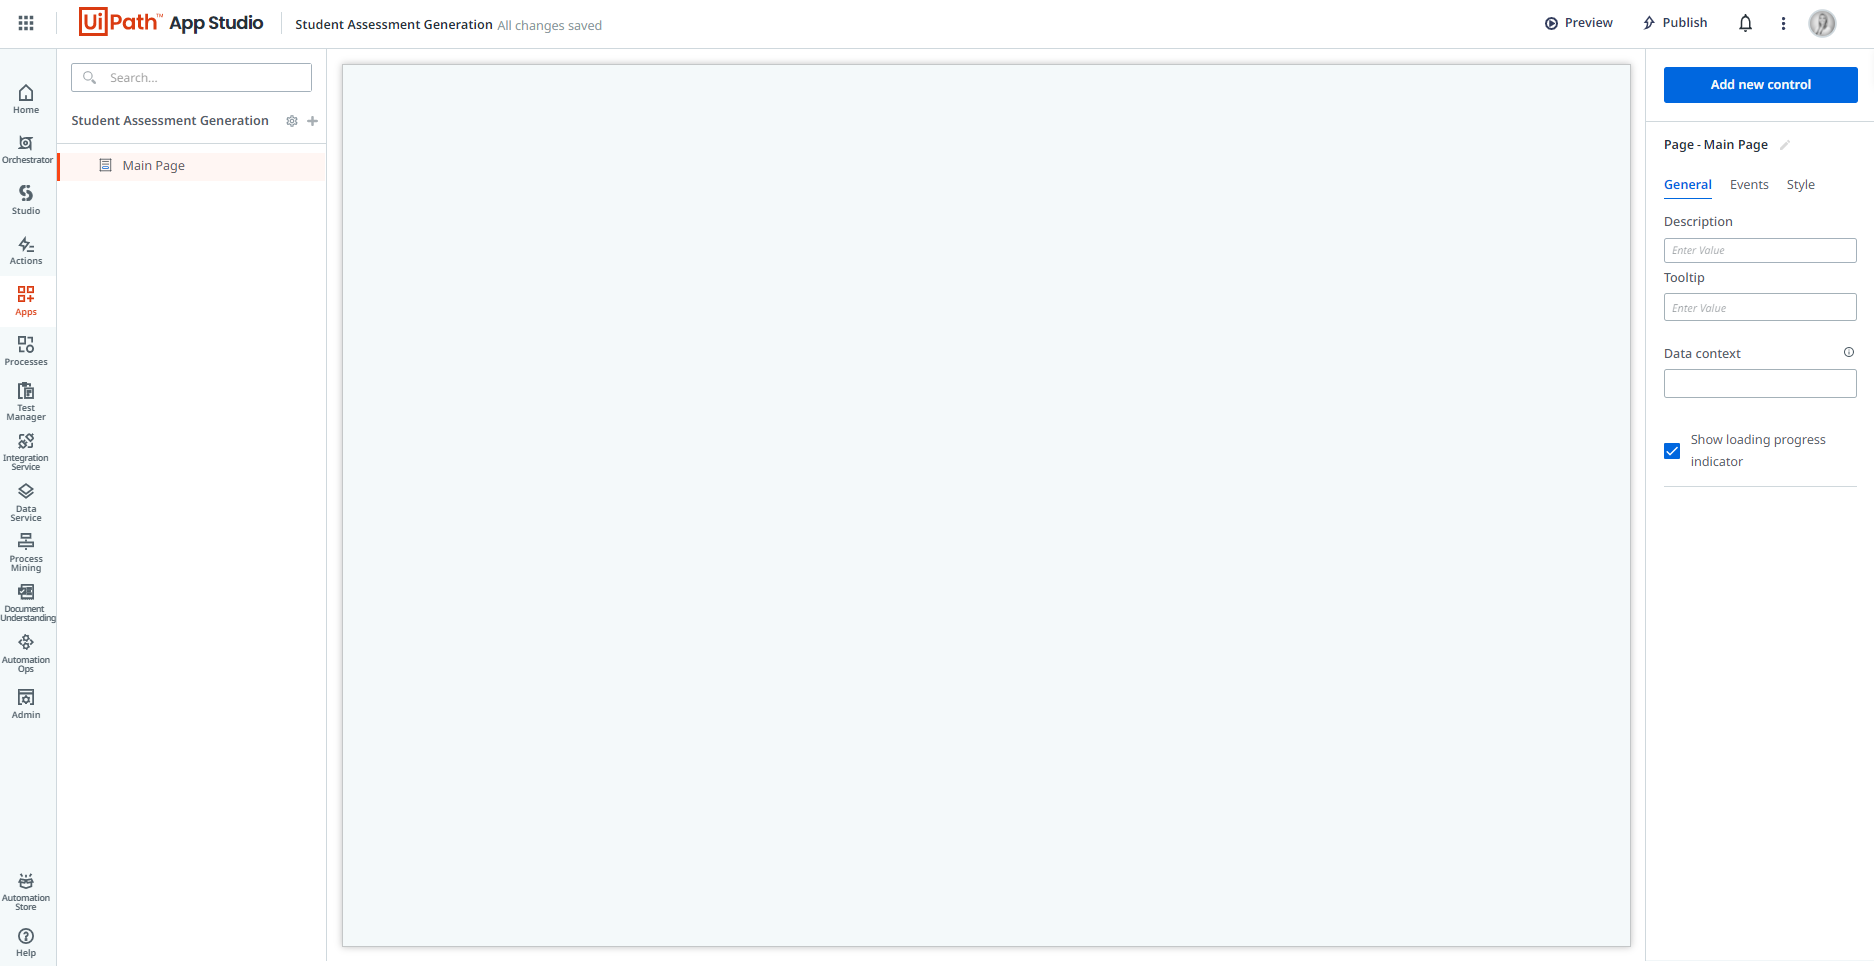
Next, click the ‘+’ button to connect the UiPath Process and UiPath Data Service Entity to the Apps.
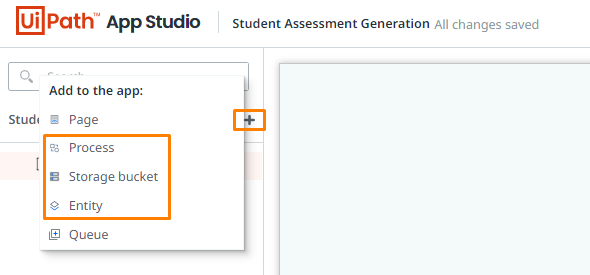

Once all of your components are linked, the following should be displayed.
Note: Be sure to connect to the services that'll be used. In this case, all components were linked so that different approaches may be trialed (i.e., using Data Service compared to using Storage Buckets).
Navigate back to the home page and add a label as a display control.

Next, add an input student number

A button is a good way to execute actions (like kicking off a process) through rules created under the events tab. Add a button which will be used to create a Data Service entry and will start the process. Once the process is complete, the file should be queried from the storage bucket and made available for download. Create a button and set up a rule that executes the following steps:
1. Shows a spinner that disables any user interaction with the form while it continues to process.
2. Create a record in the download log data service entity
3. Start the process that generates and uploads the student file
4. Get the uploaded student file from storage buckets
5. When the file is retrieved, hide the spinner

Once these steps are complete, the component that allows the users to download their files. Add a file picker control and manipulate the properties to turn it into a download control.

For a smoother user experience, use variables to manipulate the visibility of the file picker property.
Conclusion
The effort involved in creating an assessment and memorandum could range anywhere from 60 minutes to a few hours, depending on the content of the assessment. Generating an assessment and memorandum for every student manually is therefore, not thought possible with classes that contain more than roughly 15 people.
By turning the assessment and memorandum into a template and compiling the logic to create dynamic assessments using UiPath significantly decreases the human time that'd be spent on generating assessments. With an average of 90 minutes for a person to create an assessment and memorandum for around 100 students, it'd take roughly 19 full working days to generate the tests. The creation of the UiPath process and related collateral took three working days, including testing—resulting in a time saving of 16 days (128 hours).
Lecturers can delegate various administrative tasks to robot assistants, like submitting mark sheets, starting an auto-assessment marking process, or even heavy lifting for research topics.

Application Architect, Dimension Data
Get articles from automation experts in your inbox
SubscribeGet articles from automation experts in your inbox
Sign up today and we'll email you the newest articles every week.
Thank you for subscribing!
Thank you for subscribing! Each week, we'll send the best automation blog posts straight to your inbox.


