Using UiPath Azure Activities to Access Azure Blob Storage Data
Share at:

Introduction
UiPath activities are the building blocks of automation projects. They enable you to perform all sorts of actions ranging from reading Excel, Outlook mails, PDFs, Word documents, and more to interact with different applications like Microsoft's Azure cloud.
UiPath.AzureActivities package offers activities that enable IT departments to easily automate critical Azure operations in their workflows like storage accounts, Blob containers, Blobs, Key Vault, virtual machines, and resource groups. This article will assist you in using UiPath activities to get data from Azure Blob storage.
Requirements
Before we get started, you'll need to have:
1. An overview of the Azure storage account, containers, and blob
2. An understanding of App registration in Azure Active directory
3. UiPath.Azure.Activites installed in UiPath Studio
Scenario
Sometimes it can be challenging to align with all the teams to develop end-to-end process automation. You need to agree with their policies and way of working. I came across a scenario where we required some data daily from another organizational unit for our automation solution. We asked to share data over email, shared location, SharePoint, or any other common channel, and due to data sensitivity and policies, they could only share it via Azure storage.
But the challenge was we never used Azure storage in any of our automation solutions. So, we explored various alternatives, including:
1. Connecting to Azure Blob from Excel
2. Downloading blobs from Azure Blob storage by using AzCopy
3. Azure Blob storage explorer
Out of various alternatives, we found out that UiPath Azure Activities is the best possible solution because it is easy to implement, it offers stability and scalability.
Now, let's dive into the steps to set up integration between UiPath and Azure. Keep the above scenario in mind and follow the steps.
Connecting to Azure storage
The official UiPath IT Automation activities for Azure enable us to connect to Blob containers with both an App Registration and with a StorageAccountKey (without needing a Scope Activity).
Option 1: Using a StorageAccountKey
Option 2: Using the AzureScope activity and an Azure AppRegistration
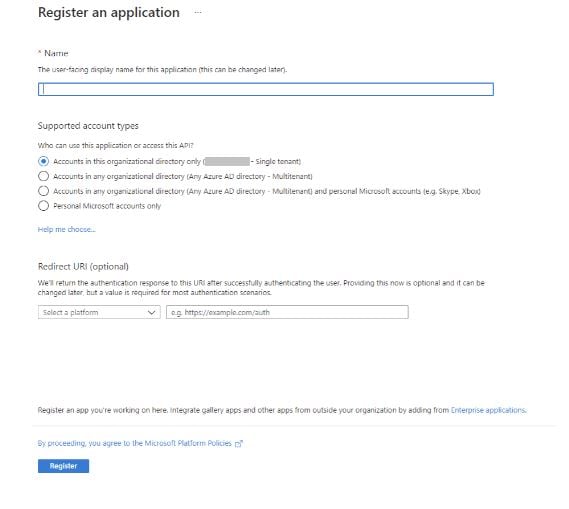
Step 1: Create App Registration in Azure Active Directory
Once you have logged into Azure Portal, the first step to do is create an app in App registration. For this, follow the below steps:
Go to Azure Active directory
Go to App Registrations
Click on New Registration
Provide a Name and select the Supported Account Type (which can use this application or access this API)
Click on Register

Next, you need to add API permissions.
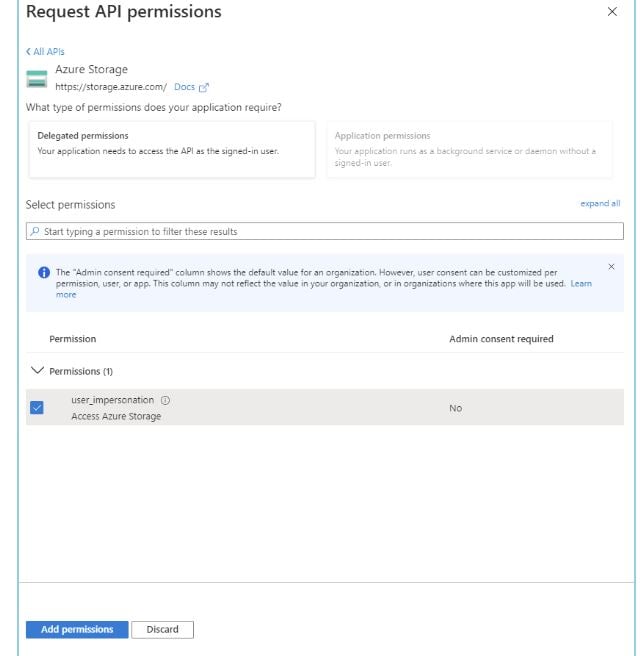
Step 2: Assign API permissions
Follow the below steps to assign API permissions:
Select API Permissions inside the newly created app registration
Click on Add Permissio
Select Azure storage
Select user_impersonation permissions
Click on Add Permissions

Now the App registration setup is completed. Get the Application ID, Tenant ID and Client Secret and Subscription ID.
Step 3: Retrieve necessary information
To use Azure Scope Activity in UiPath Studio, you will need to collect some information as mentioned below:
Select Overview inside the newly created app registration
Copy the Application (Client) ID and directory (Tenant) ID
Click on Client credentials and Add a certificate or secret Subscription ID will be visible in the overview section of the storage account (once it has been created)
Now you are ready to create a storage account.
Step 4: Create an Azure storage account
You can create Azure storage account with the Azure portal, by taking the steps below:
From the left portal menu, select storage accounts
Click Create on storage account page
Select Subscription create a dedicated resource group
Select storage Account Name, Region, Performance and Redundancy
Once you create a storage account, create a container, and share it with the team to load data. Now that you have a storage account and App registration, let’s create a connection between them.
Step 5: Assign App registration permissions to storage account
To assign registered App access to the storage account, follow these steps:
Go to Resource Group where storage account is created
Select Access Control (IAM)
Click on Add andselect Add Role Assignment
Assign role to Storage Account Contributor
Select Members andsearch for newly created
App registration
Now everything is configured in Azure. Let’s create a workflow in UiPath to download data from Azure storage.
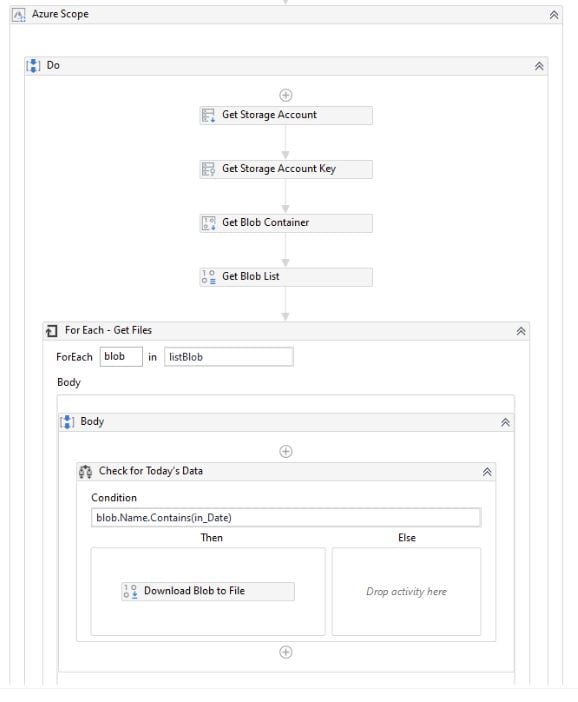
Step 6: Create UiPath workflow to download data
To get the data from Azure, follow the below steps:
Add Azure Scope in the sequence
Enter the input details retrieved in Step 3 – ClientID, ClientSecret, SubscriptionID and TenantID
Add Get Storage Account Activityinside theAzure Scope
Enter Storage Account name, Resource Group Name and create an output variable for Storage Account
Add Get Storage Account Key Activity to retrieve Storage Account Key
Add Get Blob Container Activity and Enter Container name, Storage Account, Storage Account key and create an output variable for Blob container
Add Get Blob List Activity and Enter blob container and retrieve output as list of Blob.
Add For Each Activity to iterate through the blob list
Add Download Blob to file Activity to download the data

Now you have data downloaded from Azure storage.
Conclusion
One of the best things to do when building something is to be prepared in advance. Try to explore all the possible approaches to achieve the business scenario you have in mind. By using UiPath Azure Activities, you are not limited to downloading data, and you can also perform various operations in Azure Key Vault, networking, resource groups, security, storage, and virtual machines. This article explains at a conceptual level the steps that can be taken for UiPath and Azure integration.
Ronak Gupta is an RPA Solution Architect & Developer at TomTom
Topics:
IT AutomationGet articles from automation experts in your inbox
SubscribeGet articles from automation experts in your inbox
Sign up today and we'll email you the newest articles every week.
Thank you for subscribing!
Thank you for subscribing! Each week, we'll send the best automation blog posts straight to your inbox.


