UiPath Blog
UiPath AI FabricとAction Centerでのモデルファインチューニング

Summarize:
本ページでご紹介しているAI FabricはAI Centerの旧製品名です。
0:事前準備
AI Fabricの基本的な使い方についてAI Fabric カスタムモデルの利用方法を参照ください。
Action Centerの利用につきましてAction Center(フォームとタスク)を参照ください。
1:AI FabricとAction Centerの連携概要
Action Centerの機能をAI Fabricと連携させることで
AIの結果の人間による確認
学習データの作成
をUiPathプラットフォーム内で完結させることができます。
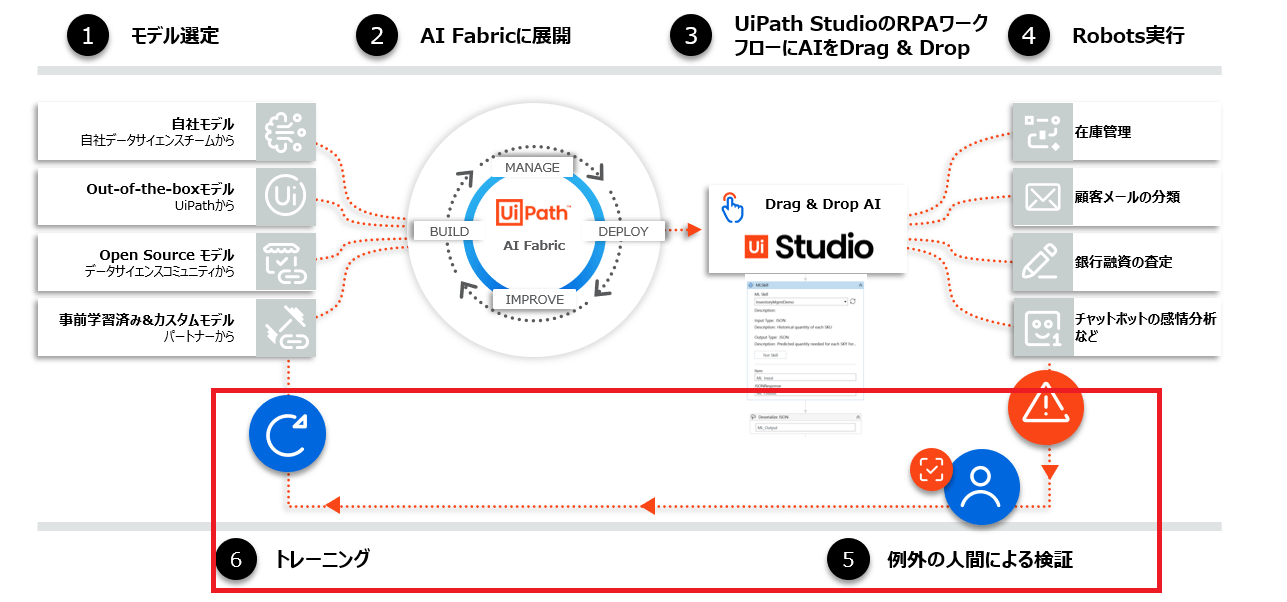
ラベル付けされていない元データをAction Centerを利用してバリデーションし、MLモデルの精度向上に利用できます。
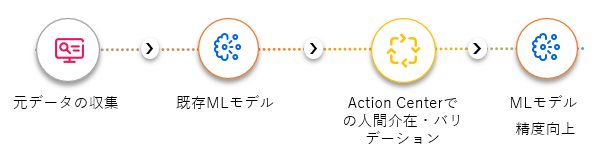
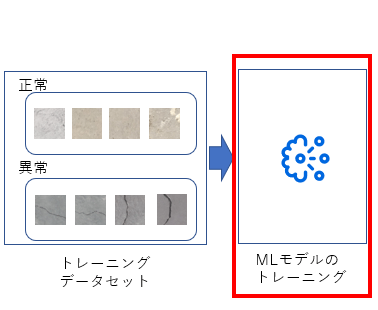
2:サンプルケース
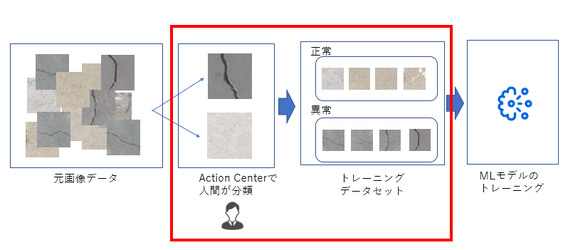
実際のMLモデルの作成、Action Centerを使ったトレーニングデータセットの作成、MLモデルのトレーニング、トレーニング後の分類と分類信頼度による人間のチェックまでをサンプルユースケースを通してやってみましょう。 今回は「コンクリートの画像にひび割れがあるか確認する画像分類モデル」を作成してみます。
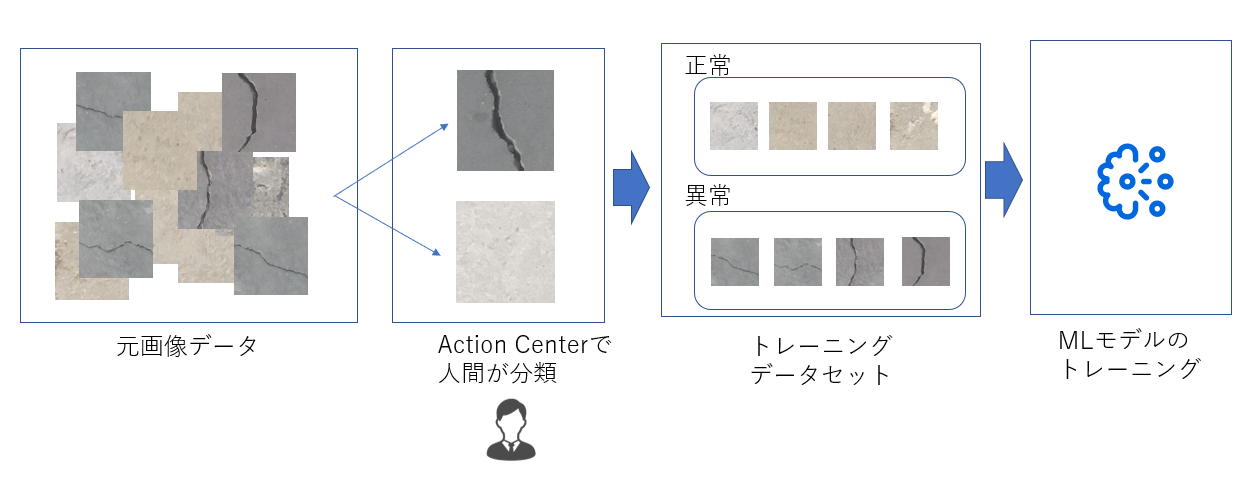
2-1: Action Centerによるトレーニングデータセットの作成
Action Centerを使うことでだれでも容易にデータの分類からトレーニング用のデータの作成、ラベル付けを行うことができます。
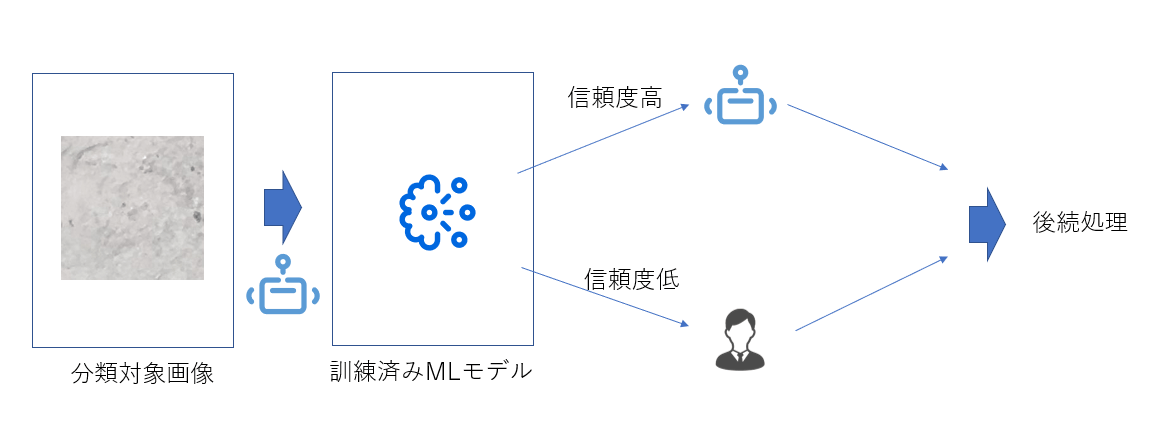
2-2: 信頼度閾値によるAction Centerでの人間チェック工程
2-1で作成したMLモデルを実際に利用した際に信頼度が低いものだけAction Cnterでの人間チェック工程に回すことができます。
3:Datasetの作成
それでは実際にコンクリート画像にひび割れがあるか無いかを分類するML PackageをするためにまずはDatasetを作成します。
3-1: 画像データを用意
Mendeley Dataのこちらのデータを利用します。正常なものとひび割れのあるコンクリート画像がそれぞれ20000枚用意されています。
利用する元画像データ: 2018 – Özgenel, Ç.F., Gönenç Sorguç, A. “Performance Comparison of Pretrained Convolutional Neural Networks on Crack Detection in Buildings”, ISARC 2018, Berlin.Lei Zhang , Fan Yang , Yimin Daniel Zhang, and Y. J. Z., Zhang, L., Yang, F., Zhang, Y. D., & Zhu, Y. J. (2016). Road Crack Detection Using Deep Convolutional Neural Network. In 2016 IEEE International Conference on Image Processing (ICIP).3-2: Action Centerでデータセットを作成するUiPathロボットワークフロー
こちらの赤枠部分になります。
このセクション3で最終的に以下のようなデータセットが作成でき、AI FabricのDatasetとしてアップロードします。
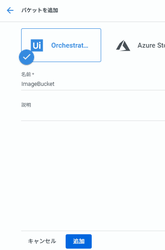
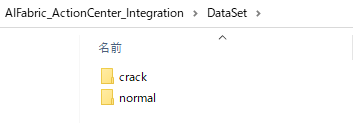
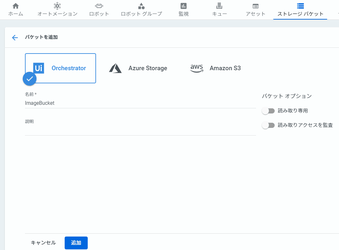
DataSet-- |--crack |--画像 |--normal |--画像事前にオーケストレーターにStorage Bucketを作成します。
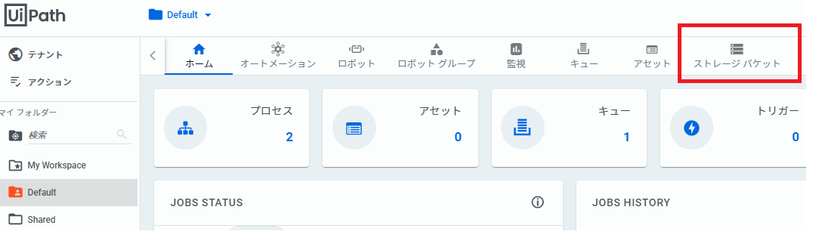
今回は「ImageBucket」という名称で登録します。
このサンプルワークフローをダウンロードしてUiPath Studioで開いてください。
AI-Fabric_Action-Center_Integration.zip
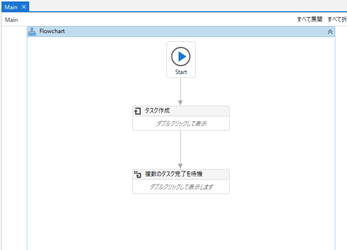
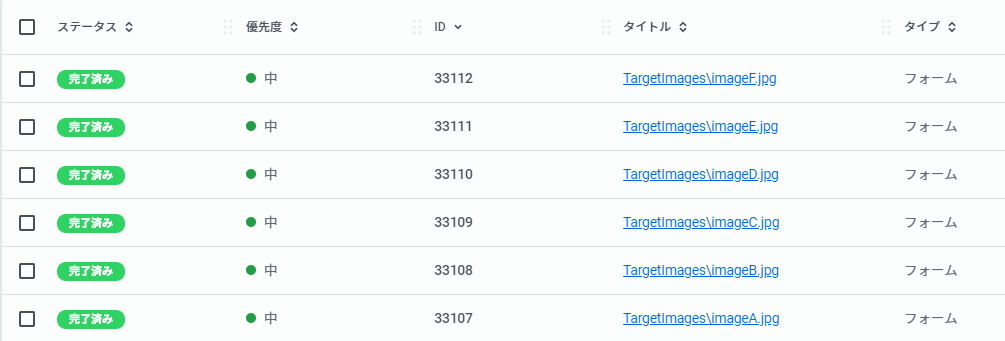
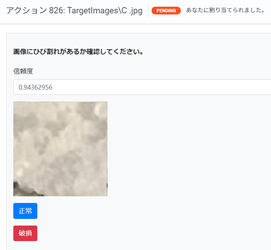
ワークフローを実行すると“TargetImages”のフォルダーにある6枚の画像を人間が分類するためにAction CenterにそれぞれのTaskが作成されます。

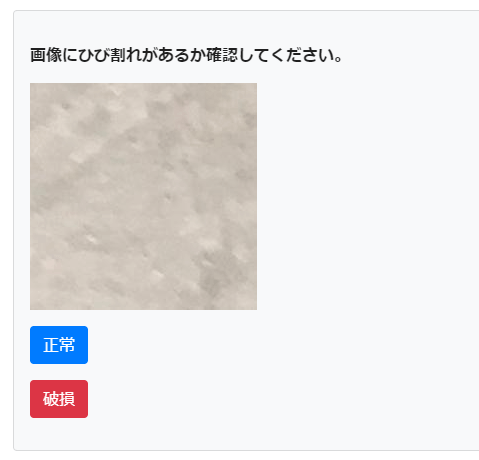
それぞれのタスクを開くとFormに対象画像と「正常」「破損」のボタンが表示されますので、画像に対して分類してください。
すべてのTaskを完了させてください。
タスク完了まで待機しているロボット処理を「再開」させます。

”DataSet”フォルダー配下の”crack”または”normal”に各画像が分類されます。※事前に200枚づつ分類してあります。作成するモデルの精度を上げる場合データセットを利用してトレーニング用画像の枚数を増やしてください。
3-3: DatasetをAI Fabricにアップロード
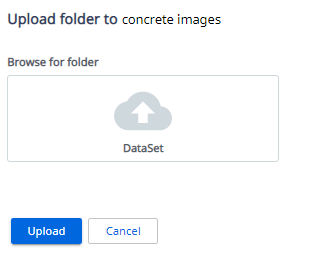
新規Dataset “concrete images”を作成
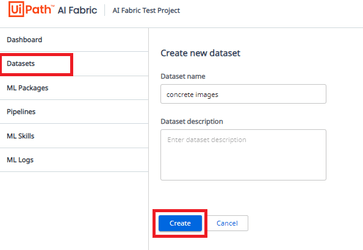
Upload folderを選択
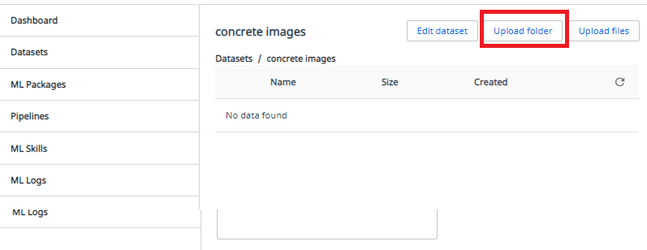
3-2で作成した「AIFabricAction CenterIntegration\DataSet」のフォルダーを選択し「Upload」
これでトレーニング用のデータセット準備は完了です。
4:ML Packageの作成
次にML Packageを作成します。
4-1: 初期モデルの準備
トレーニングする前の初期のモデルを準備します。今回はImageNet データセットで学習させたResNet50をKeras Application※から利用します。
# train.py from keras.applications.resnet50 import ResNet50 ResNet = ResNet50(include_top=False, weights='imagenet', input_tensor=input_tensor)※https://keras.io/api/applications/resnet/#resnet50-function
4-2: train.pyの作成
セクション5以降でFull Pipelineを利用するため、process_data(), evaluate(), train()のFunctionを作成します。
各Functionの用途とFull pipelineを実行した際に実行される順序は以下の通りです。
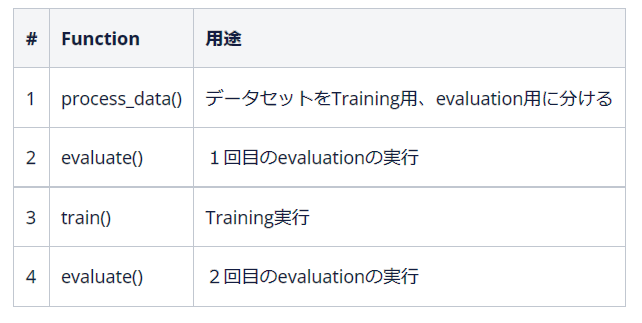
# train.py class Main(object): def __init__(self): self._run_config = RunConfig() #環境変数の設定 def train(self, directory): # directoryは環境変数の"training_data_directory"に設定された値 # evaluationの実行 def evaluate(self, directory): # directoryは環境変数の"evaluation_data_directory"に設定された値 # evaluationの実行 def process_data(self, directory): # directoryは元のデータセットPath # データをTrain用とEvaluation用に分割
各Functionの引数は以下の通りです。
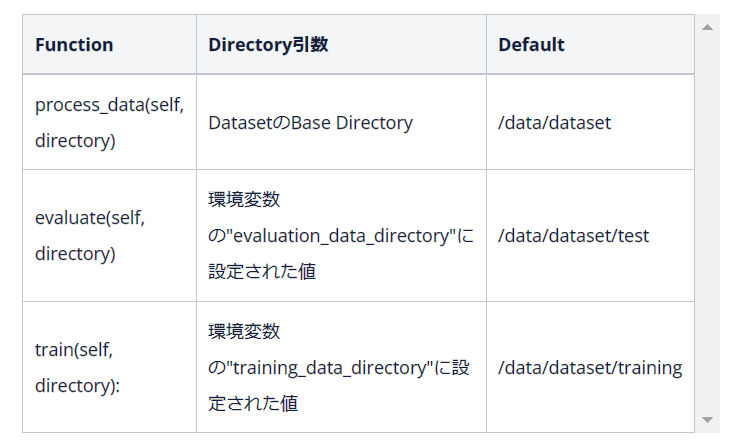
ResNet50のBaseモデルに対して画像データをトレーニングするサンプルです。
4-3: main.pyの作成
ML SkillとしてUiPathロボットから実行するためにmain.pyにpredict()を作成します。手順 「7:ML Skillの実行」の際に呼び出されます。
import json import glob import io from PIL import Image import numpy as np import keras from keras.preprocessing.image import img_to_array, load_img class Main(object): def __init__(self): self.model = keras.models.load_model('./model/resnet50Best.h5') #事前に十分な画像データ枚数でトレーニング済のモデルになります。 def predict(self, file_bytes): classes = ['crack', 'normal'] img = Image.open(io.BytesIO(file_bytes)) rgb_im = img.convert('RGB') x = rgb_im.resize((224,224), Image.NEAREST) x = img_to_array(x)/255 x = x[None,...] ratings = self.model.predict(x)[0] top_ratings_indices = ratings.argsort()[-1:][::-1] result = {} for r in top_ratings_indices: result['class'] = classes[r] result['score'] = str(round(ratings[r], 9)) return json.dumps((result))4-4: zipの作成とML Packagesへのアップロード
ML PackageとしてAI Fabricにアップロードできる形式にします。
Concrete_Crack_Classification.zip
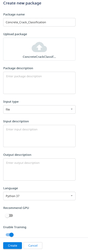
「ML Packages」→「Upload zip file」
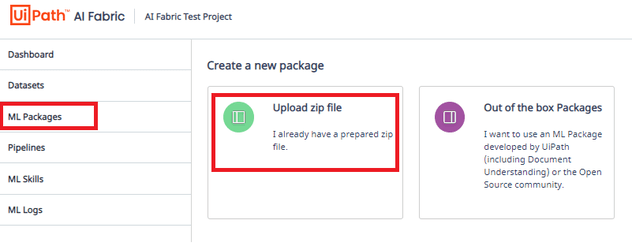
Create new Packageで、「ConcreteCrackClassification.zip」をアップロード、Input typeは「file」、「Python37」を選択し、「Enable Training」を「オン」にします。
「Undeployed」のステータスでML Packageが作成されます。

5:Pipelineの実行
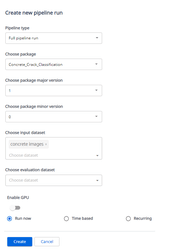
続いてPipelineを実行します。Full pipelineを選択するとTraining(及びモデルのSave)とEvaluationが実行されます。 「Full pipeline run」を選択、手順4で作成したML Packageを選択、「major version = 1」,「 minor version = 0」,そして、Datasetに手順3で作成した「Dataset」を選択します。
Pipelineの実行が「Packaging」から「Queued」ステータスでスケジュールされ、

15分程度で完了します。

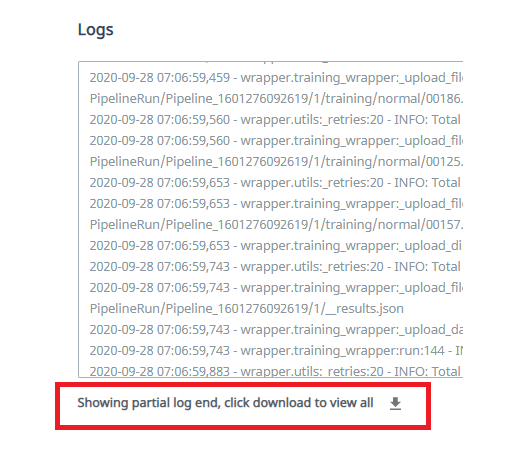
Pipelineの詳細ログは各Pipelineの「Details」からダウンロードできます。

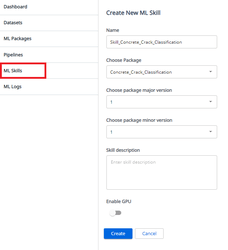
6:ML SkillのDeploy
ML PackageをPipeline実行しトレーニングが完了したらML SkillとしてDeployし、UiPathロボットから利用できるようにします。 ML Skillsで”Create new”をクリックし、以下の画面で”SkillConcreteCrackClassification”の名前で、先程学習したパッケージ”ConcreteCrack_Classification”のバージョン”1.1”でML Skillsを作成します。
Deployが始まります。

「Available」になりUiPathロボットから利用できるようになります。

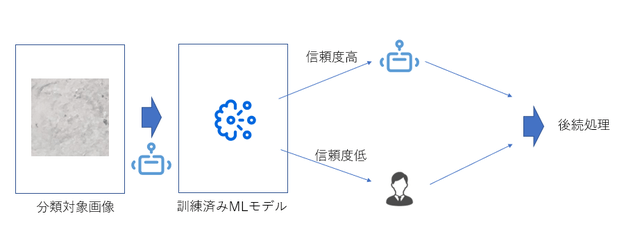
7:ML Skillの実行
UiPathロボットからML Skillを実行し、いくつかの画像ファイルを実際に分類してみます。その際、モデルからの分類結果の信頼度が低いものについてはAction Centerを利用し人間が確認するフローにしてみます。
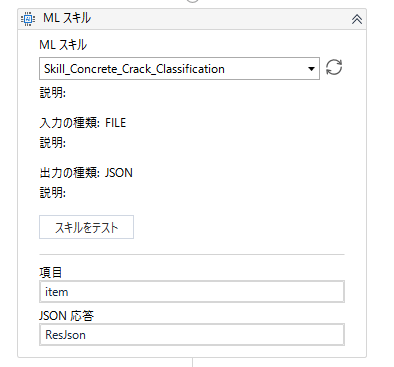
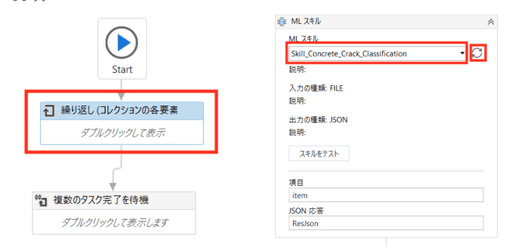
7-1: MLスキルアクティビティ
MLスキルアクティビティを使い、手順6でDeployしたML Skillを選択します。今回はInputの項目にはFileパスを入れてください。
7-2: Action Centerにタスクを作成
ML Skillの信頼度スコアが例えば95%以下ならばAction Centerにタスクを作成し、人間のチェックに回します。
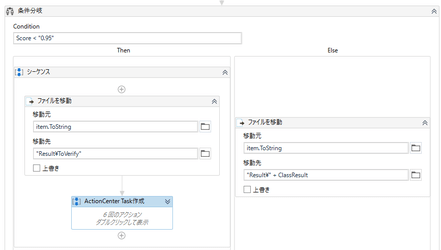
サンプルのワークフローになりますので、手順3-2と同じように実行してください。
AI-Fabric_Action-Center_Verify.zip
事前にOrchestratorのStorage Bucketに「ImageBucket」という名称でStorage Bucketを作成します。このストレージに画像ファイルが格納されます。
そしてML スキルアクティビティで手順6で作成したMLスキル(SkillConcreteCrack_Classification)を選定します。
ワークフローを実行するとMLスキルの出力のスコア(確度)が一定以下の画像ファイル(今回は95%を閾値にしています)については人間の確認工程に回すためにタスクが作成されます。

割り当てられたタスクについては正しい結果にAction Centerで振り分け、再度学習データに回すことができます。
Action Centerでの確認が終わった画像データはResultフォルダから正しいラベルでDataSetフォルダー配下に振り分けられ、再学習用データとして活用できます。
以上です。今回ご紹介した画像分類以外でも様々なユースケースでの利用が考えられます。みなさまもぜひAI FabricとAction Centerを使ってRPA×AIによる業務自動化を行ってみてください。
Principal Sales Engineer, UiPath
Related articles


Get articles from automation experts in your inbox
Sign up today and we'll email you the newest articles every week.
Thank you for subscribing!
Thank you for subscribing! Each week, we'll send the best automation blog posts straight to your inbox.
Get articles from automation experts in your inbox
Sign up today and we'll email you the newest articles every week.
Thank you for subscribing!
Thank you for subscribing! Each week, we'll send the best automation blog posts straight to your inbox.