Advanced UiPath Orchestrator management using APIs

Introduction
This guide is designed for intermediate to advanced users looking to streamline their UiPath Orchestrator management through APIs. By utilizing UiPath API capabilities, you can efficiently perform tasks like folder management, asset handling, and queue management directly from within your favorite development tools. In this guide, we'll use Postman for a demonstration, though you can apply these principles to any API client or programming language of your choice.
What you’ll learn:
How to authenticate and retrieve an API token for secure access
Access and manage folders, assets, and queues in UiPath Orchestrator
Practical tips for error handling, common pitfalls, and best practices
Setting up API access in Orchestrator
To access UiPath Orchestrator resources using APIs, you’ll need API credentials from your UiPath account. Follow these steps to set up access.
Step 1: Log in to UiPath Orchestrator
Go to cloud.uipath.com and log into your UiPath account.
Step 2: Access API details
Once logged in, navigate to User Preferences > Privacy & Security.
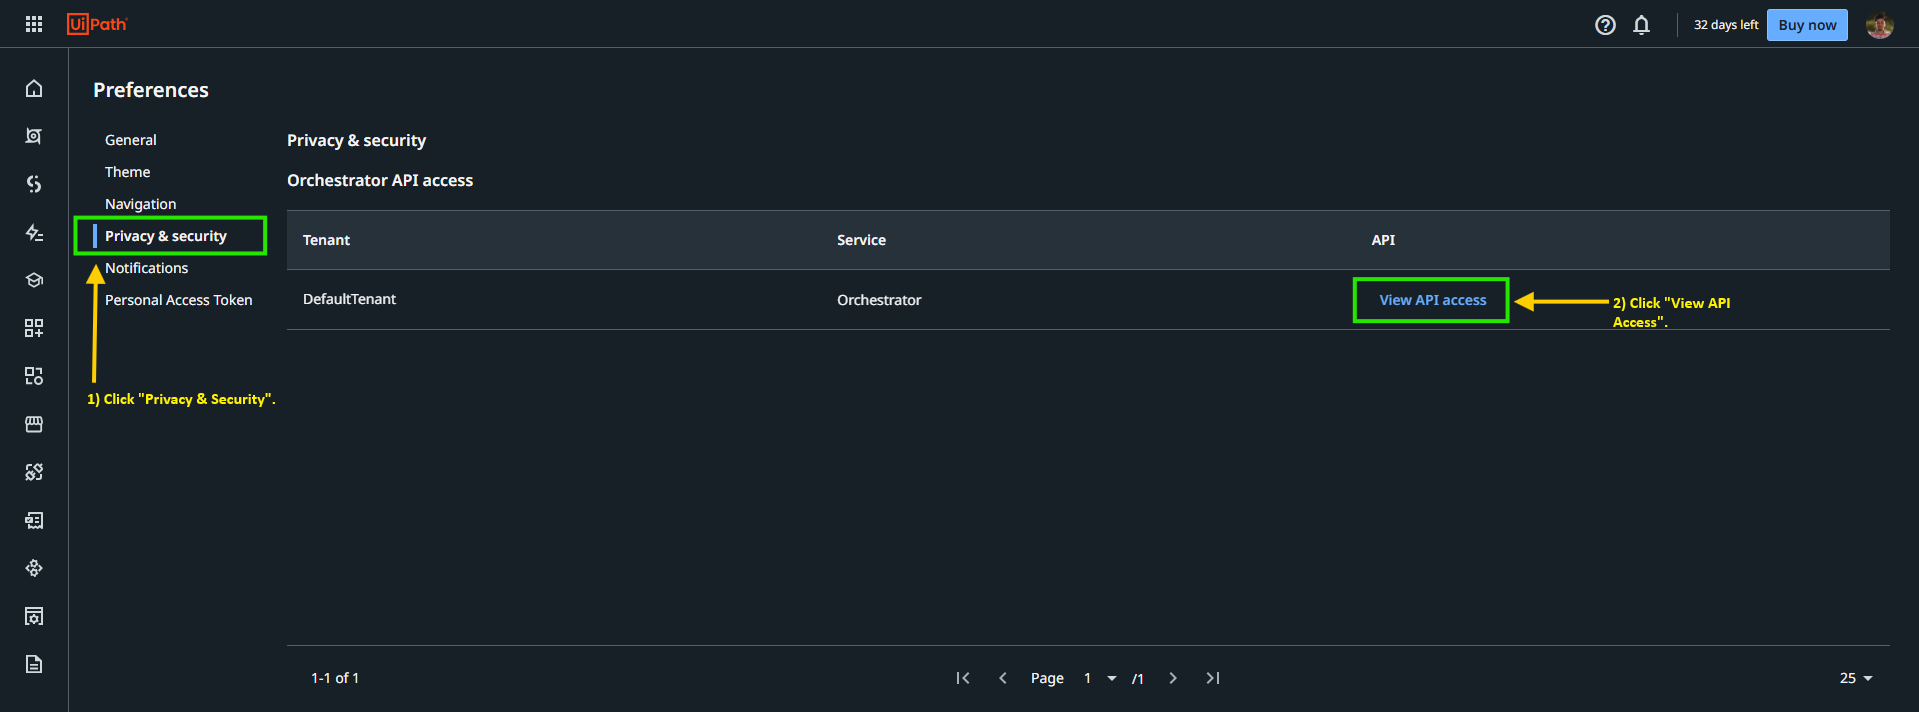
Select View API Access to view your User Key & Access Key. Copy these keys (Refer to Image 2).
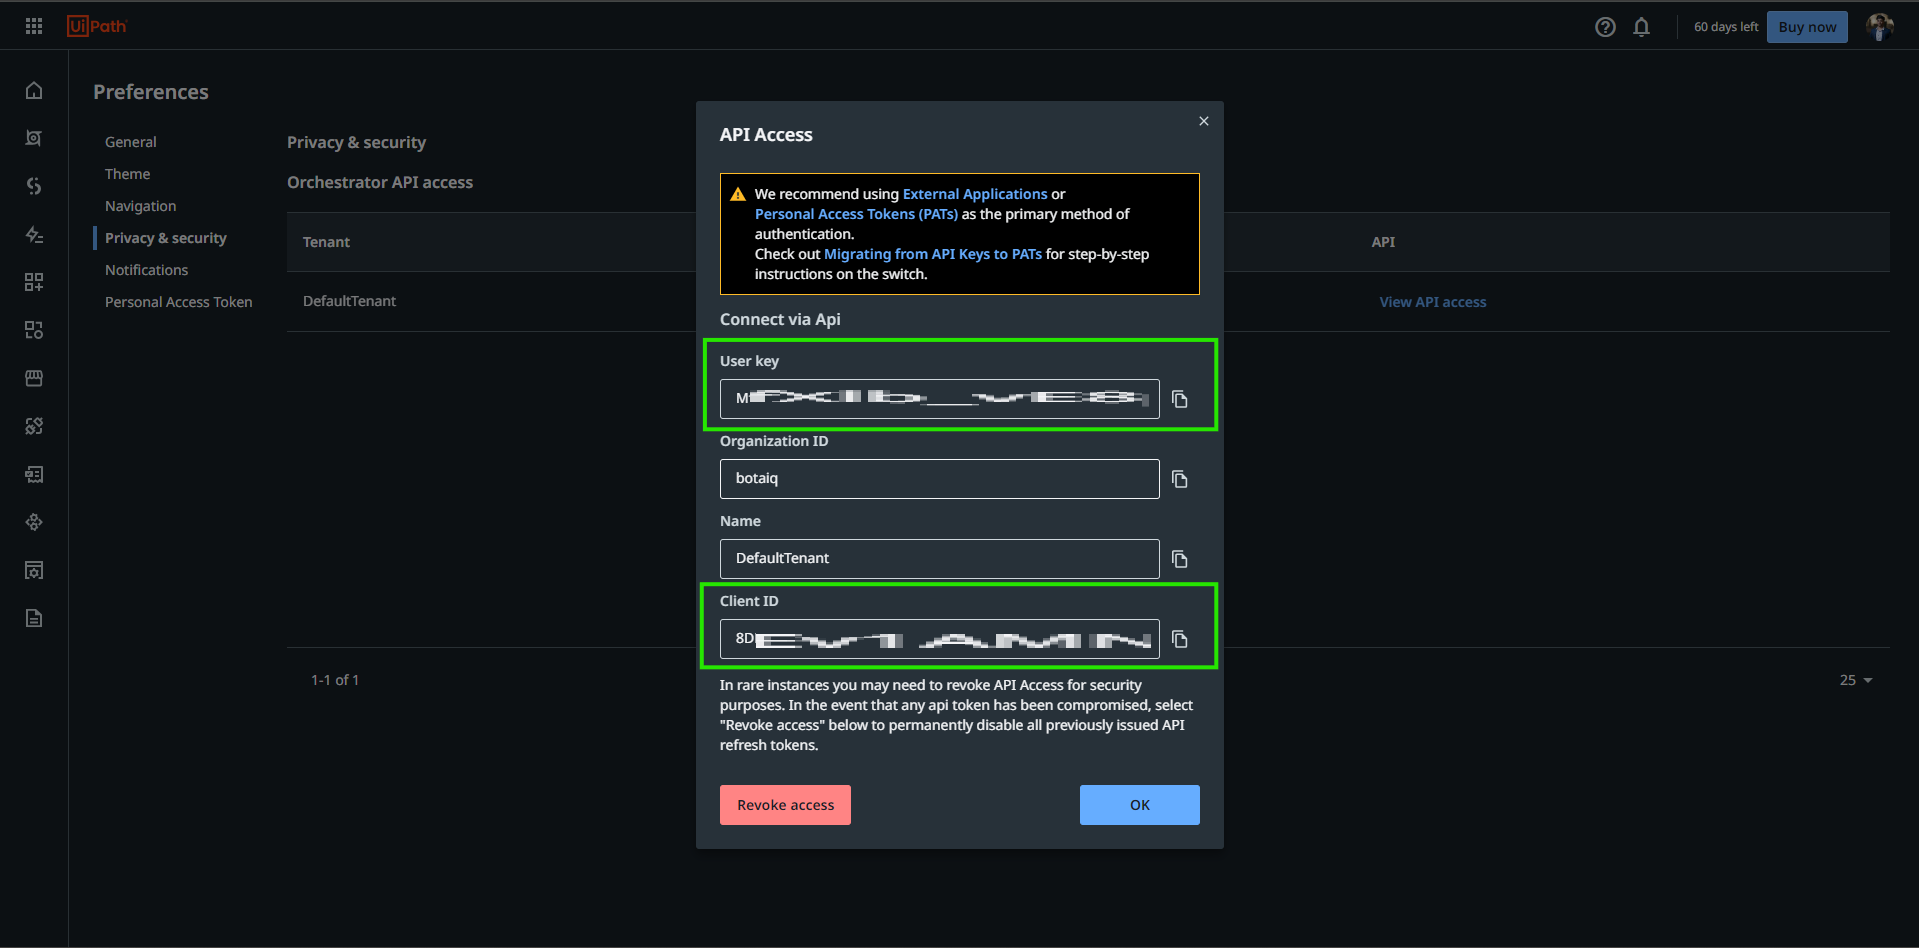
Security note: Store these keys securely, as they’re used to authenticate API requests. Avoid sharing them publicly.
Authenticating to obtain an API token
Authentication is required to access Orchestrator resources via API. Follow these steps to generate an access token.
API request for token retrieval
Type: Post
URL: https://account.uipath.com/oauth/token
Headers: None needed for this initial authentication request.
(JSON format):

Explanation of parameters:
granttype: Set to "refreshtoken", which uses a refresh token for authentication.
client_id: This is your client ID from UiPath Orchestrator.
refresh_token: The refresh token you retrieved in Step 2 above.
Sending the Request and Checking Response
In Postman, configure the request as shown in Image three. Execute it and verify the HTTP status is 200.
If successful, you’ll receive an Access Token, see below.
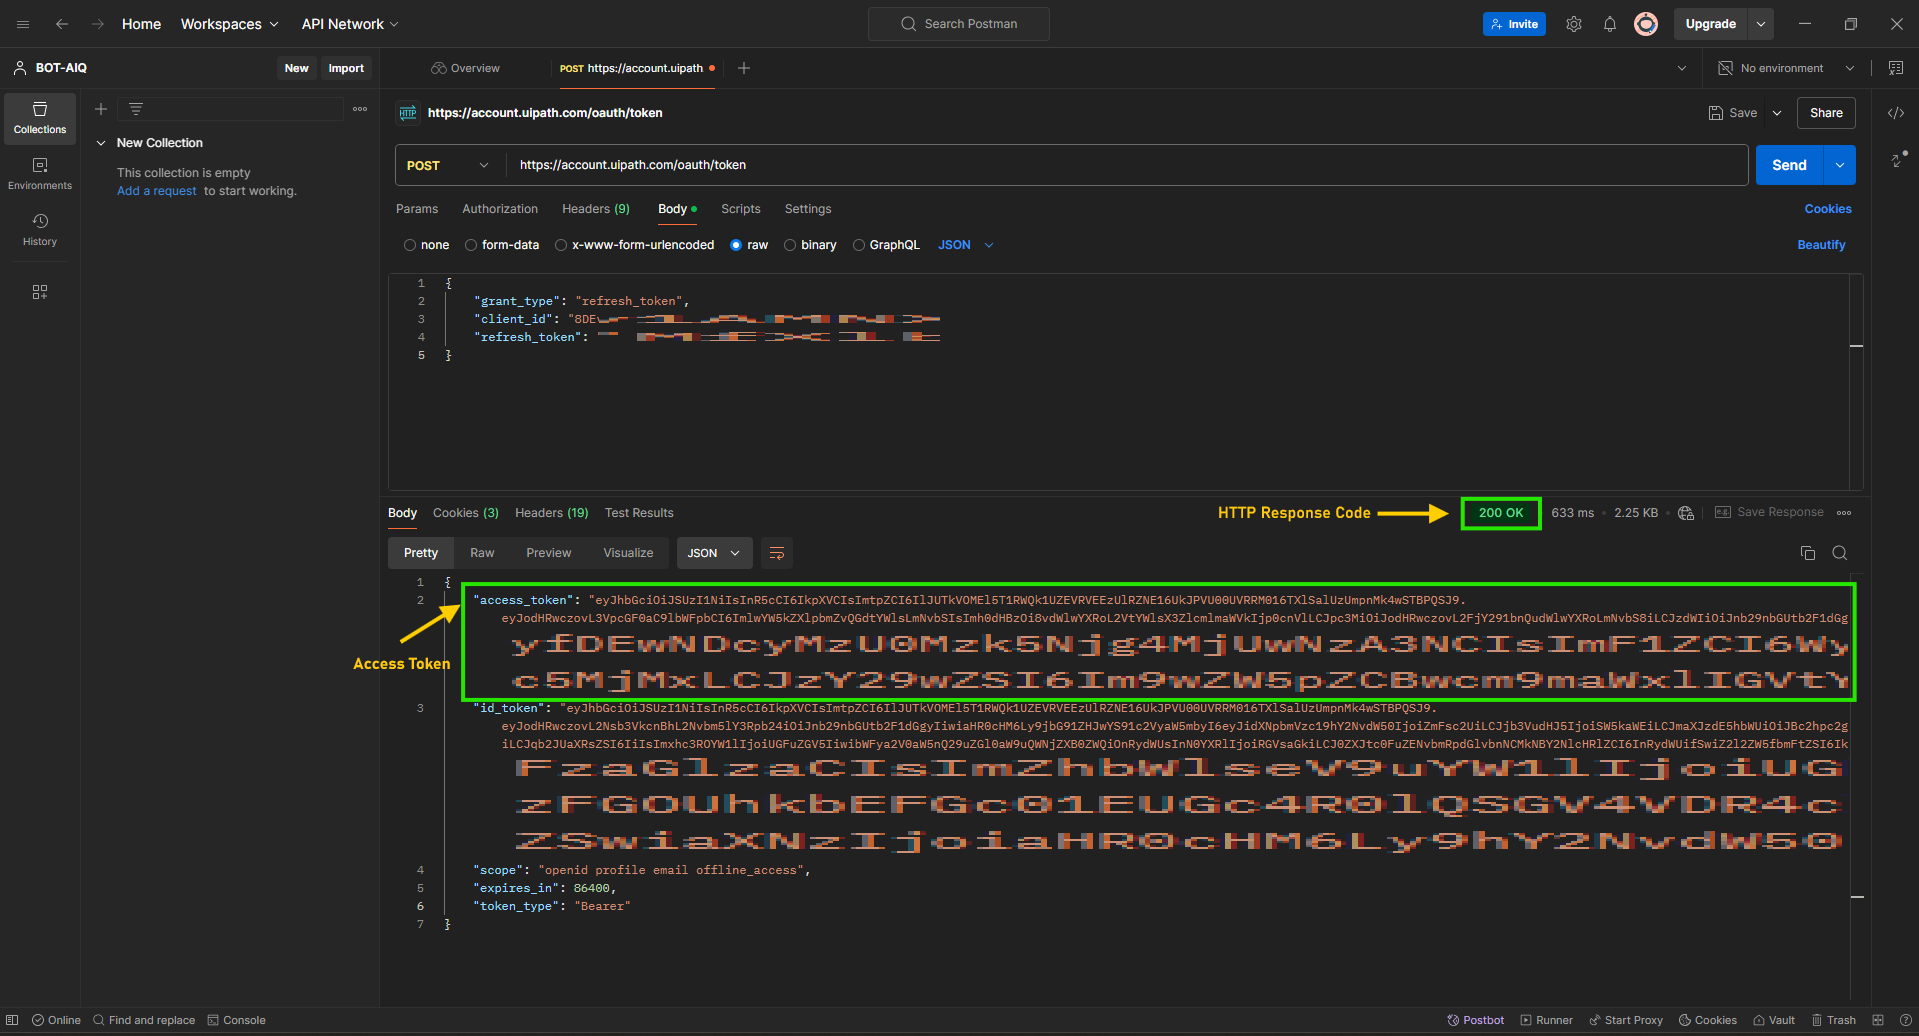
Note: The Access Token is temporary, typically valid for 24 hours (86400 seconds). You’ll need to refresh it periodically.
Understanding the output options:
Access token
The access_token is a JSON web Token (JWT) used to authenticate the user and grant access to resources. It contains encoded information about the user and the token's permissions.
2. ID token
The id_token is also a JWT and is used to verify the user's identity. It contains information about the user, such as their email, name, and whether their email is verified.
3. Scope
The scope field lists the permissions granted to the access token. In this case, the permissions include:
Openid: This scope informs the service that the client wants to authenticate the user using OpenID Connect.
Profile: This allows access to the user's profile information.
Email: This allows access to the user's email address.
Offline_access: This grants the ability to obtain a refresh token, which can be used to get new access tokens.
4. Expires in
The expiresin field indicates the lifetime of the accesstoken in seconds. Here, the token is valid for 86400 seconds, which is 24 hours.
5. Token type
The token type specifies the type of token issued. In this case, it's a Bearer token, which means that the token should be included in the Authorization header as Bearer <access_token> when making requests to protected resources.
Performing key Orchestrator tasks via API
Once authenticated, you can use the API to perform common Orchestrator tasks. Below are examples for accessing folders, managing assets, and working with queues.
Accessing folders Folders are used in Orchestrator to organize and separate resources.
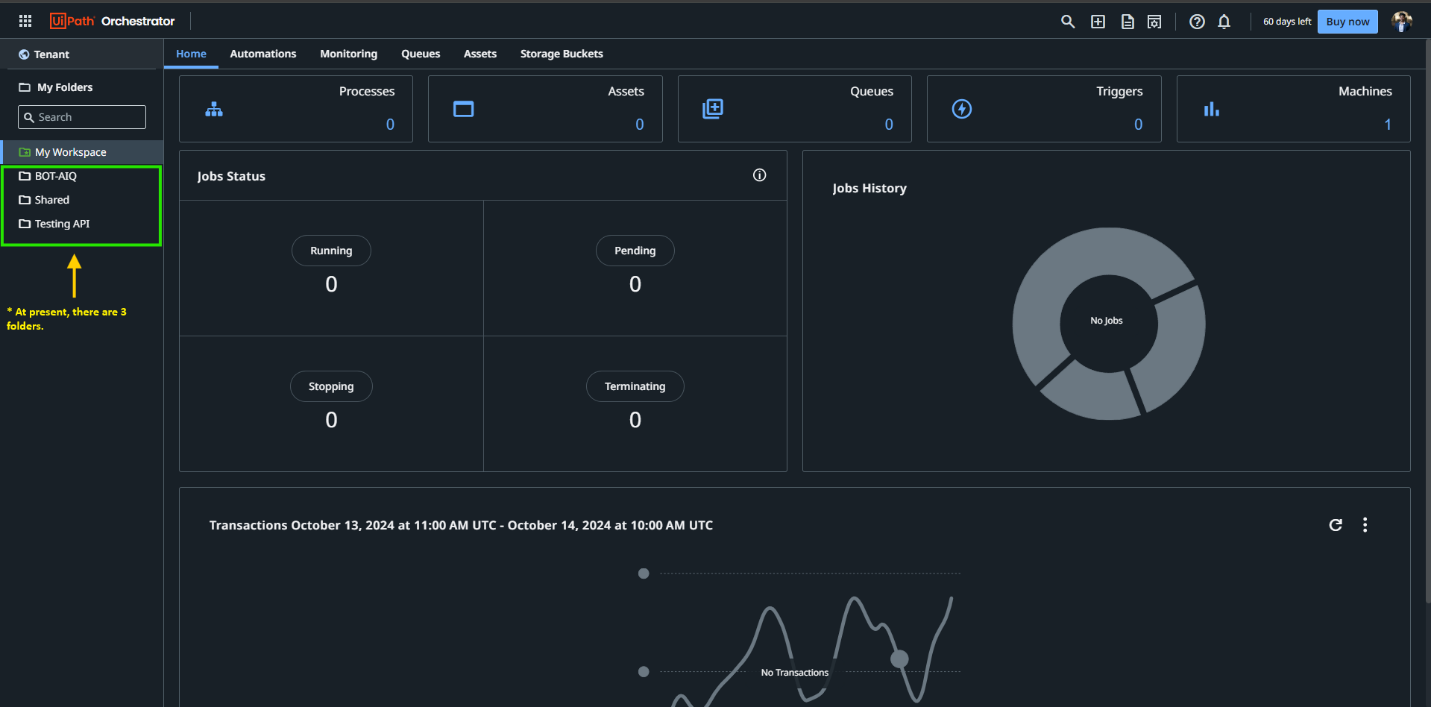
Here’s how to retrieve a list of all folders.
Retrieve all folders
Method: GET
Endpoint: {{cloudUrl}}/{{cloudOrg}}/{{cloudTenant}}/orchestrator_/odata/folders
Authorization: Bearer token (access_token).
Example output: This call returns a list of folders with their respective IDs (see Image 6). Store each ID for future API requests that require folder-specific access. Example in Postman.
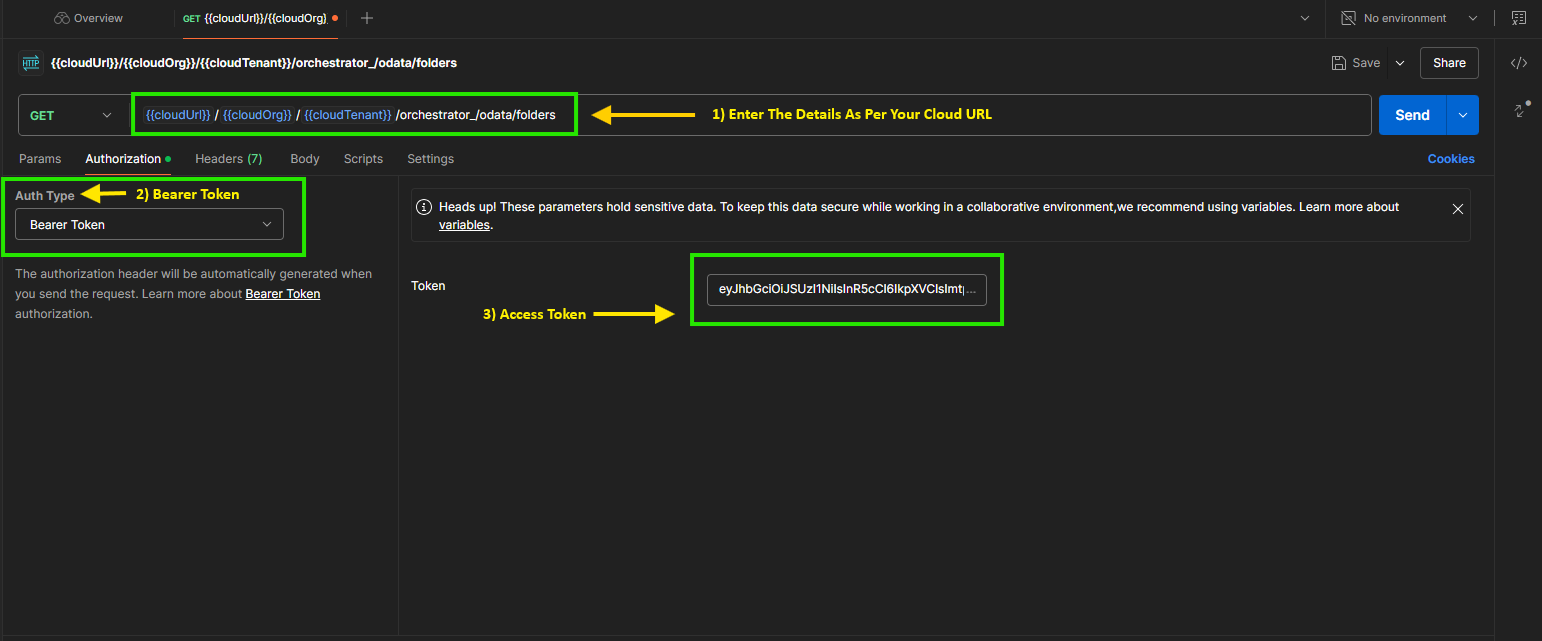
See image six for how the get request is configured in Postman, showing all necessary input fields for folder retrieval.
Note 1: As shown in Image five ("Folders on Orchestrator"), there are three folders. Our API results also confirm that the Orchestrator has exactly three folders.
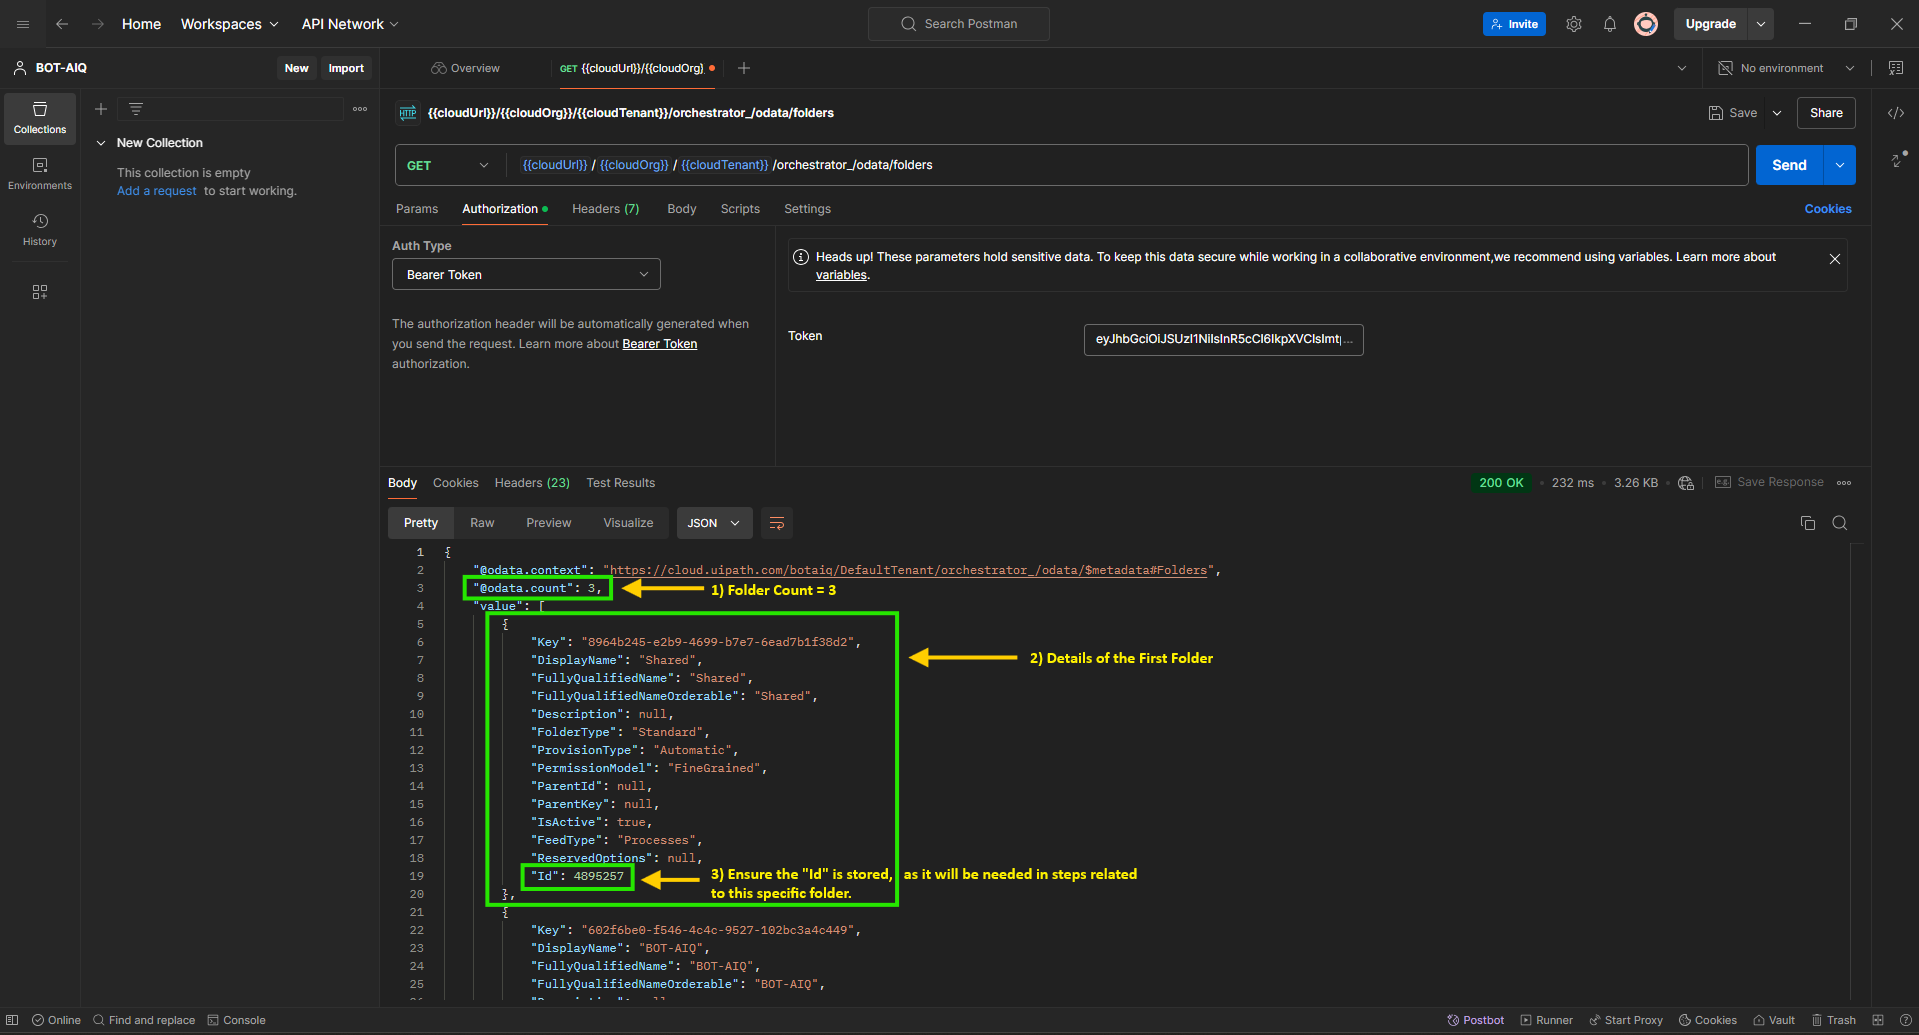
Note 2: Ensure the "Id" is stored, as it will be needed in steps related to this specific folder.
Managing assets
Assets in Orchestrator allow you to store reusable information like file paths, credentials, or URLs. The steps below show how to retrieve and create assets. Retrieve all assets in a folder Currently, there are five Assets in the folder bot-AIQ.

Retrieve all assets in a folder
Method: GET
Endpoint: {{cloudUrl}}/{{cloudOrg}}/{{cloudTenant}}/orchestrator_/odata/Assets
Authorization: Bearer Token (access_token).
Headers:
x-uipath-TenantName: Specify the folder name (e.g., "BOT-AIQ").
X-UIPATH-OrganizationUnitId: Enter the folder ID obtained in the folder retrieval step.
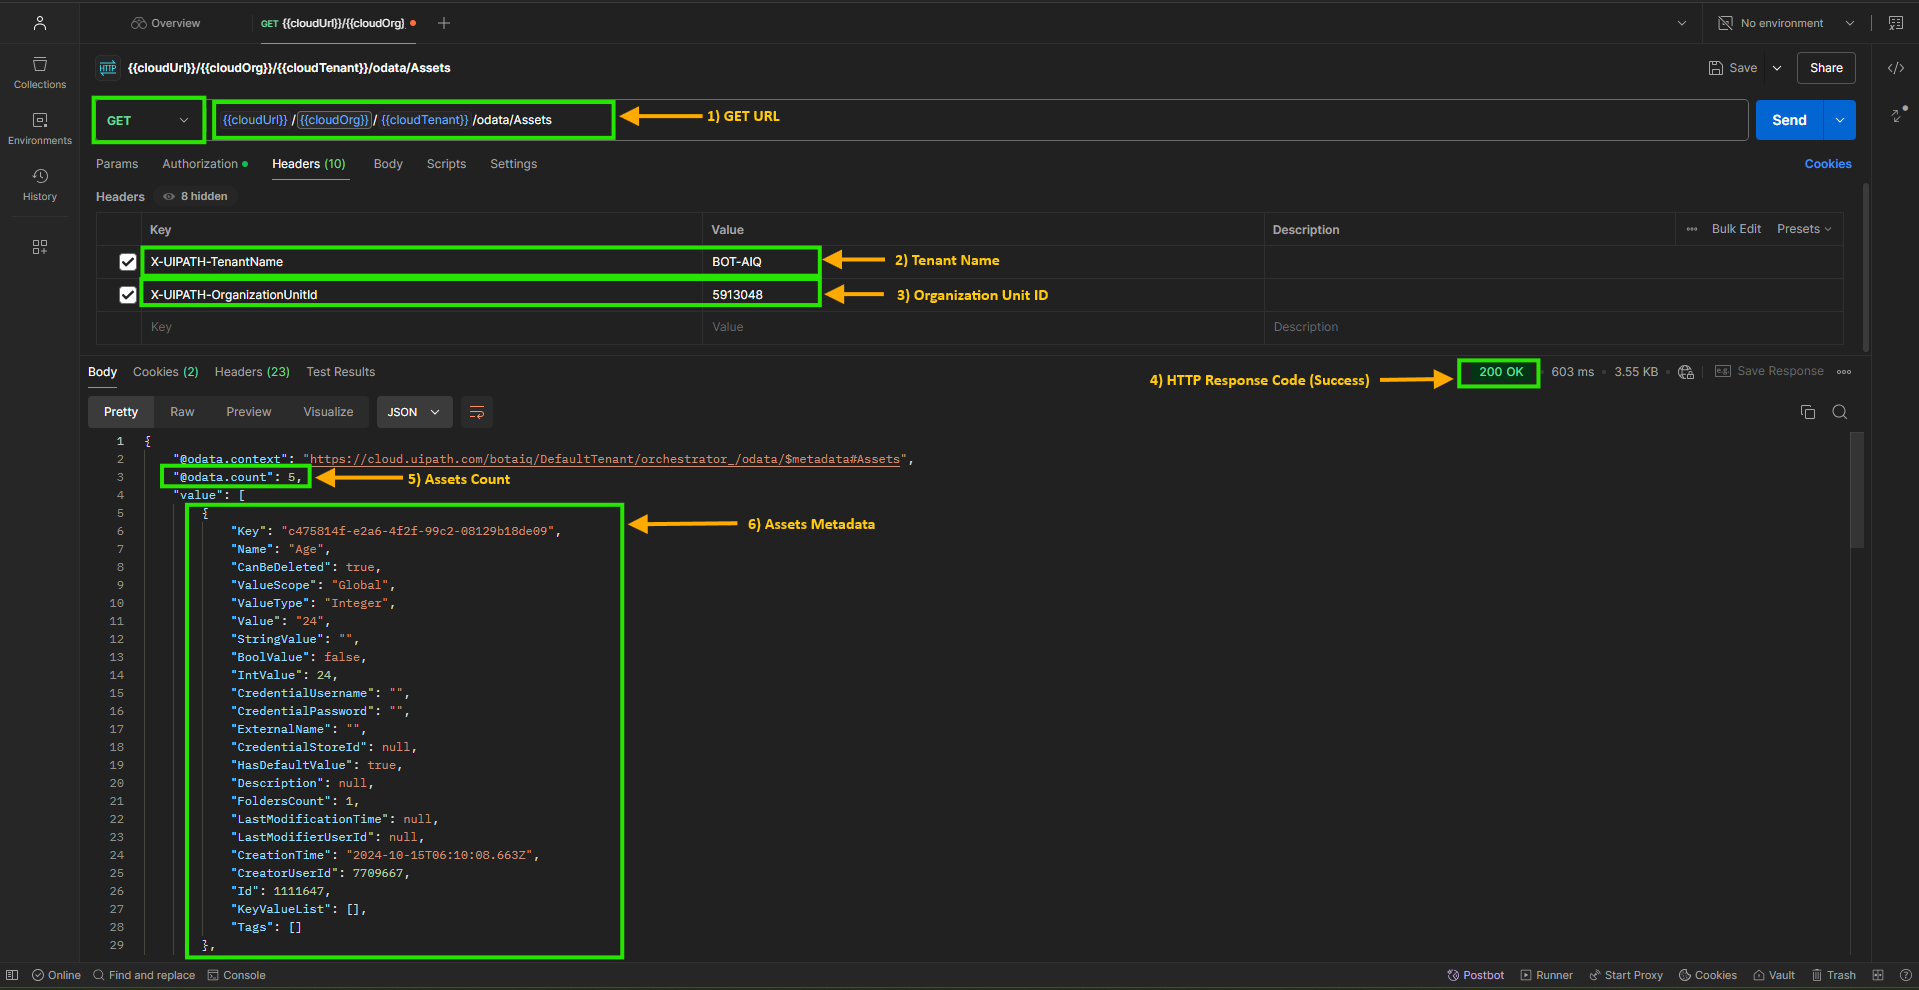
Execution details: Refer to Image 9 for an example response with the list of assets in the folder “BOT-AIQ.”.
Creating a new asset
To add a new asset in a specified folder, configure the request as follows:
Method: post
Endpoint: {{cloudUrl}}/{{cloudOrg}}/{{cloudTenant}}/orchestrator_/odata/Assets
Headers:
X-UIPATH-TenantName: Enter the folder name.
X-UIPATH-OrganizationUnitId: Provide the folder ID.
4. Request body (JSON format):
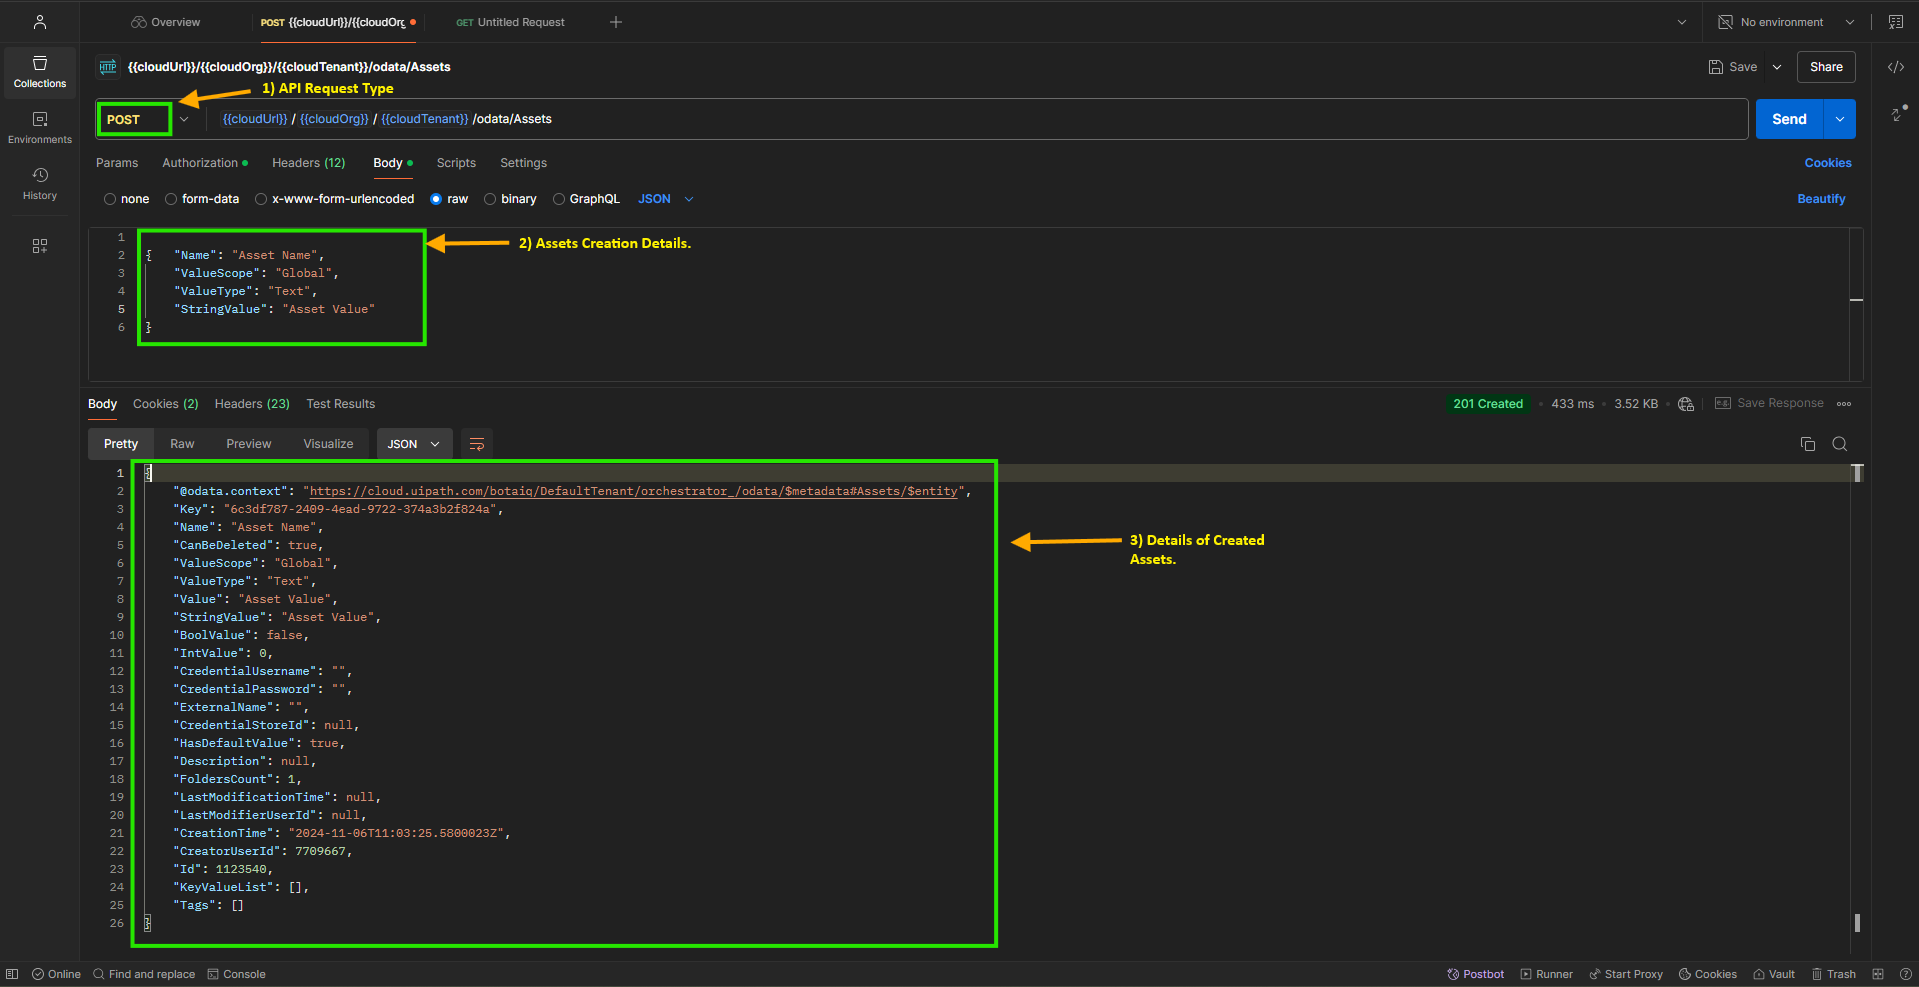
Now, let's review the created assets in Orchestrator.

In the previous step, we created an asset named "Asset Name" using the API, as shown in Image 10“Execution Details Format in Postman: Create New Assets”.
Following the successful HTTP response, the asset count has increased by one, now totaling six assets, as shown in Image 11, “New Asset Created: UiPath Orchestrator”. In the same manner, you can perform the following operations on assets:
Edit an Asset
Delete an Asset
For more information on how to perform these actions, refer to the following link: Postman UiPath API Documentation.
Working with queues Queues are used for managing transaction data, such as processing items in a structured sequence. Below are the steps for accessing and creating queue items.
Retrieve queue information To list details about existing queues within a folder:

Currently, the folder "BOT-AIQ" contains two queues, as shown in the above image (Image 12, “Queues in folder queue BOT-AIQ: UiPath Orchestrator”).
The required input parameters for API:
Method: GET
Endpoint: {{cloudUrl}}/{{cloudOrg}}/{{cloudTenant}}/orchestrator_/odata/QueueDefinitions
Authorization: Bearer Token (access_token).
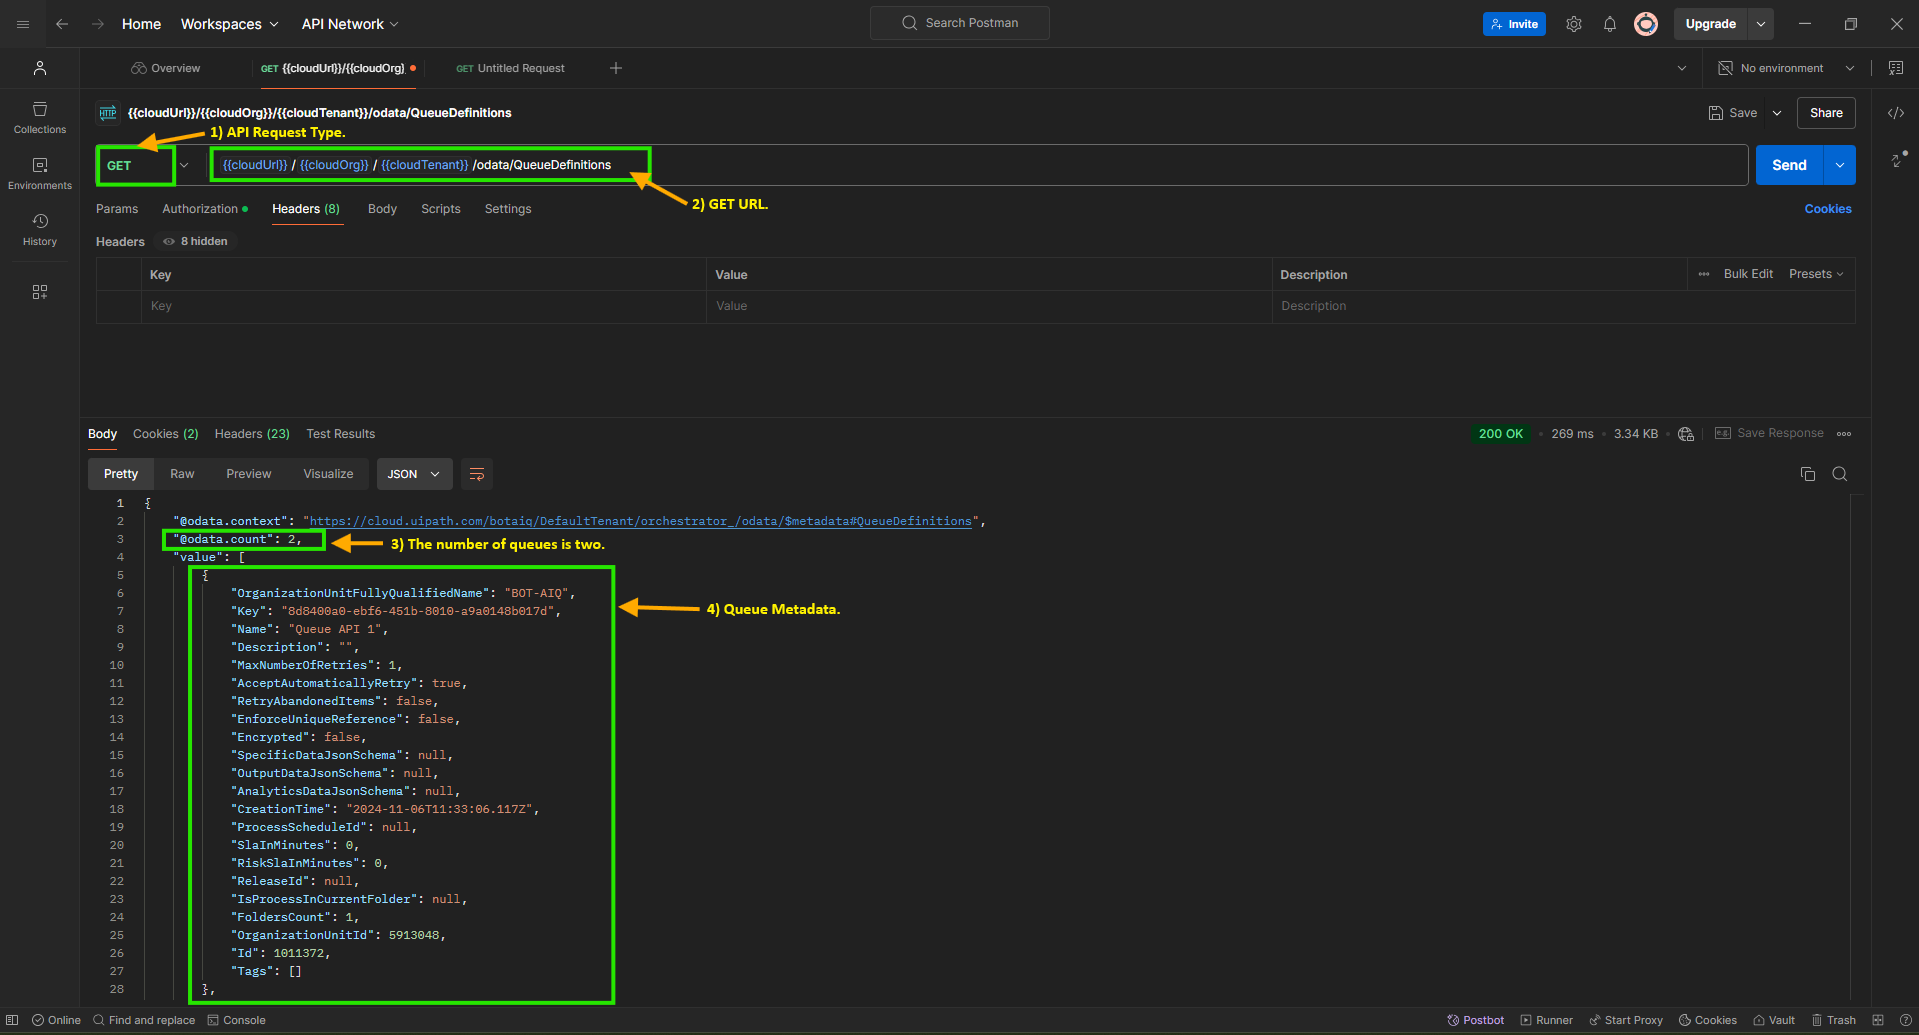
As outlined, Image (Image 13“Execution Details Format in Postman: Retrieve queue Data”) confirms the presence of two queues, validating that the API results align accurately with the UiPath Orchestrator data shown in the above Image (Image 12, “Queues in folder BOT-AIQ: UiPath Orchestrator”). Creating new queue items To add items to a queue, use the following parameters:

In this scenario, we observe that the queue named “queue API 2” currently has zero items as shown in above image (Image 14“queue Items: UiPath Orchestrator”). The required input parameters for API:
API type post
API URL: {{cloudUrl}}/{{cloudOrg}}/{{cloudTenant}}/odata/Queues/UiPathODataSvc.AddQueueItem
Authorization: Bearer Token.
Token: access_token.
Headers
x-uipath-OrganizationUnitId: ID (Refer Note two For More Information).
5. Body (Data)
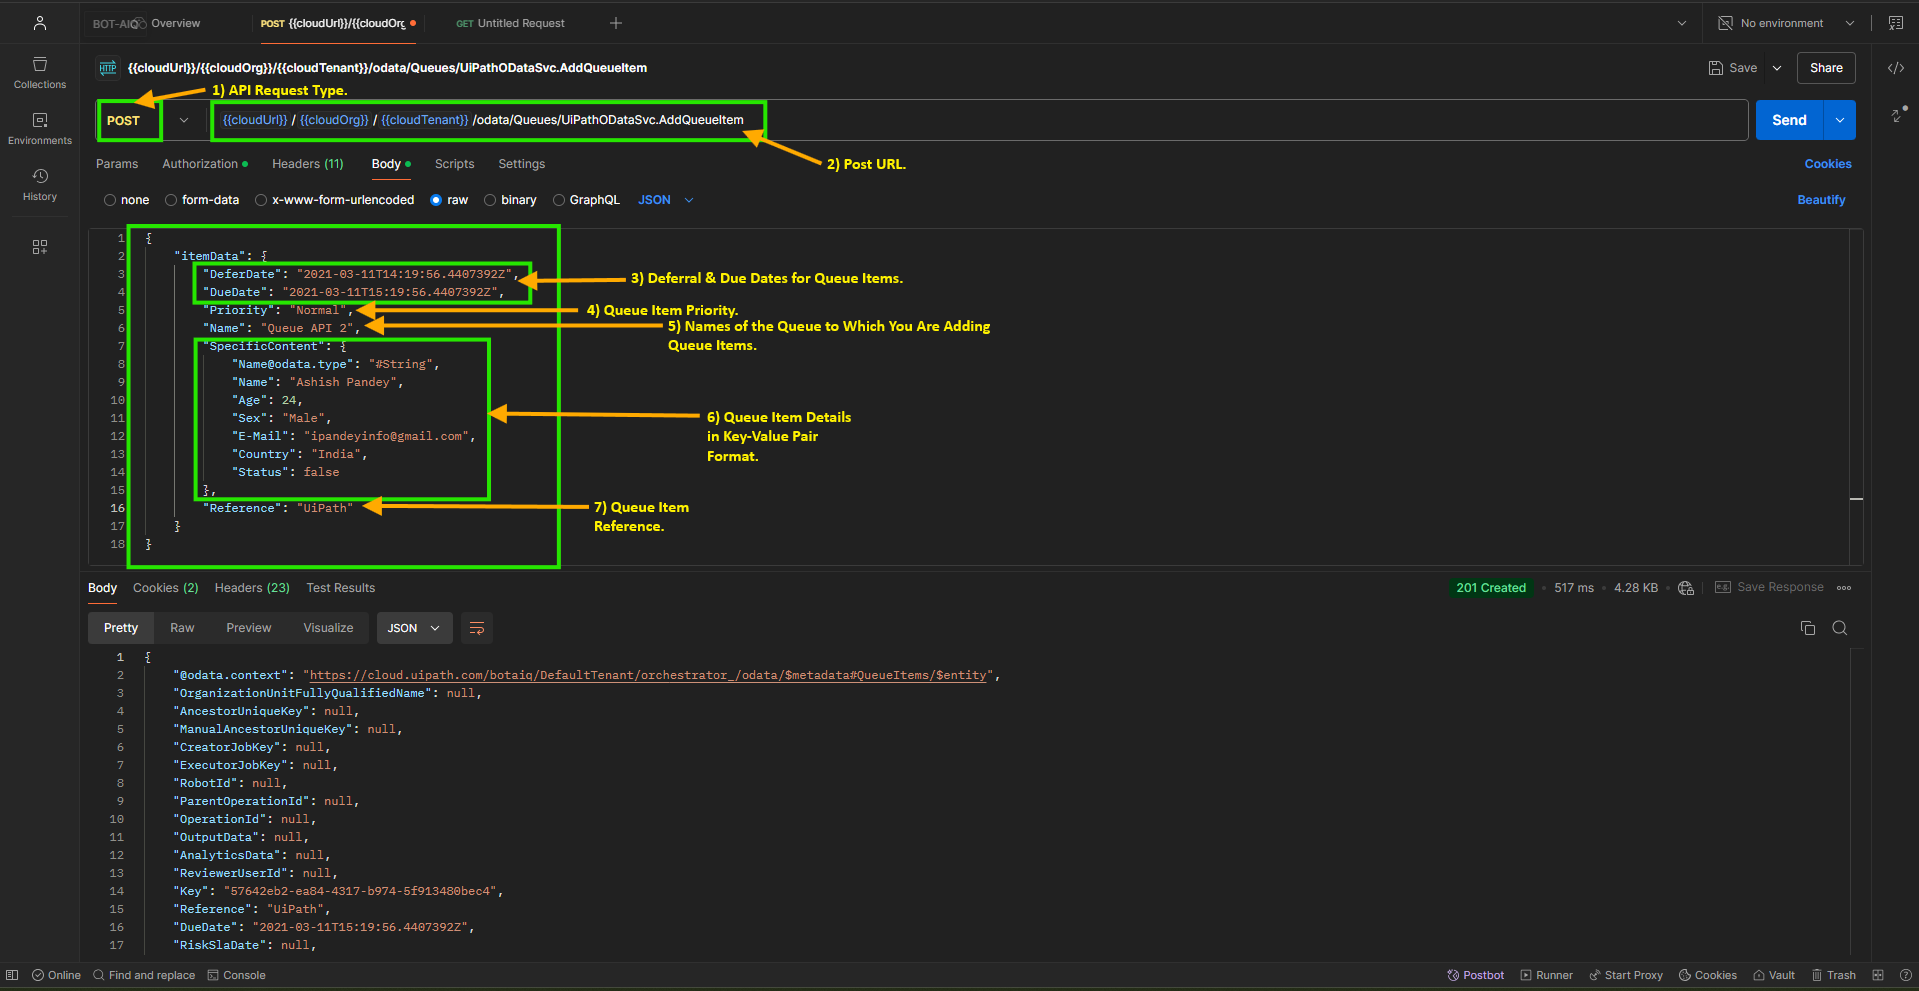
After the request, a new item appears in the queue, as shown in Image 16.

Error-handling, tips, and best practices
Token expiration: Watch token expiration times. Renew tokens as needed to prevent permission failures.
Double-check folder and asset IDs: Ensure correct IDs in API calls to avoid errors.
Handle HTTP errors gracefully: Implement retries for common errors like 401 (Unauthorized) or 500 (Server Error).
Conclusion
API authentication: Authenticate with UiPath to access resources securely.
Folder and asset management: Use APIs to manage Orchestrator folders and assets.
Queue management: Simplify and prioritize tasks by managing queues via API.
This guide has walked you through the essentials of Orchestrator API management. With these insights and examples, you’re now equipped to build efficient, API-driven workflows. Happy automating!
Additional resources
Topics:
OrchestratorSenior RPA Consultant, RPATech
Get articles from automation experts in your inbox
SubscribeGet articles from automation experts in your inbox
Sign up today and we'll email you the newest articles every week.
Thank you for subscribing!
Thank you for subscribing! Each week, we'll send the best automation blog posts straight to your inbox.


