Using UiPath AI Center BYOM feature to detect custom objects (Community Blog)
Using UiPath AI Center™ BYOM feature to detect custom objects

Why custom object detection? Why video, instead of just images?
The advent of AI and machine learning has revolutionized the way we analyze and interpret data. One such application is the detection of custom objects in video streams. This article explores how to leverage the Bring Your Own Model (BYOM) feature in UiPath AI Center™ to achieve this.
Video streams are rich sources of data. However, extracting meaningful information from them can be challenging. Pre-trained models like ssdmobilenetv1coco20171117 can detect basic objects, but their capabilities are limited to the classes they were trained on. This is where custom object detection comes into play.
Custom object detection is a computer vision task that involves identifying and locating specific objects within an image or video.
The importance of custom object detection spans across various industries, providing valuable insights and real-time responses to events. In retail, for instance, object detection applications can detect people and store items, helping businesses understand shopper behavior and improve operations. It allows retail operators to track product objects out of background images, propose what class an object belongs to, and define the boundaries of the proposed object.
Security and safety is just one of the many areas where object detection plays a significant role. It can be deployed on surveillance systems to constantly monitor for security threats in locations like airports, stadiums, and transit systems. It can identify unauthorized access to businesses and locations like construction sites, preventing theft. Moreover, it can monitor and improve safety in construction and industrial worksites by placing virtual fences around hazardous areas that trigger alerts when people cross certain thresholds.
State of-the-art object detection algorithm and AI Center™
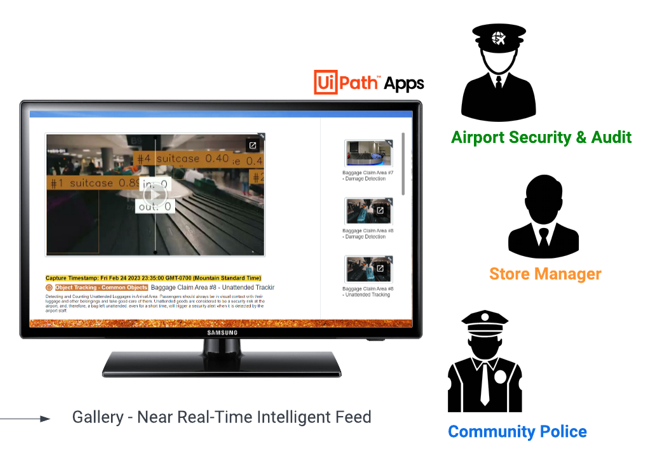
Let's see how we can combine two state-of-the-art technologies, one in object detection and one in RPA and AI model management.
This leads us to a demo where we are going to showcase this capability with the latest iteration of the most popular object detection algorithm YOLO-V8. The result is an automation use case, enabled with intelligent image and video tracking capability.
This shows the essence of being able to bring your own custom or any open-source models into AI Center™, and helps you quickly operationalize it for your business through the help of RPA.
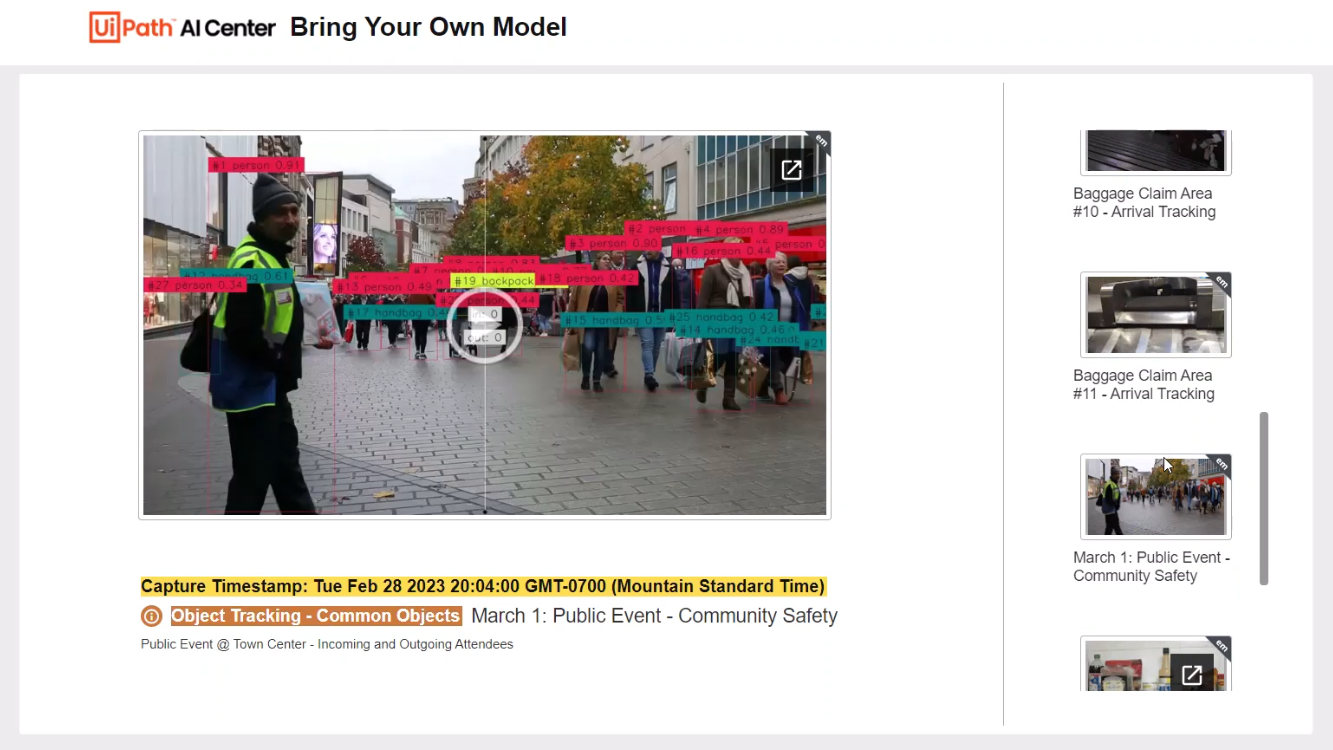
For the uninitiated, YOLO is one of the most popular algorithms in the object detection space. As the name implies, it requires a single propagation in its network to perform both classification and prediction of bounding boxes for a detected object. In simple words, it's super-efficient. It rose to popularity as it boasts considerable accuracy while maintaining a small model size.
Now, with the release of YOLOv8, it has become much easier to use, making it an excellent choice for a wide range of object detection, image segmentation and image classification tasks.
On top of the architectural and extensibility improvements, it's the first version of YOLO that has become available and distributed as a PIP package! Which you will see once we go into the code.
Use cases
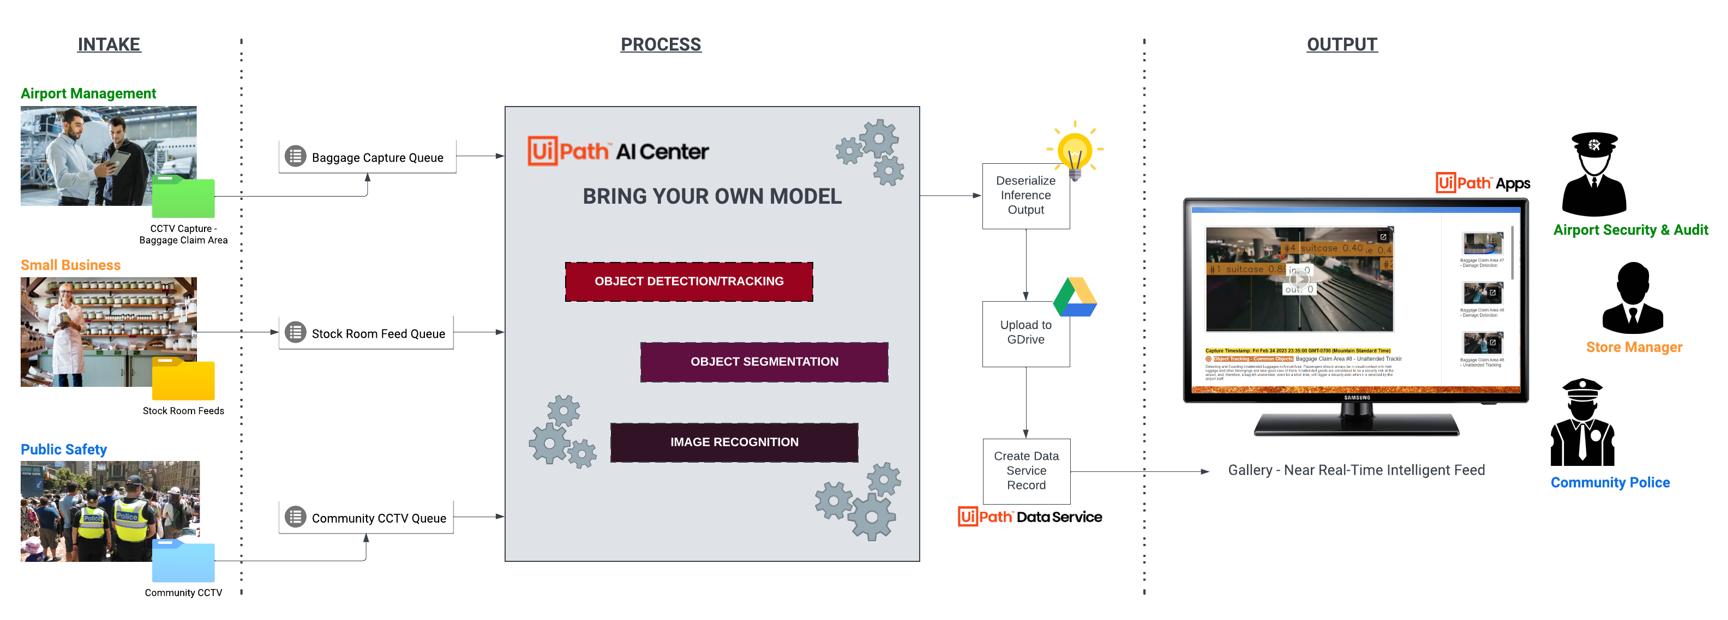
Now, onto the use case flow, this section will show you how the high-level end-to-end process looks like. We’ll be walking through the intake parameter. How they're being fed into the model for inferencing and finally how it generates the output gallery.
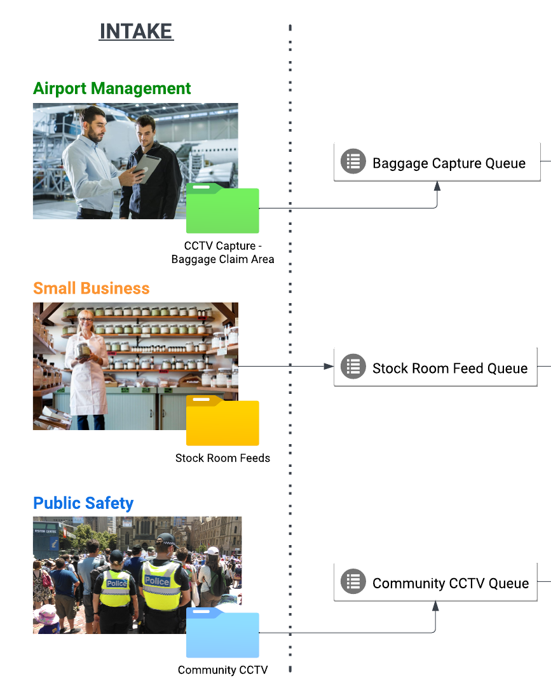
There are different intake channels that inputs can come from to cater these various use cases. In airports, for example, we can feed automatically segmented clips with per-minute intervals, coming from different critical coverage areas such as baggage claims, arrivals and others.
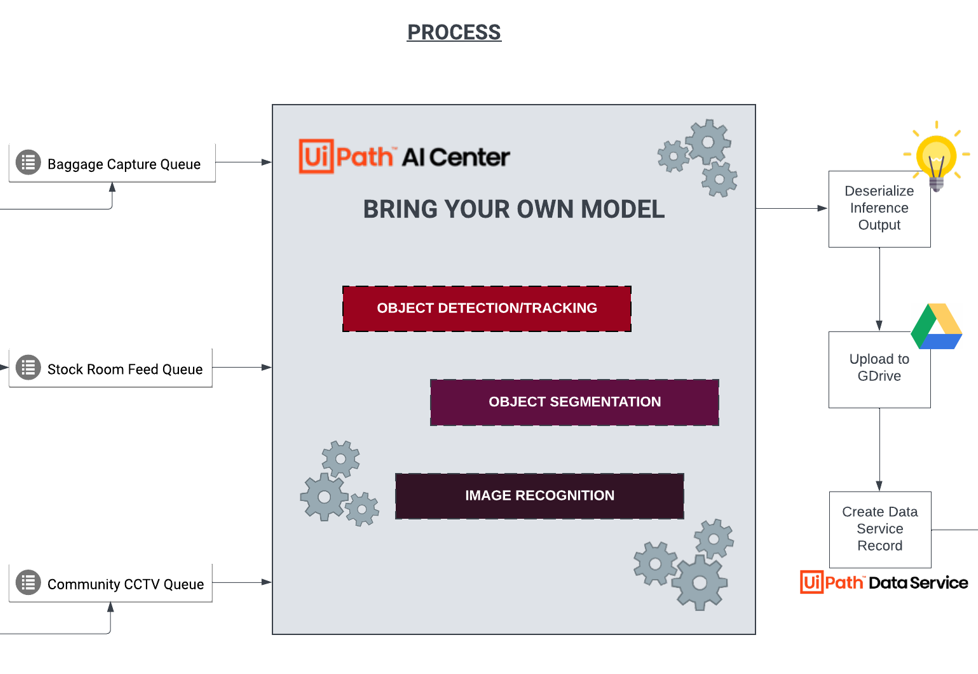
Then the next piece is the inference process feeding the inputs from each queue into AI Center™ where the models were trained and hosted.
Object detection task with YOLOv8 is used with multi-object tracking capability for videos by leveraging ByteTrack SDK. We have the base model (pre-trained with common objects dataset) and custom model that’s retrained with luggage conditions, products.
Object segmentation is another type of task for the model, which is more fine-grained than object detection, as it provides more detailed information about the object's shape and boundaries.
The last one is another custom model for image recognition using Inceptionv4, which is a popular deep learning technique that was released a while back, for classifying images into different categories. For this use case, this model is used to categorize the inputs and create the description or title, pretty much the ancestor of GPT-4 in the image context generation space now that it has multimodal capability, although it's built on a completely different architecture.
Moving on, after completing the model process steps, the Inferred image and video are deserialized from byte array and uploaded to file repository and pushed to UiPath Data Service.
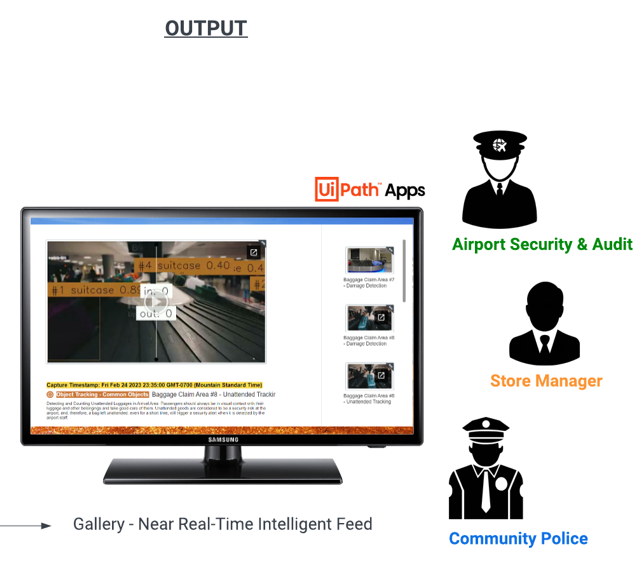
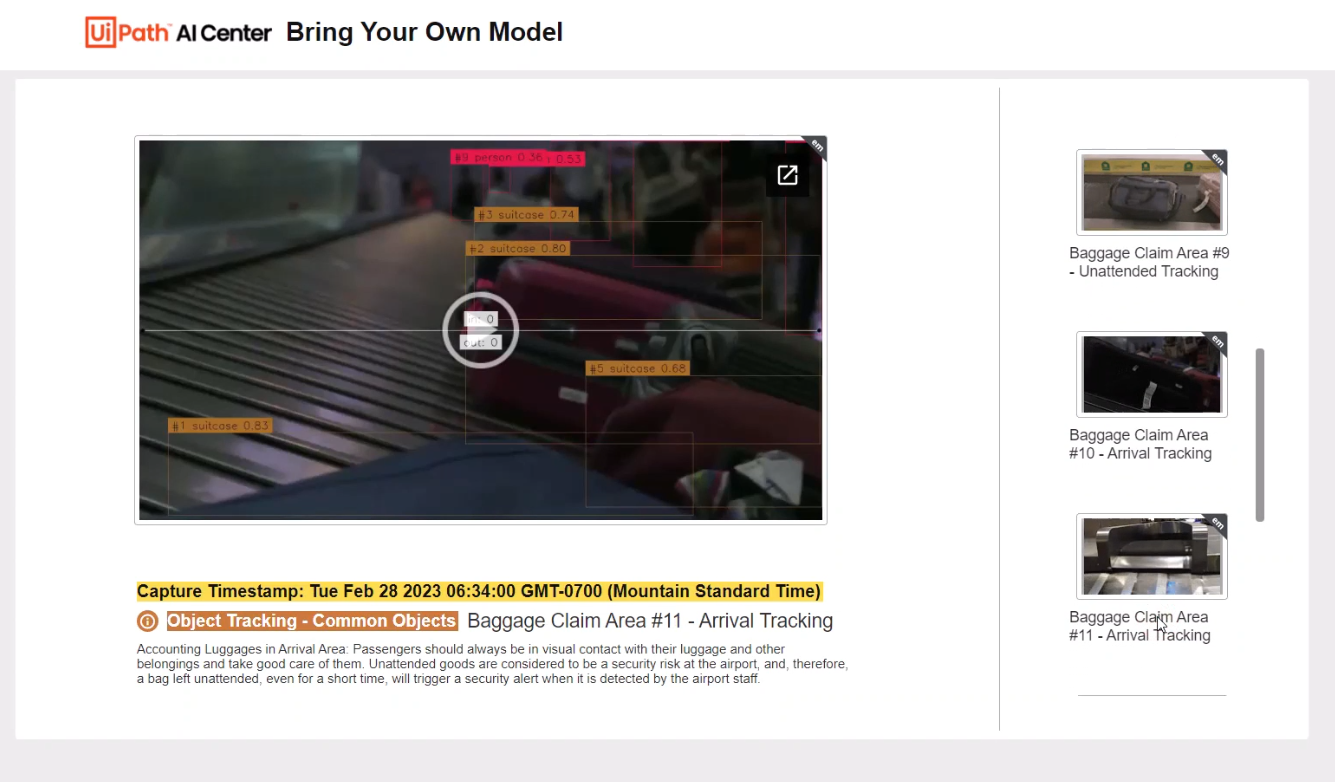
This then feeds into a UiPath Apps project to serve as a human interface in a gallery-like view which can be utilized by the different personas involved, such as airport security, store managers, and community police. Airport security can now have an AI powered view to track unattended baggage in the airport. It’s important for passengers to always have visual contact with their luggage and other belongings.
Unattended goods are considered to be a security risk at the airport, and, therefore, a bag left unattended, even for a short time, will trigger a security alert when it is detected by the airport staff.
Another benefit that this can provide to airport management, is proper baggage handling and handling claims for damaged baggage in the airport. Airlines are responsible for repairing or reimbursing a passenger for damaged baggage or its contents when the damage occurs while the bag is under the airline's control during transportation, subject to maximum limits on liabilities.
On another end of the spectrum, whether it's in small businesses or communities, store managers can track products and manage inventory to properly navigate business demands by leveraging AI custom with object detection capability.
Building, packaging, and deploying custom object detection model into AI Center™
I fondly created an acronym for easy remembering: F O R T - Fort. F - file structure
O - organizing methods or functions
R - requirements or generating requirements.txt
T - training or creating an optional training/retraining function. Now, let's start to build our fort! File and folder structure

At the minimum you should have main.py and requirements.txt, let's talk about how to generate the requirements later.
Organizing methods Let's look at the code behind.
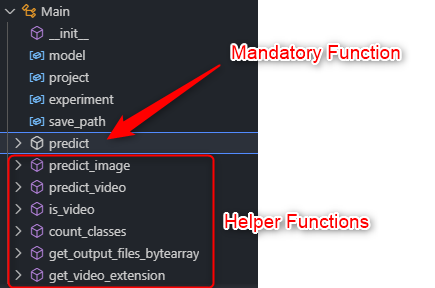
Of course, you have the typical dependencies, modules, imports, etc, which is essential for the code to run. But in terms of organizing or naming your code, it should have a class called Main, and within this Main class you have your method called predict. Let's dig a bit deeper on this sample custom ML model we showcased, which is based off of YOLOv8.
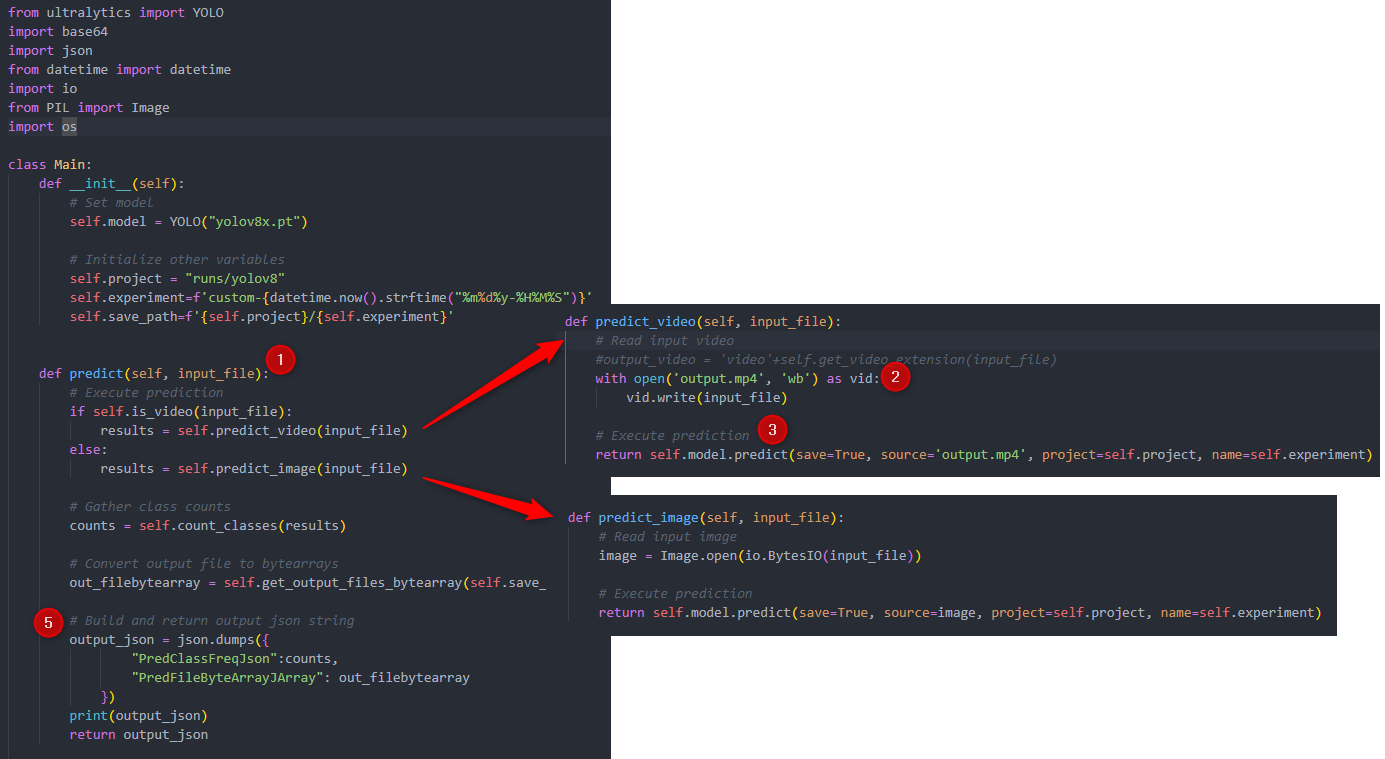
The first thing you need to keep in mind when building the code is the type of input you're going to feed the model, which can fall under three categories a string, a file or, a list of files. In this case I'm accepting a file input whether it's an image or video.
In the predict function, if it's a string, you just pass it directly. Feed it to the model. If it's a file or a list of files, it will be fed and converted into a bytearray, so the code has to serialize that back into a binary object and restore into its original format, depending on how the model you're using accepts it.
In this example, our input is a file, specifically an image or video. From this image or video, I want for the model to detect and track specific objects once I feed it into the predict function, and that's where the custom model comes in, whether it's pretrained or custom trained with your own dataset.
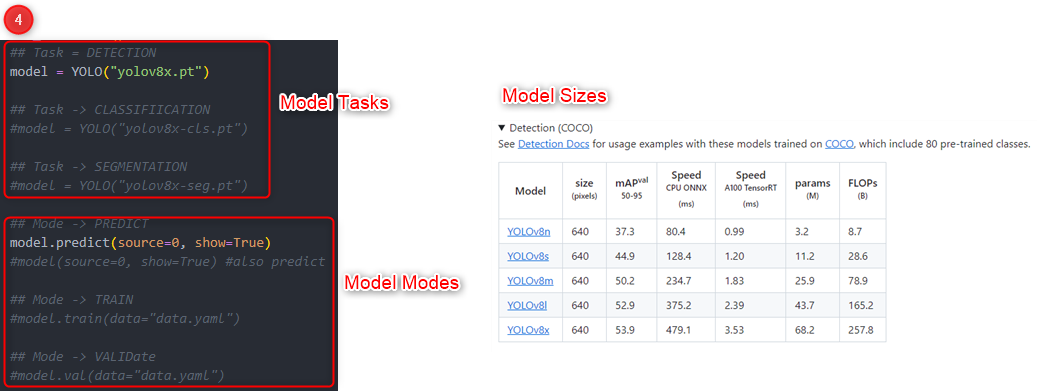
The model that I used for this example is YOLOv8, which is the latest iteration of YOLO and provides an SDK to execute in different modes such as predicting, validating and training. Also, you just have to specify the model name to execute various tasks such as object detection, classification, and object segmentation.
Unlike previous versions, you don't have to download the model weights. You just need to specify the task to initiate the model and call the specific mode you want to execute that model with whether it's predict, validate, or train.
Ok so after that, you have to parse the output and build your output dump of json string which in this example we're outputting the class frequencies and the output byte array of the file which has bounding boxes on the detected objects. So we built these nifty helper methods for those purpose.
Requirements
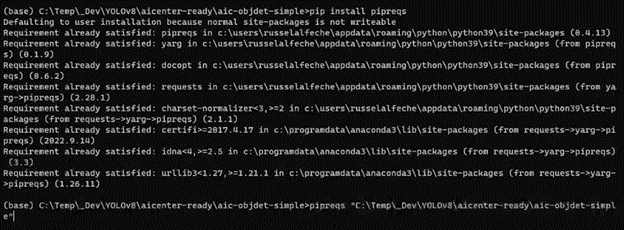
Once you're done with this step, we'll go ahead and generate the requirements file. There is a python module which serves exactly this purpose, and you just have to install that and run it in the directory where your main.py is. Then it automatically builds the requirements.txt for you containing all the dependencies or modules you used in the code with specific versions. Open your python environment, then navigate to your project directory where you will create the requirements.txt Below is a sample sequence of commands.
# Activate python environment (I’m using anaconda python module manager) conda activate base
# Navigate to project folder cd c;/path/to/project
# Install pipreqs if not yet installed pip install pipreqs
# Run pipreqs to generate requirements.txt pipreqs c:/path/to/project
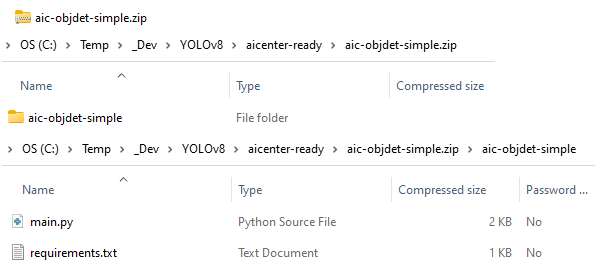
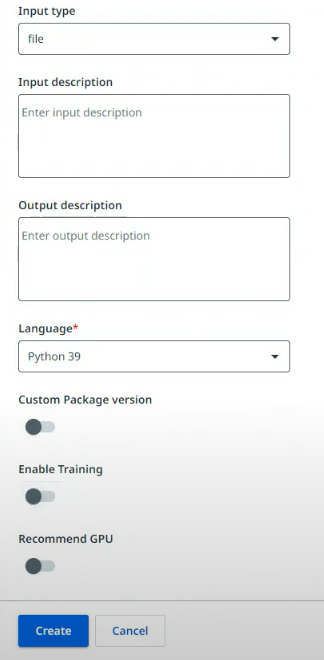
And that's it. You just have to zip it and upload it to UiPath AI Center™ Make sure the name of the root folder in the Zip file is the same name as the Zip file.
Below snippets provide step-by-step on how you can upload the package into AI Center™as a custom mode.
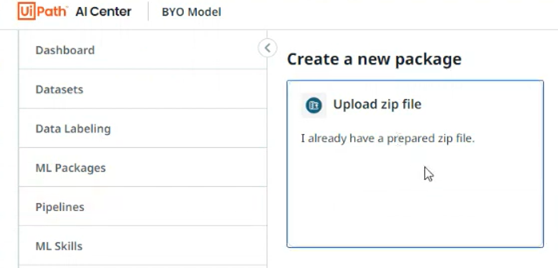

Training

The optional step, which is adding a training or retraining capability, is just adding two additional methods in the code, which is train and save. Obviously, this would contain the call to the train mode and function to save the model weights generated from training.

All the other succeeding steps to zip and upload remain exactly the same.
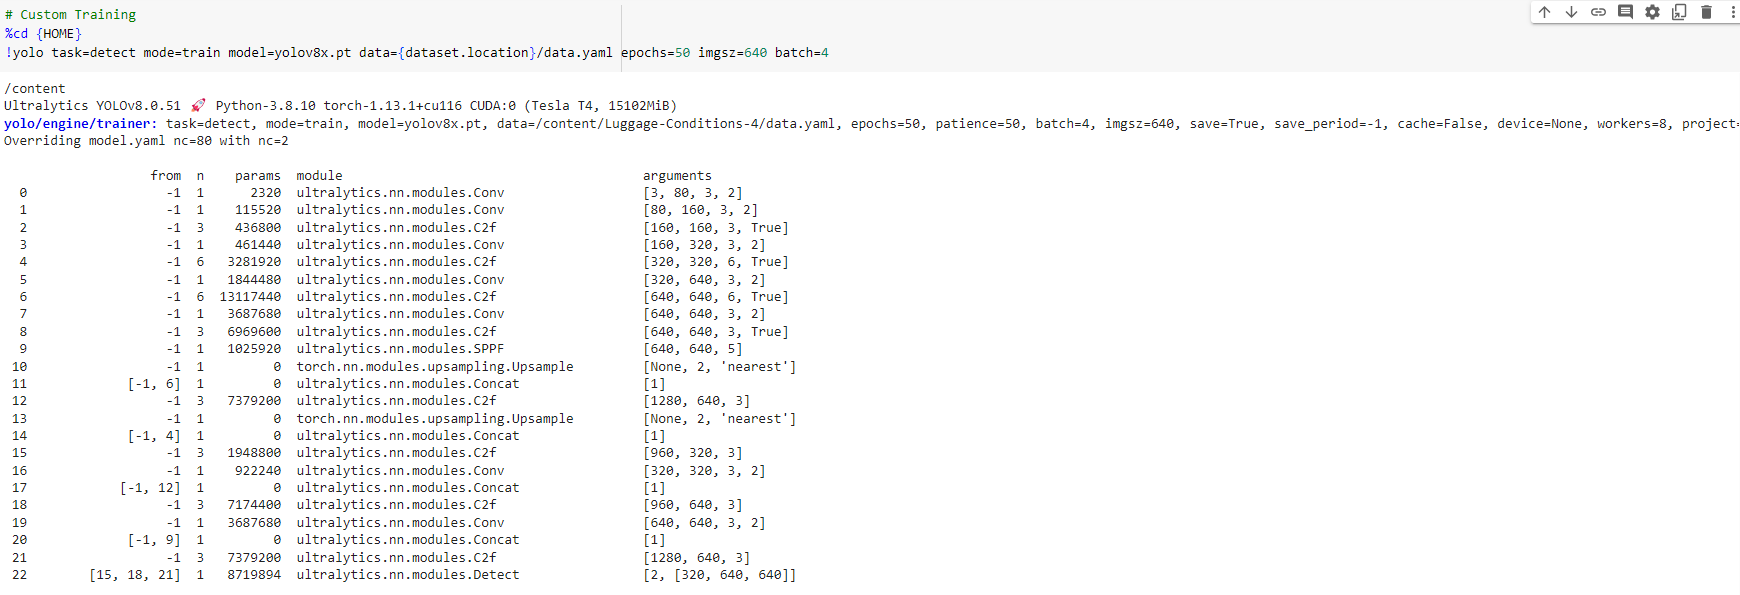
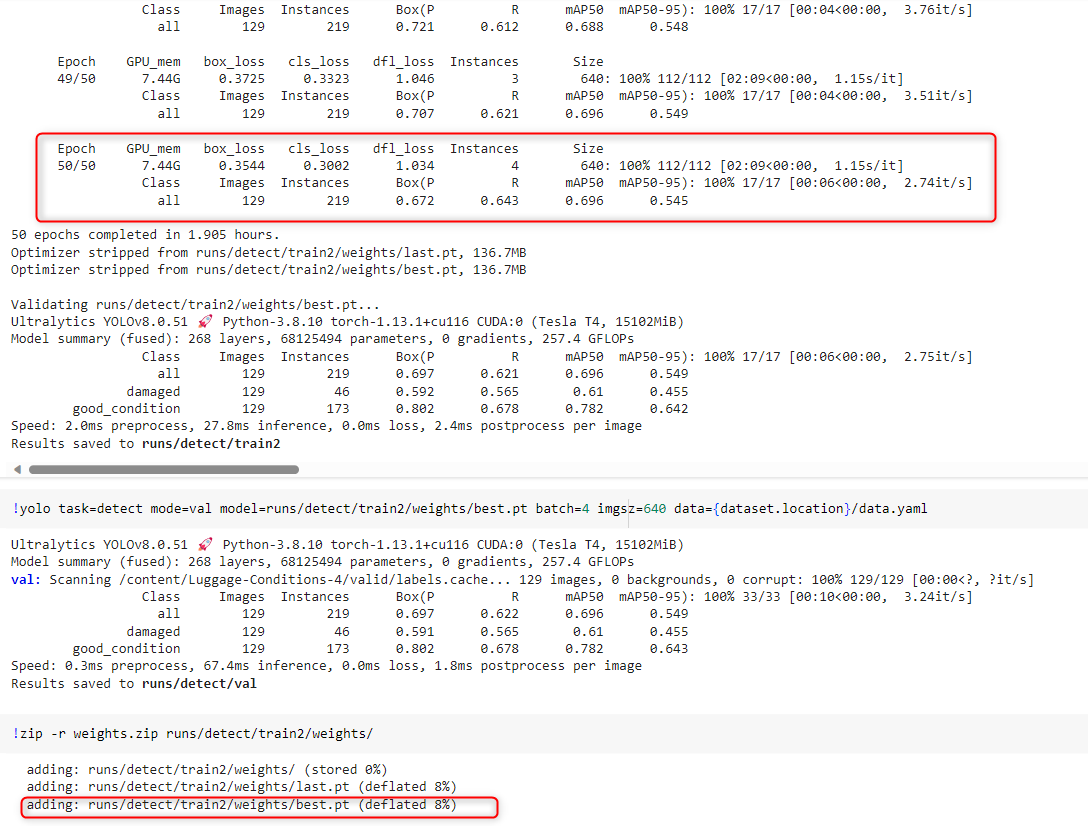
For this particular use case, I’ve used Google Colab to execute the training, but same can be done using AI Center™ once the retrainable package is uploaded.
Below is an example training run and performance metrics output from my Google Colab workspace, which also shows the final output artifact, pretrained weights (best.pt). This frozen weight will be the one used for the custom object detection model inference in the ML skill, so it needs to be in the ML package that will be uploaded to AI Center™, if you’ve used an external tool to do the training.
Picking the fruits of your work

Now going back to our use case. Let's see how this process runs from intake, processing, and to output using this sample image. And let's do that by running this workflow based off of the process diagram shown initially. Just quickly to summarize the process, first off, it fetches the input image or file from a queue or folder.
Runs the object detection model, counts, and tracks detected objects.
Runs the input captioning model to describe the inferred transaction Then it generates a thumbnail and uploads them into google drive along with the output image or video artifact.
Finally, it then updates a data service entity with the preview thumbnails and output as well as other pertinent details from the model to populate the tile, description, capture timestamp, model type, etc)
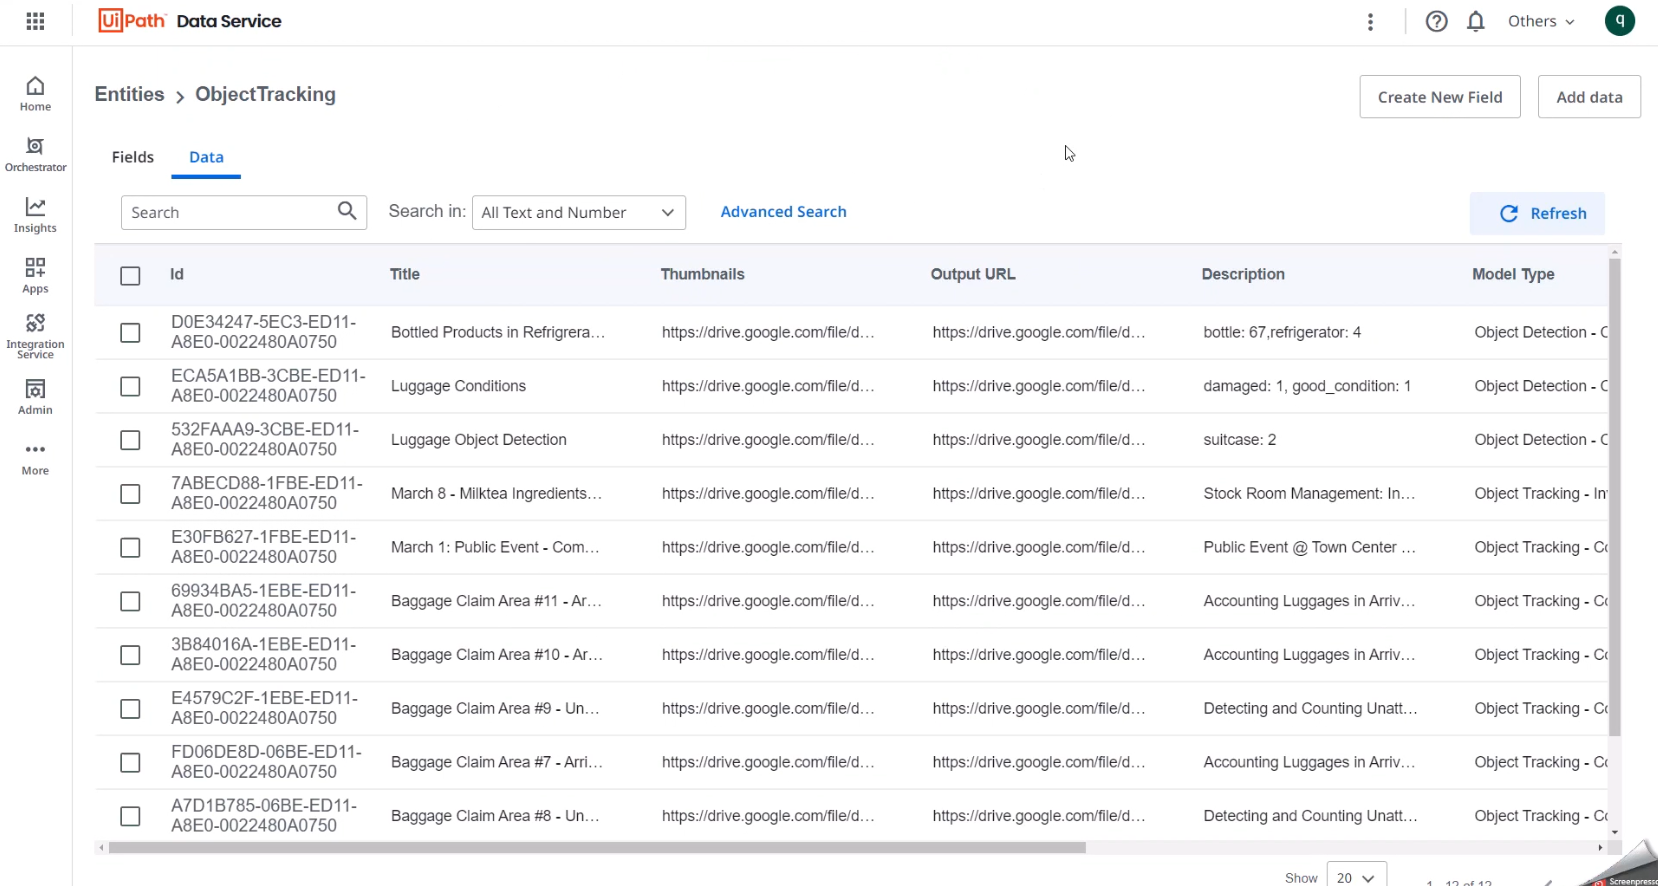
Once the run completes, let's look at data service. We hit refresh and verify newly added records after the artifacts were uploaded to google drive. Then if we look at the gallery, refresh it, we will see the latest inference output added into the feed.
Conclusion
Custom object detection in video streams using the BYOM feature in AI Center™ opens up a world of possibilities in video analysis. As AI continues to evolve, we can expect even more sophisticated tools and techniques in this domain.
Technology Leader, RPA, qBotica
Get articles from automation experts in your inbox
SubscribeGet articles from automation experts in your inbox
Sign up today and we'll email you the newest articles every week.
Thank you for subscribing!
Thank you for subscribing! Each week, we'll send the best automation blog posts straight to your inbox.


