Effortless custom connectivity with UiPath Connector Builder

Summarize:
Introduction
In today’s interconnected digital landscape, seamless integration across various systems and APIs is imperative for efficient automation. UiPath Connector Builder is revolutionizing how developers create custom connectivity to third-party REST APIs. Its simplicity and power make it an indispensable tool in any developer's toolkit, providing a familiar experience for building and testing custom connectors.
A developer’s dream
The Connector Builder is designed with developers in mind. Its user-friendly interface will look familiar to anyone who has previously worked with API testing tools. This familiarity reduces the learning curve, allowing developers to focus on building robust integrations quickly.
Key features
No-code: Create connectors without writing a single line of code. The no-code environment wraps vendor APIs into Integration Service connectors, making it accessible to citizen developers as well.
Simple test interface: The build and test interface makes it fast to quickly define endpoints, send test calls, and inspect the results.
Curated activities: With the Activity Preview feature, developers can prescribe and preview activities. This ensures that custom connectors are well-defined, providing great visibility and control over the end user experience.
Power and flexibility
The true power of the Connector Builder lies in its ability to create custom connectors that can be reused across various workflows and projects. These connectors seamlessly integrate with the larger ecosystem, including UiPath Studio, Orchestrator, and Assistant, allowing for high reusability within your automation workflows.
One of the standout features of the Connector Builder is its capability for central governance, which is crucial for scaling automation initiatives across large organizations. This governance allows Centers of Excellence (CoEs) to manage and publish custom connectors, effectively, ensuring compliance and consistency across teams.
Benefits for COEs
Scale with composability: By creating and publishing connectors as accelerators, CoEs can empower their teams to discover and consume these resources easily.
Enhanced control: Centralized governance ensures that all custom connectors adhere to organizational standards and best practices, reducing the risk of errors and inconsistencies.
Discoverability: Custom connectors are easy to find within the catalog, making it simple for developers to incorporate them into their projects.
Building a custom connector to the Xero API
To showcase the Connector Builder capabilities, let’s walk through a step-by-step tutorial on building a custom connector to the Xero API. This tutorial will guide you through connector settings, authentication setup, creating resources, defining curated activities, and publishing your connector for use in UiPath Studio.
Sign up for a developer account with Xero
We first need to set up a developer account with Xero and create an OAuth2 application to use with our UiPath Integration Service connector.
Navigate to: developer.xero.com
Click ‘Sign up’
Enter your details in the sign up page
Xero will send a confirmation email – click to validate and create your password
Once logged in, Xero will prompt you to “Add your business”. You do not need to perform this step – simple navigate back to developer.xero.com
Click “sign in”
Now that we have our developer account, let’s create the OAuth2 App:
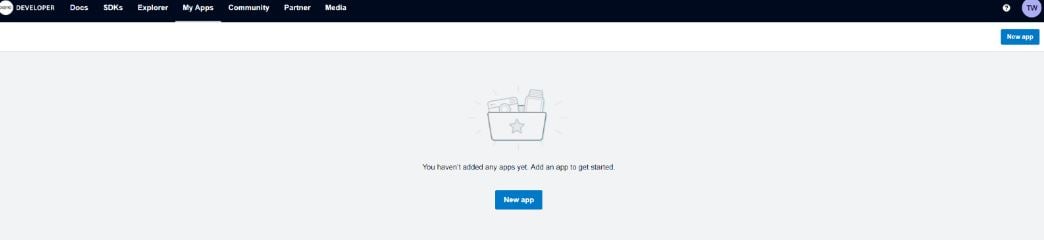
Go to My Apps and click “New app”
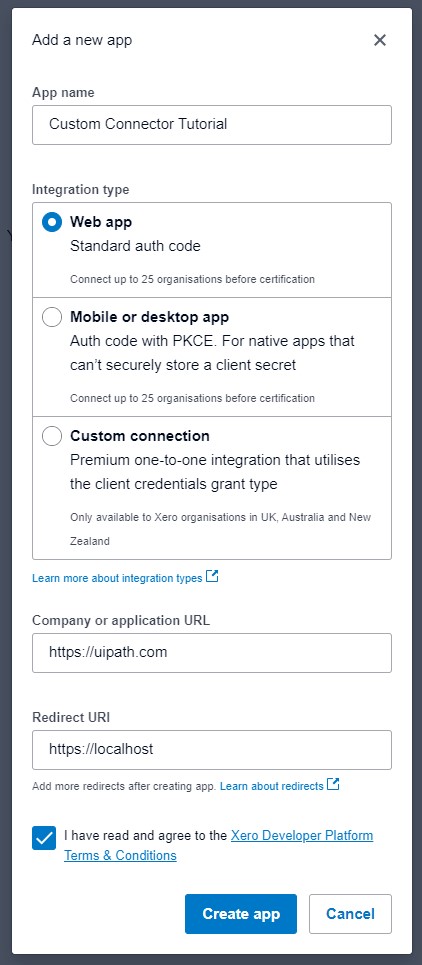
Give your app a name and select “Web App”. Enter a website. Use https://localhost for the redirect URL – we will edit this later. Click “Create App”.
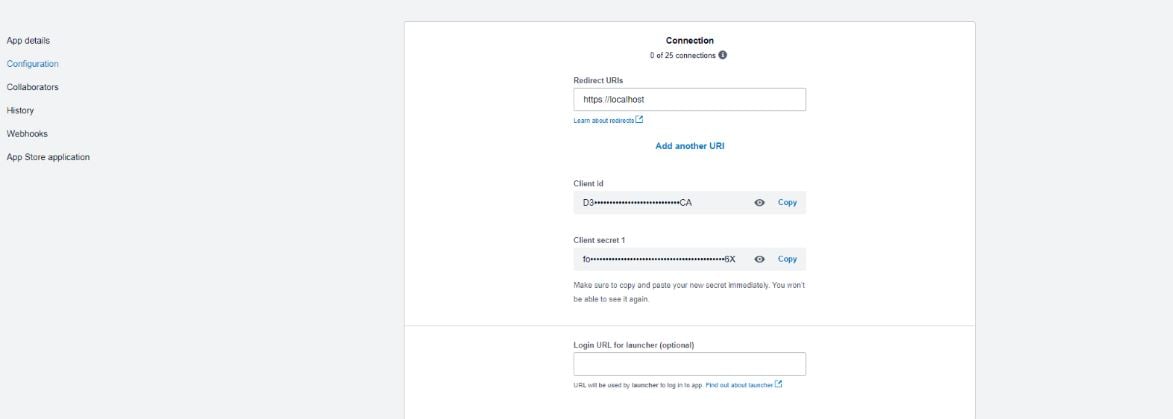
On the next page, go to “Configuration” and click “Generate a secret”. Take note of the client secret that is shown. Keep this in a safe place! Note that we can edit our redirect URIs on this page – keep this tab open to easily navigate back later.
With our client ID and secret in hand, we’re ready to start building our custom connector in Integration Service!
Custom Connector settings
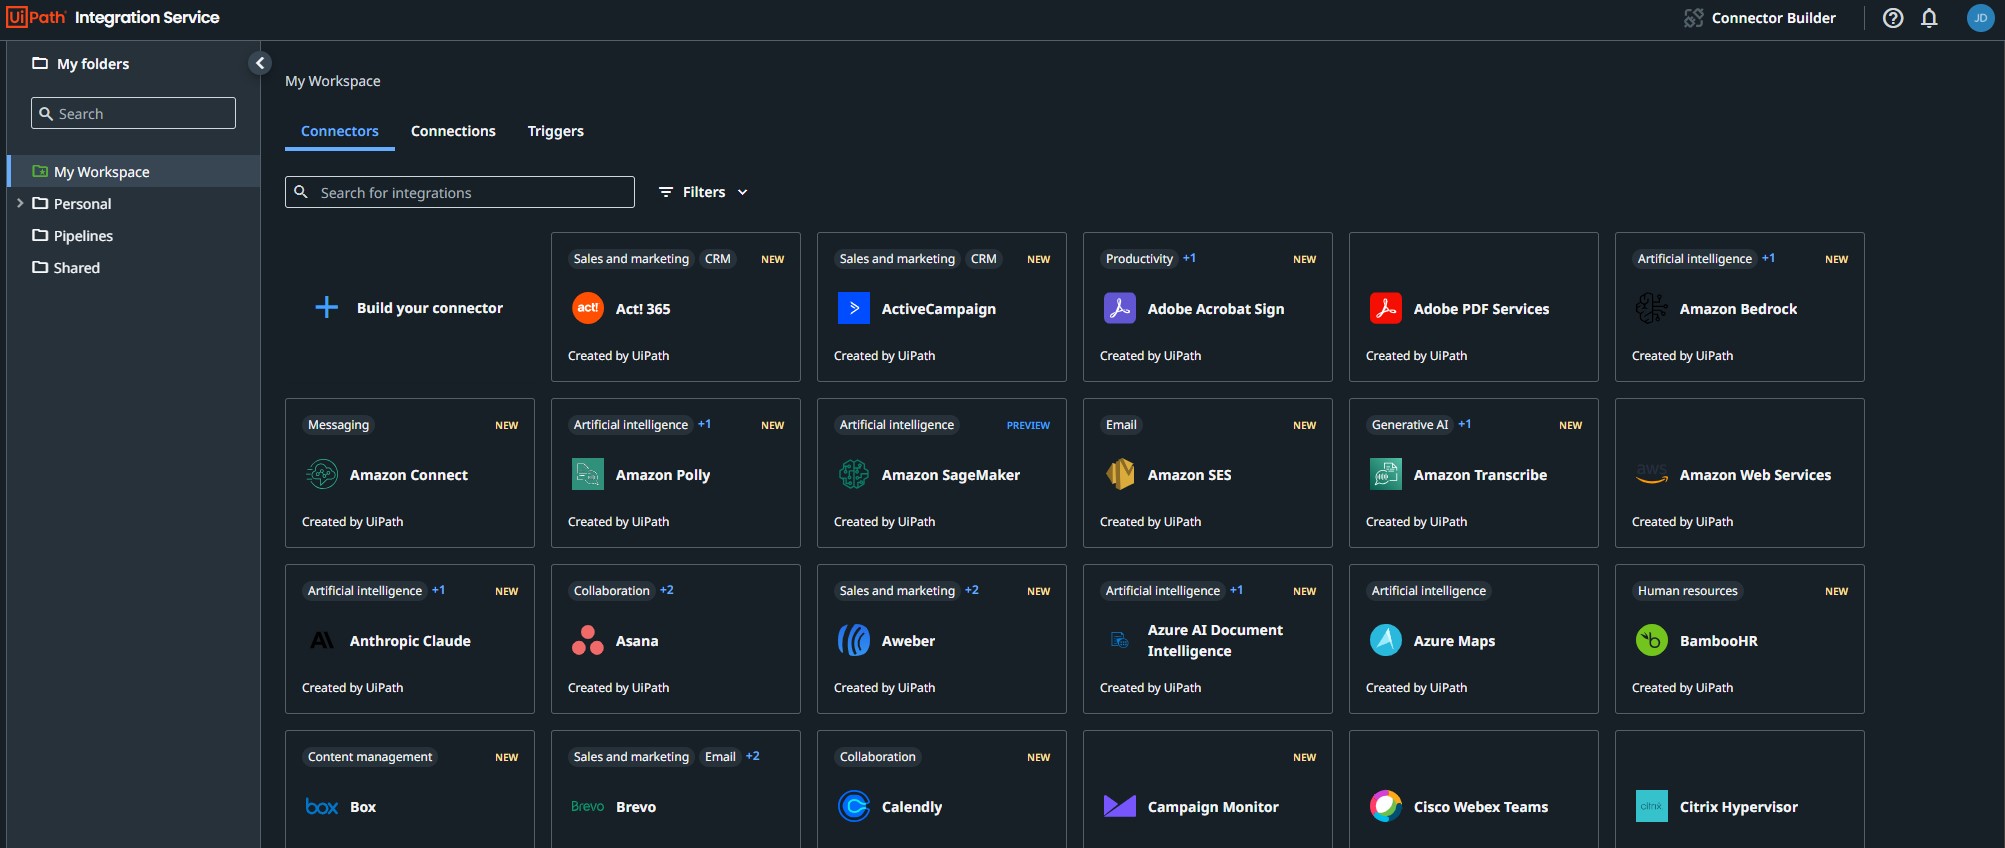
Navigate to Integration Service in UiPath Automation Cloud™ and click “Build your connector” Click “Create new connector”
Note that we can start with an API definition if available.
In this case, click “Start from a blank connector”.
Enter a name (e.g. “Xero Demo”).
You can upload an icon. Click “Create”.
Setting up authentication
The first item to set up is the authentication approach for the API and some general settings.
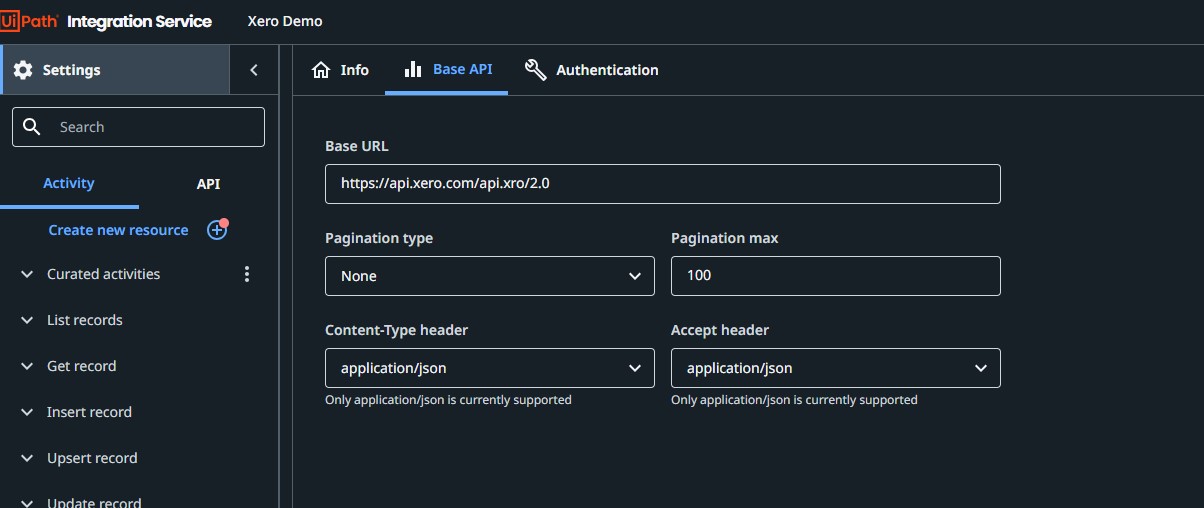
Make sure you’re on the “Base API” tab in the connector builder.
Enter the Base URL. For this exercise, we'll be creating a connector for the Accounting API in Xero, which has a base URL of: https://api.xero.com/api.xro/2.0. Make sure to click “Save” in the bottom right corner of the page!
Navigate to the “Authentication” tab. We will set up the Authorization Code Flow for an OAuth 2.0 client application. This will be done in a few steps. Below you’ll find all the details you need to enter, but you can also reference the Xero documentation to understand the flow and where to find all the necessary information.
Client ID: Enter the client ID from the application you registered earlier in the Xero developer portal.
Client Secret: Enter the client secret that you generated for your client application in the Xero developer portal.
Scope: Enter “offline_access accounting.transactions”. This scope gives access to read/write on accounting objects.
Authorization URL: Enter https://login.xero.com/identity/connect/authorize
Token URL: Enter https://identity.xero.com/connect/token
Refresh Token URL: Same as Token URL
Basic Header: Leave as “true”
Token revoke URL: https://identity.xero.com/connect/revocation
Refresh interval: 1800
Decode Authorization Code: false
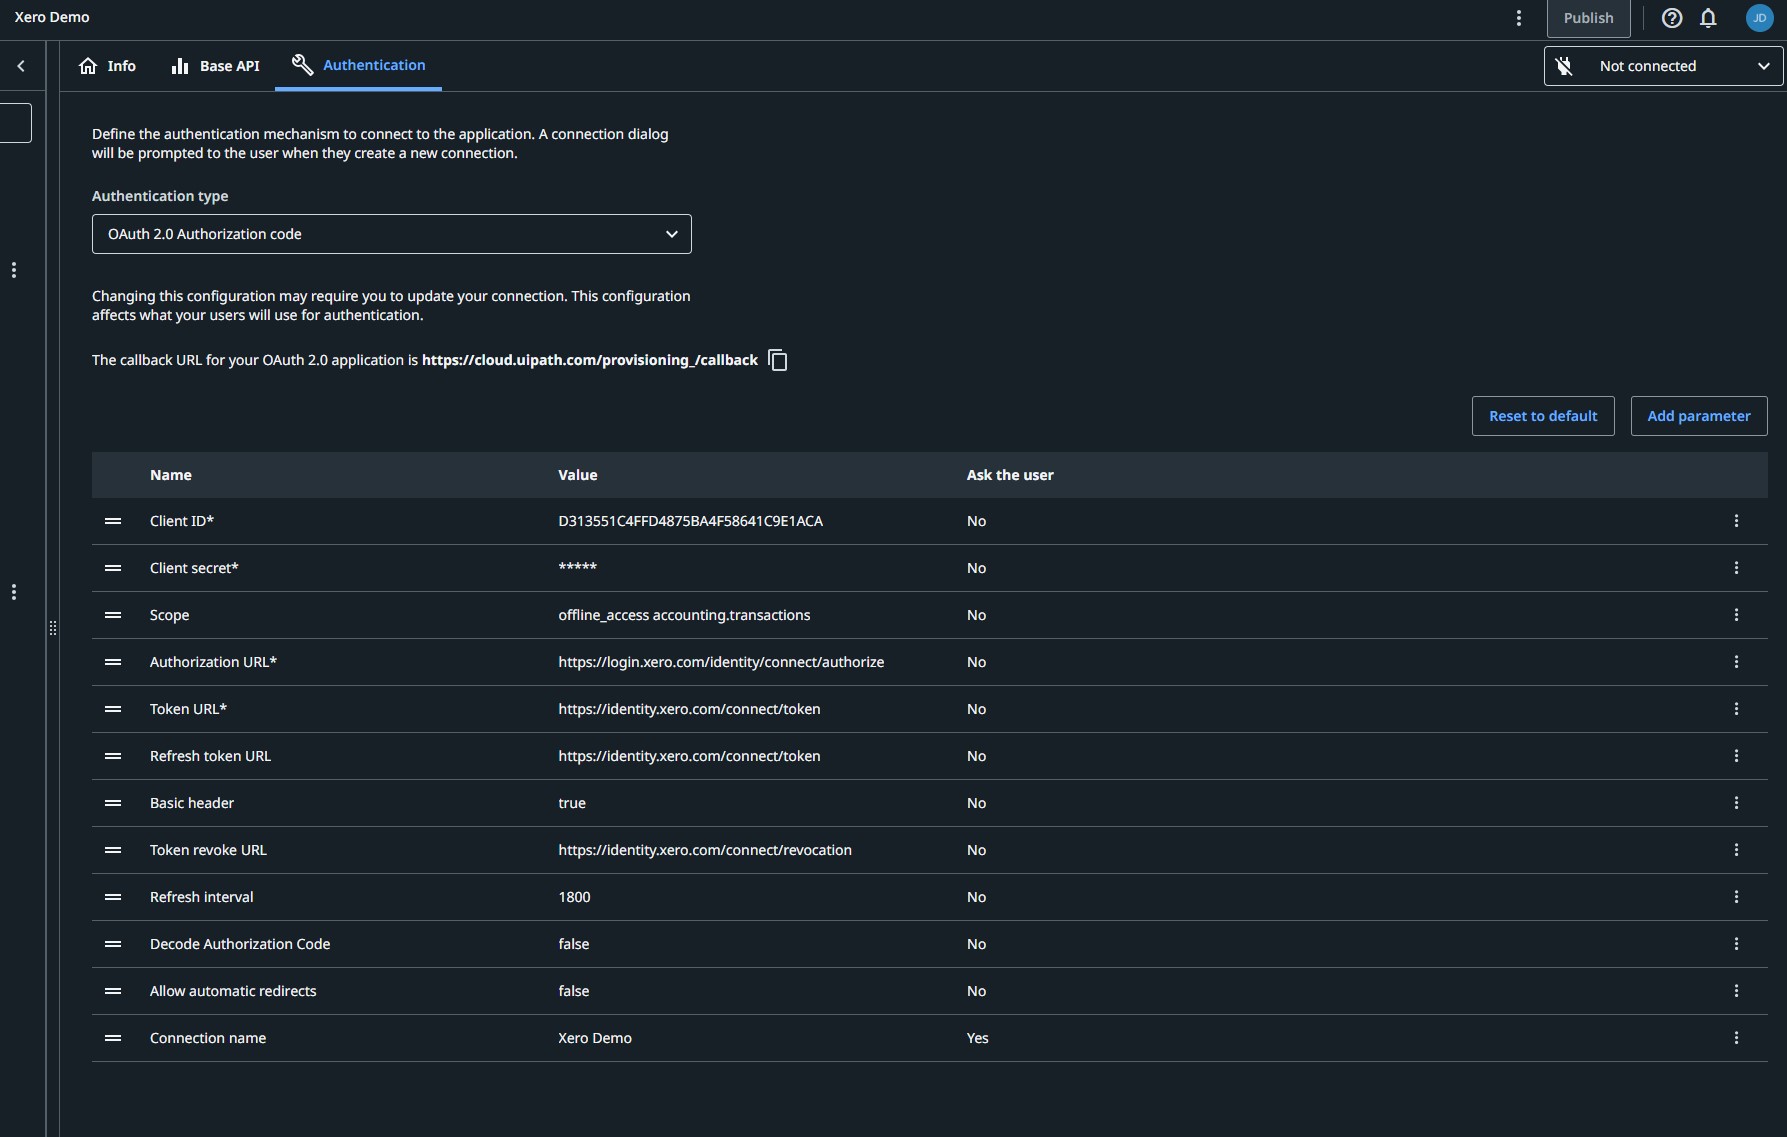
Before we can test this connection, we need to set the redirect URL in our Xero app to point to UiPath Integration Service. Note the callback URL above the table in the Authentication page – https://cloud.uipath.com/provisioning_/callback . Copy this URL and navigate back to your client application at https://developer.xero.com/app/manage.
Open your app and go to Configuration.
Paste the UiPath callback URL in the Redirect URIs input. Click Save.

Now we’re ready to go back to Connector Builder and test the connection! In the top right of the Connector Builder Authentication page, click the drop down where it shows “Not Connected” -> “Add Connection”
Click “Connect” when the pop-up window appears.
You’ll be sent to the Xero authentication page. Choose the Demo Company (US) from the drop down and click to allow permission for the UiPath app to access the requested resources.
The auth flow will redirect you back to Integration Service. If successful, you should see the Authentication Trace Log automatically appear at the bottom of the page showing your retrieved access token!
Congratulations! We just set up an OAuth 2.0 flow in Connector Builder and ran our first test.
Creating resources
With our connection set up in the Connector Builder, we can start testing API calls to specific endpoints. We can mirror the API structure provided by Xero by creating resources (e.g. Invoice, Accounts, Contacts, etc.).
Before we proceed with creating a resource, there’s one more step to set up in Authentication that will make our lives easier later on.
Adding a custom header
The Xero API specifies that calls should include a Tenant ID as a custom header. We can add this header in the authentication settings, even though it’s not used to retrieve the token. When it is added to the authentication settings, it will be shared for all API calls performed on any resource – this means we do not need to manually add the custom header on every call.
Retrieve tenant ID
Go to api-explorer.xero.com
Select Xero Accounting API in the API dropdown menu
Select Accounts for the Endpoint
Select Get Accounts for the Operation
Expand “Show auto-generated headers”
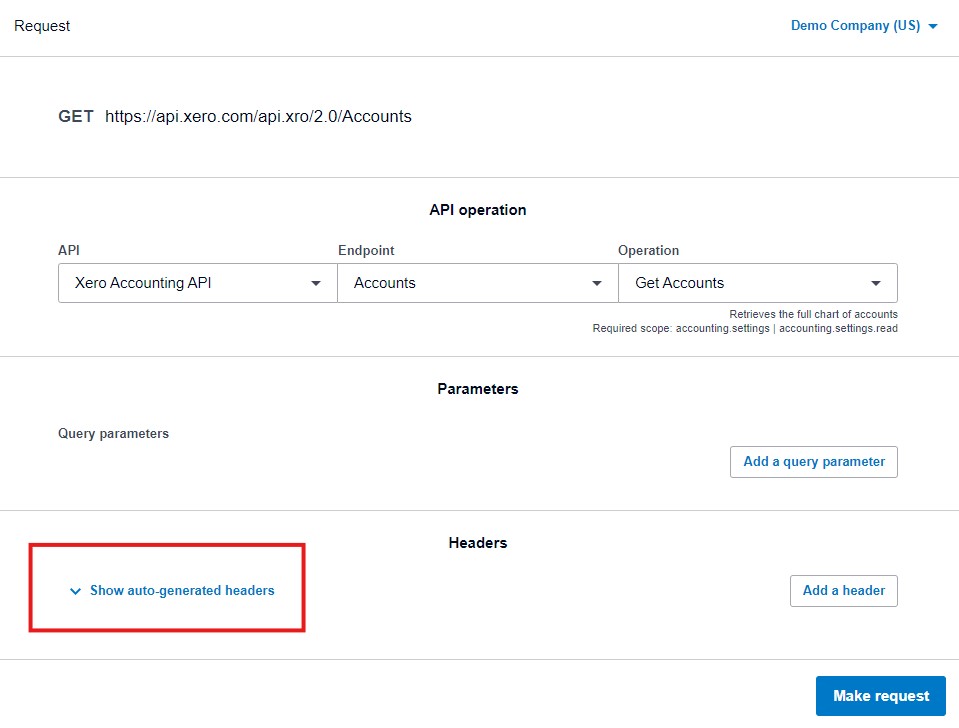
Copy the value next to “Xero-Tenant-Id”
Add the custom header to the authentication settings in Connector Builder
In the same Authentication tab of the Settings, click “Add parameter”
Enter the Display Name and Provider name as “Xero-Tenant-Id” – ensure this matches the header name that was shown in the Xero API Explorer
Select “header” for in the “Send to provider as type” dropdown menu Click “Save”
Connector Builder will prompt you to create a new connection – go through the same steps as above to re-create the connection.
Adding the contacts resource
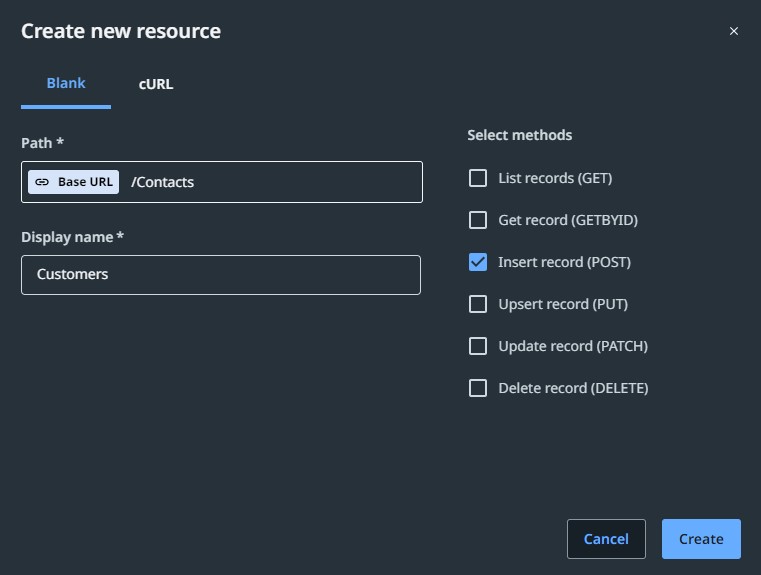
Click “Create new resource”
Enter “Contacts” after the Base URL
Important: Change the Display name to “Customers”.
Select “Insert record (POST)” for a method. Note you can select other methods here for any supported operation for the Contact resource. For the scope of this blog, we’ll just set up the Create Contact request.
Click “Create”
The Create Contact operation requires a payload (or body) that includes parameters to define the contact object.
Click the “Request fields” tab
Click “Options” then “Generate from payload”
Enter the following JSON payload in the sample payload field:
{ "Name": "Foo9987", "EmailAddress": "sid32476@emailserver.com", "IsCustomer": true }

Click “Generate”. You should see the three parameters added in the Request Fields.
Click “Send Request”
When prompted, click “Execute”
You should see Success: 200 for the response code and the raw response data in the request trace at the bottom of the screen
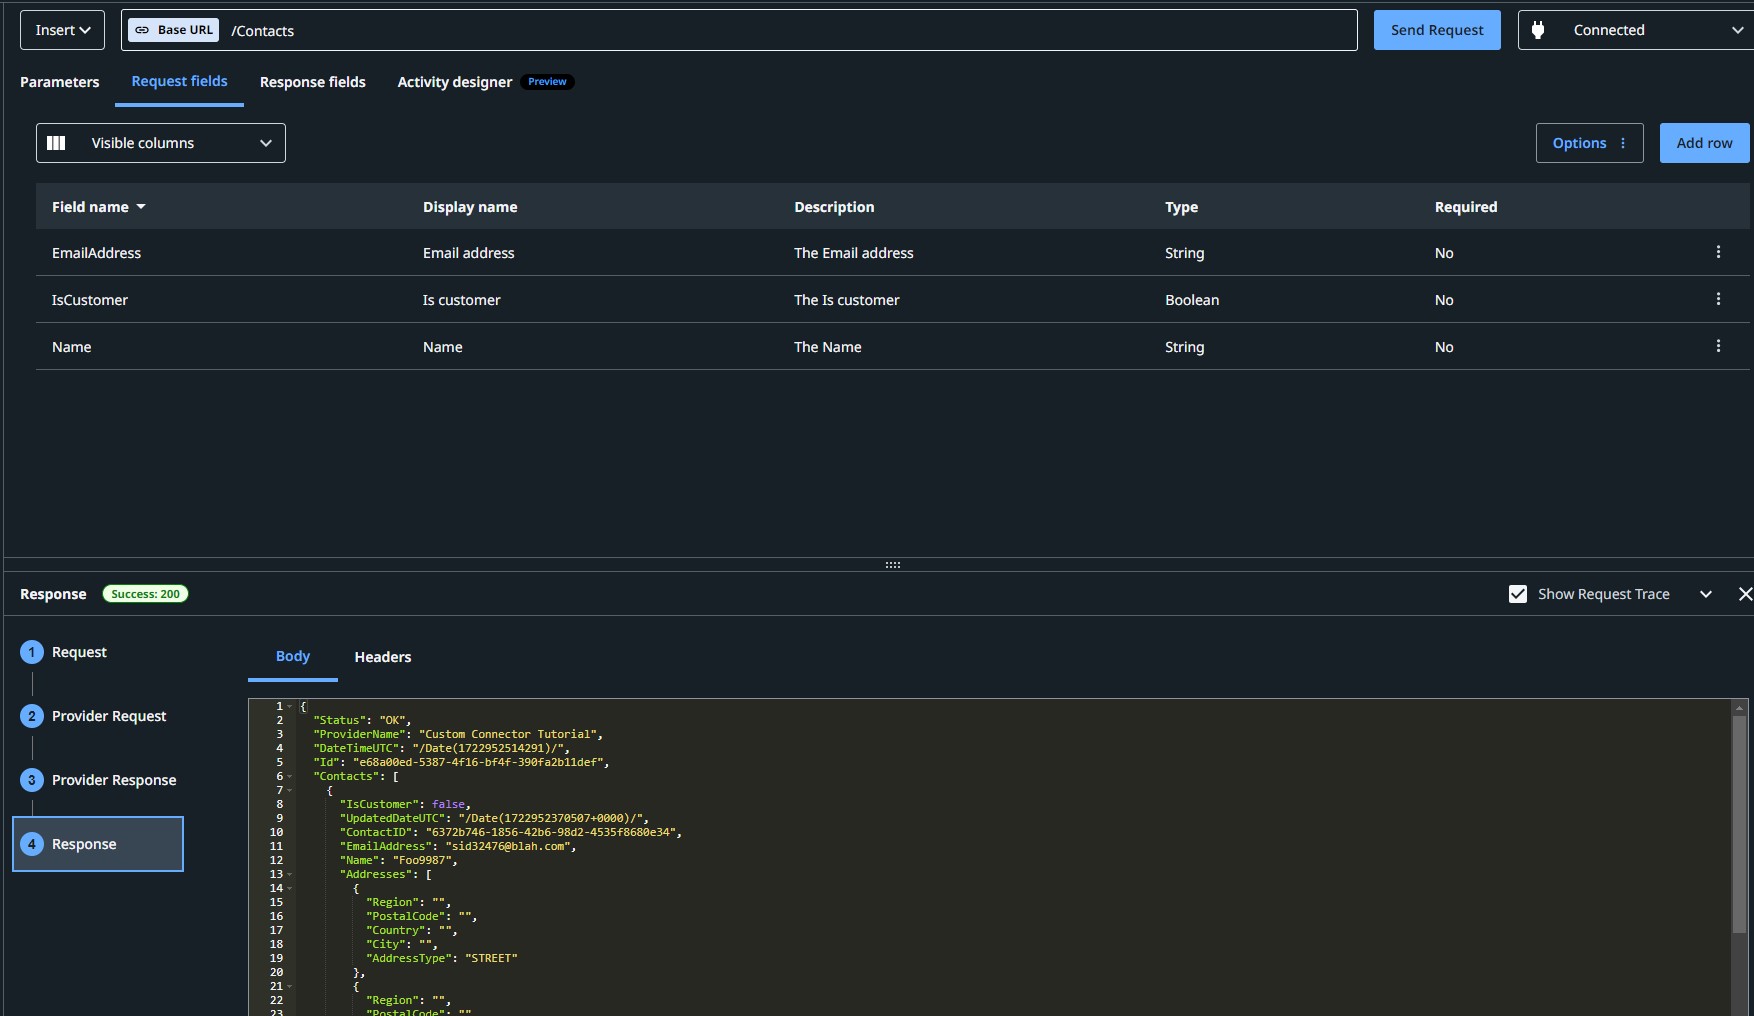
Switch to the “Response Fields” tab. All of the responses fields have been automatically organized into individual data fields! This will be important in a moment when we create a “Curated Activity”. If the response fields have not been automatically populated, you can copy the response payload from the request just made, and paste it into the “Generate from payload” option for the response (similar to how we created the request fields).
Defining the resource is technically enough to fulfill an action to be used in a workflow. We can leverage the Insert Contact action above and get all the data produced in the request as a response. This is great, but sometimes we don’t want to reveal all that data to consumers of the activity. We also might want to give the activity a more intuitive name than “Contact”.
This is where curated activities come to the rescue.
Defining a curated activity.
Let’s define a curated activity for the GET Invoices operation.
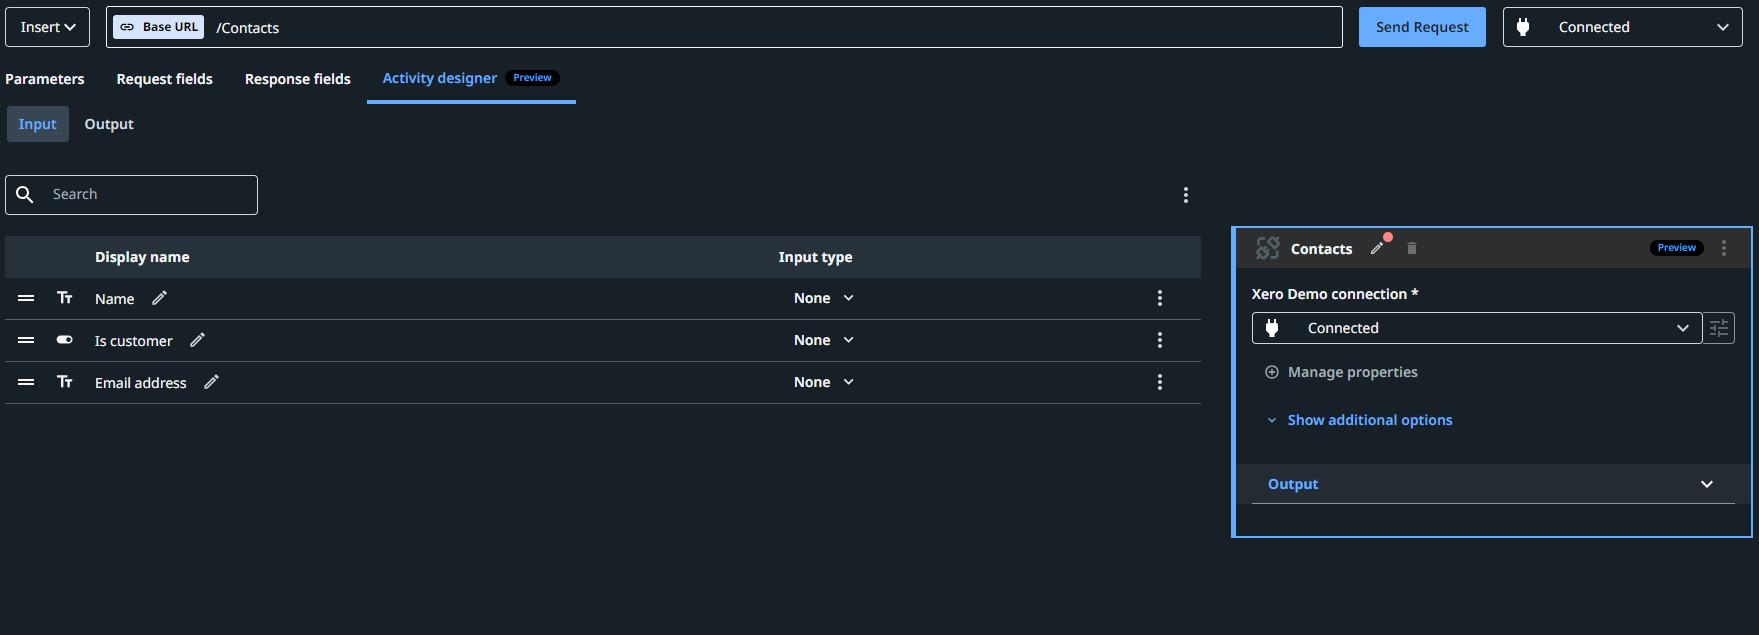
Switch to the “Activity Designer” tab.
Note the activity canvas on the right. Click the pencil icon to change the name of the activity to “Create New Customer” and add a description.
Change the Input type for Name and Email Address to “Required”.
Publish and run in UiPath Studio Web
With a resource and curated activity created, we can publish this connector and use it in UiPath Studio Web!
Click Publish
Enter the documentation URL as https://developer.xero.com/documentation/getting-started-guide/
Click Publish to publish the connector and make it available to the organization.
You’ll be redirected to the Admin tab of the connector page. From here you can create a new connection to the published connector (different than the connection used for testing the connector in build mode). Click Connect and go through the same authentication flow as before.
With the connection set up on the published connector, navigate to Studio Web by clicking “Studio” in the left menu of Automation Cloud.
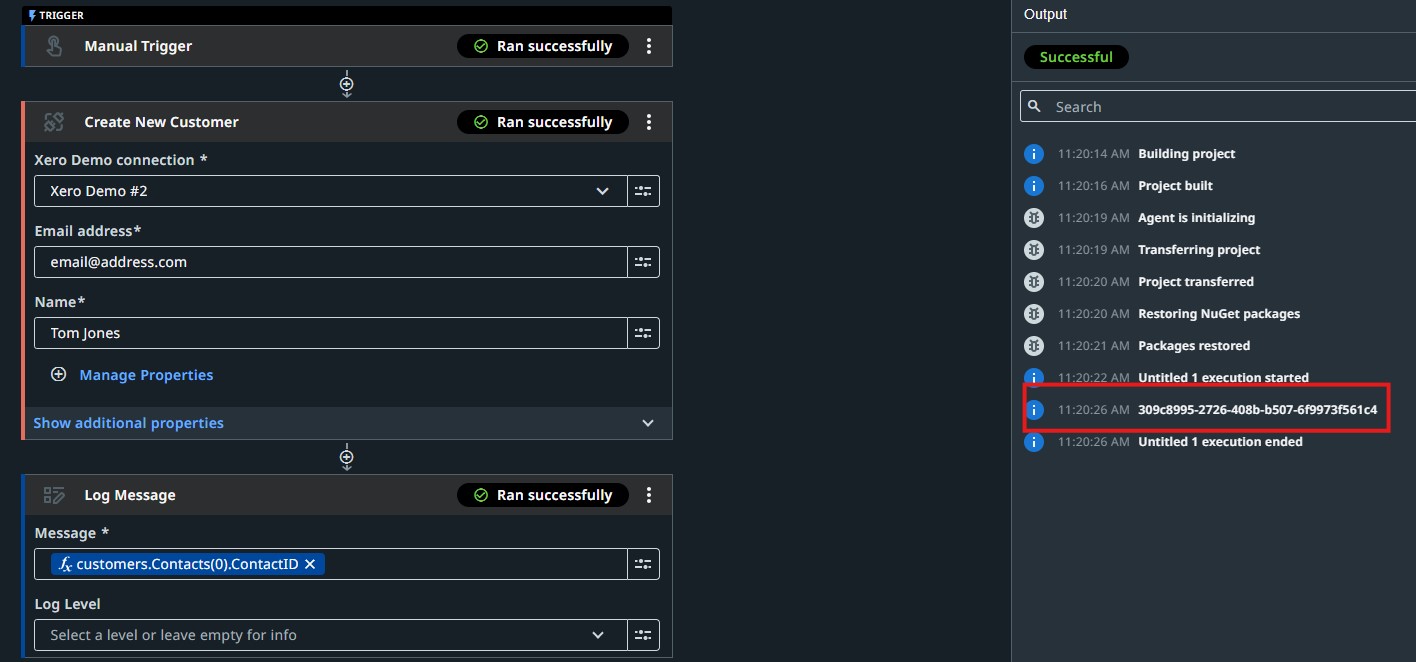
Create a new project with a manual trigger.
Add another action in the workflow by clicking the “+” icon. Search for your connector or scroll to the bottom of the menu to find “Xero Demo” or whichever name you provided in Connector Builder.
Click on your connector. Note the two actions available:
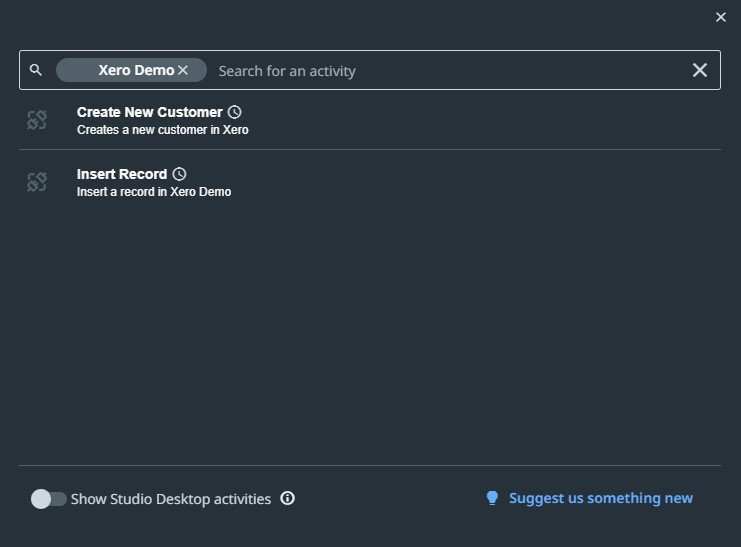
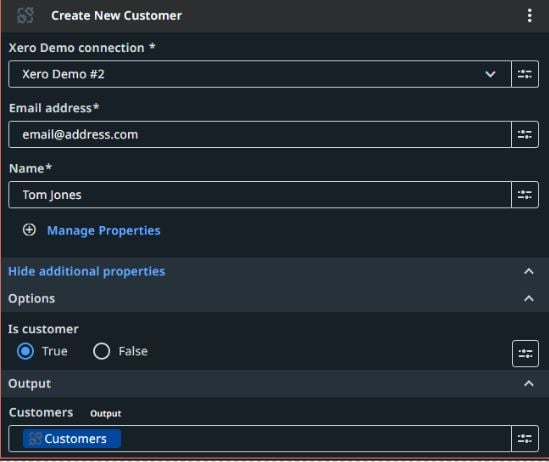
The Insert Record action is a generic operation that you can use to select a POST method for different resources. This is helpful, but the curated activity makes using this connector more intuitive, with our aptly named “Create New Customer” action. Select “Create New Customer” to add to the workflow.
The connection you made above should appear by default in the action. Enter an email address and name input. Note you can select “Show additional properties” to reveal the “Is customer” field.
Add a Log Message activity
In the Message text input, click the options on the right and open the expression editor.
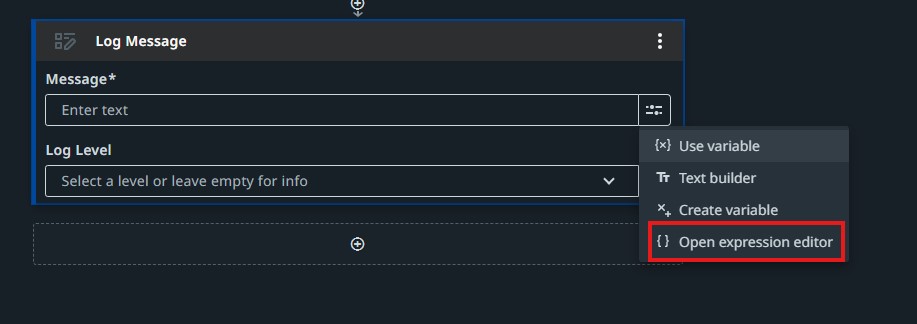
Enter the following expression:

Click “Save”.
Test the workflow! If everything is set up correctly, you’ll see it run through each step and log the ID of the contact that was just created.
Conclusion
Connector Builder is a game-changer for developers looking to build custom integrations with third-party REST APIs. The ease of use, combined with powerful features and central governance, makes it an essential tool for any automation project. By leveraging this tool, organizations can enhance their automation capabilities, drive efficiency, and scale their operations effectively.
Whether you are a seasoned developer or just starting out, the Connector Builder provides you with the tools you need to create robust, reusable integrations that can transform your automation workflows. Start experimenting, start building, and unlock the full potential of your automation projects today!
Topics:
Integration Service
Senior Sales Engineer, UiPath
Related articles


Get articles from automation experts in your inbox
Sign up today and we'll email you the newest articles every week.
Thank you for subscribing!
Thank you for subscribing! Each week, we'll send the best automation blog posts straight to your inbox.
Get articles from automation experts in your inbox
Sign up today and we'll email you the newest articles every week.
Thank you for subscribing!
Thank you for subscribing! Each week, we'll send the best automation blog posts straight to your inbox.