The anatomy of two-way match for SAP Solution Accelerators part one

Introduction
Today’s tutorial is part one of a three-part series focusing on the technical components of the two-way match for SAP Solution Accelerators.
It takes months to discover, design, build, and implement automations. It is also essential that automations are designed in a scalable and flexible approach for them to be easily configured and adapted to various situations. From finance to manufacturing and telecommunications, processes are complex, vary even within the same company, and generate friction, effort, and huge costs.
In our specific case, the two-way match Solution Accelerators are directed at Purchase-to-Pay (P2P) processes where finance leaders are challenged by older invoice processing technologies, which still produce high error rates and result in workflow inefficiency. Automation combined with AI for document understanding is a game-changing way to reengineer P2P workflows, greatly improve accuracy, and achieve new levels of straight-through processing.
What is the two-way match for SAP Solution Accelerators
Using UiPath proven frameworks to digitize and scale finance department P2P workflows, which leverages your existing financial systems, Solution Accelerators supports the ability to drive immediate ROI by achieving industry-leading straight-through processing and improves working capital. The two-way match Invoice Processing Solution Accelerators is the excellent starting point for the Purchase-to-Pay automation, which extracts data from PDFs from supplier invoices and related documents, stores legally valid invoices, removes errors, and improves processing times. Solution Accelerators was co-developed in partnership with Silicon Partners (TSP).
Main functionalities and features of the Solution Accelerators
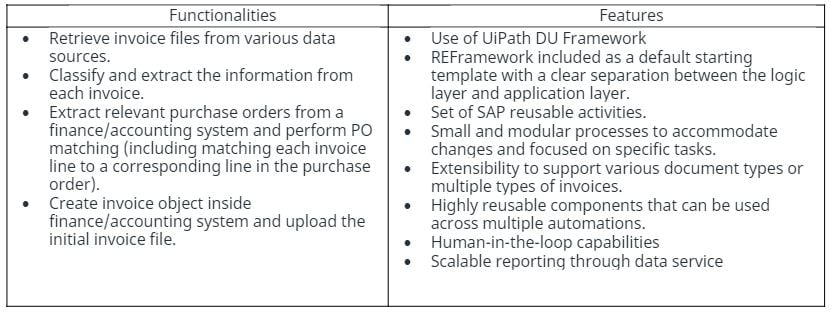
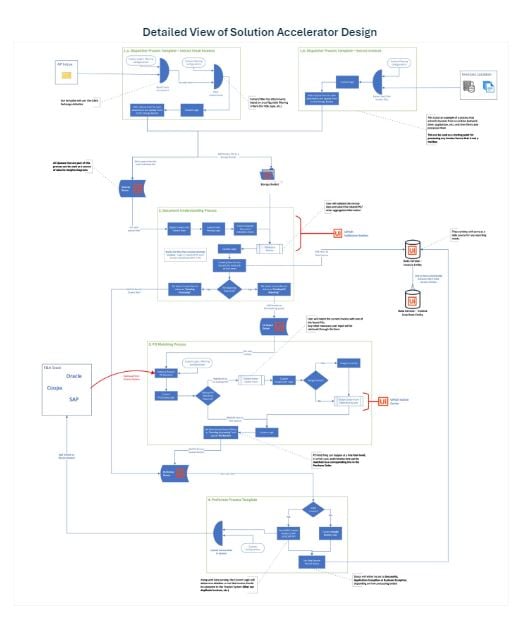
Diving into the two-way match for SAP Solution Accelerators and looking at the various components of the Solution Accelerators you will find the following templates:
Email Dispatcher Template
Simple Dispactcher Template
Classifying the Invoice files and Extracting Invoice Data Template
Email Dispatcher Template
This framework is focused on getting emails from an inbox and looking for attachments that should be processed. It consists of the following steps:
Emails to be processed are retrieved using the Office365 activities in the Init state of process.
By default, emails are filtered using a query stored in an asset called: Dispatcher_EmailFilter
The source email folder can be configured via the asset Dispatcher_InvoiceEmailsSourceAccount
Processed emails can also be moved either to a Success (asset DispatcherProcessedEmailDestinationFolder) or Failed folder (asset DispatcherErrorEmailDestinationFolder). For this to work, the Move Emails Feature must be enabled (asset Dispatcher_MoveFolderSwitch set to True)
Email attachments are also filtered by filename using a regex expression stored in the asset Dispatcher_InvoiceFilenameRegexFilter
Configuration files
Below you will find all the configuration files used in the Template, with data examples from some configuration files
InitiAllSettings.xaml - Initialize, populate, and output a configuration Dictionary to be used throughout the project. Settings and constants are read from the local configuration file, and assets are fetched from Orchestrator.
InitAllApplications.xaml - Opens applications used in the process and do necessary initialization procedures (e.g., login).
GetTransactionData.xaml - Retrieves the next transaction items to be processed.
Process.xaml - For each transaction item, the process through its attachments, filter them by name using a RegexFilter stored in an asset (Dispatcher_InvoiceFilenameRegexFilter) and process them.
Each valid attachment is uploaded to a Storage Bucket and creates a queue item so that the item will be processed by our Document Understanding process. To process each file, we use the component AddFileToAPInvoiceQueue in the AP Invoice Reusables library folder. If there are no errors and the Dispatcher_MoveFolderSwitch asset is set to True, the email message will be moved to a processed folder.
SetTransactionStatus.xaml - Set and log the transaction's status along with extra log fields. There can be three statuses: Success, Business Exception, and System Exception. All exceptions are placed in either one of the following DataTables, depending on their type: ioApplicationExceptionsDT or ioBusinessExceptionsDT.
In case of a business exception or of a system exception on the last retry of a transaction item, the email message will be moved to the Failed folder (given by asset DispatcherErrorEmailDestinationFolder). But only if the asset DispatcherMoveFolderSwitch is set to True!
RetryCurrentTransaction.xaml - Manages the retrying mechanism for the framework and it is invoked in SetTransactionStatus.xaml when a system exception occurs. The retrying method is based on the configurations defined in the process' constants.
TakeScreenshot.xaml - Capture a screenshot, log its name and location, and save it with the PNG extension. If no specific filepath is passed as argument, it saves the image in the folder specified by in_folder.
SendExceptionsEmail.xaml - This workflow is invoked by the End State if the process ended abruptly or it encountered Business or System Exceptions when processing transactions. It creates the application exception and business exception excel files and attaches them to an email.
Only System Exceptions obtained on the last Retry of a transaction library Item will count. The reusable components SendEmail and CreateExcelFileFromTemplate from the Generic Reusables library will be used as part of this process.
Simple Dispatcher Template
This framework is focused on processing attachments extracted directly from a source like a Network Drive, SharePoint folder, third party Application, etc.
You will have to replace the placeholder sequence found in the Init State with specific code that retrieves files from a source of your own choosing:
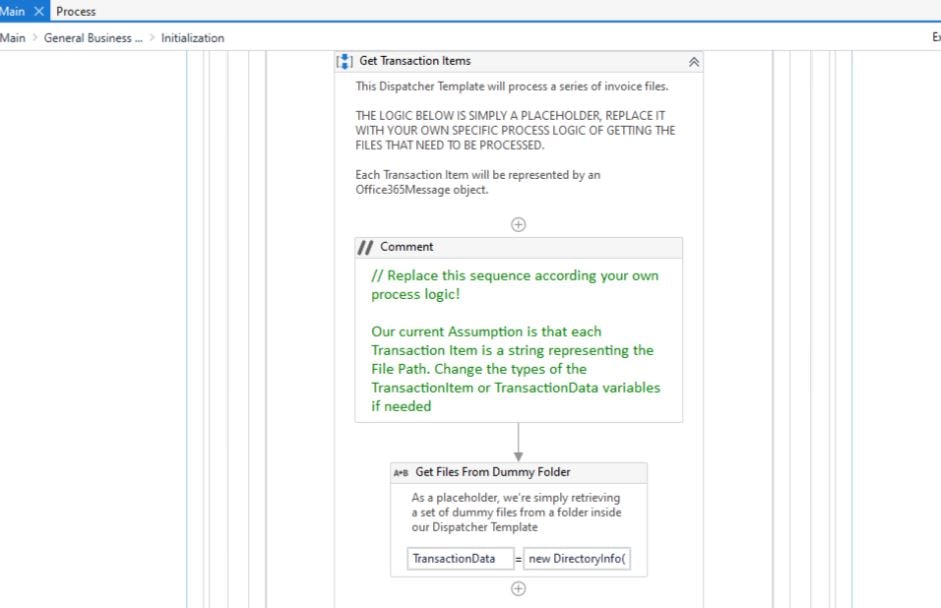
Any of the frameworks mentioned can be used either separately or in conjunction, depending on the needs The configuration files and description for this template are the same as with the email Dispatcher Template, however they carry slightly different configurations.
Main.xaml, InitiAllSettings.xaml, InitAllApplications.xaml,CloseAllApplications.xaml, KillAllProcesses.xaml, GetTransactionData.xaml, Process.xaml, SetTransactionStatus.xaml, RetryCurrentTransaction.xaml, TakeScreenshot.xaml Example of configuration for SendExceptionsEmail.xaml
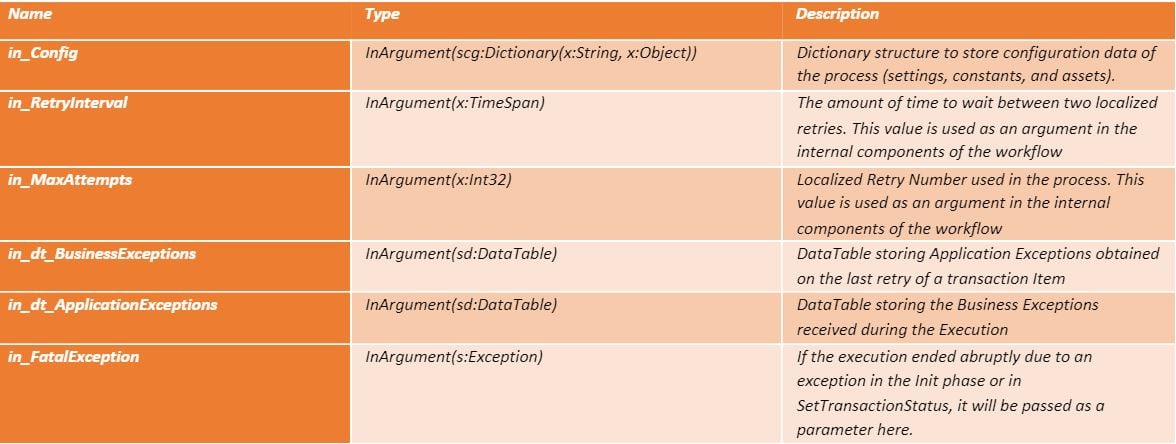
Classifying the Invoice Files and Extracting Invoice Data Each of the PDF files extracted at the previous step will reach the Document Understanding process, where the document classification and data extraction happens.
Depending on the specific requirements, the Document Understanding queue Framework can be configured to run in both attended and unattended mode, as well as skip the Dispatcher step and receive as a parameter a file that should be processed directly.
Document Classification
First the files will pass through a Digitization step and then a Classification one where the type of each inner document will be determined. Human intervention can be applied in the case of an inconclusive result, through an interface such as below:
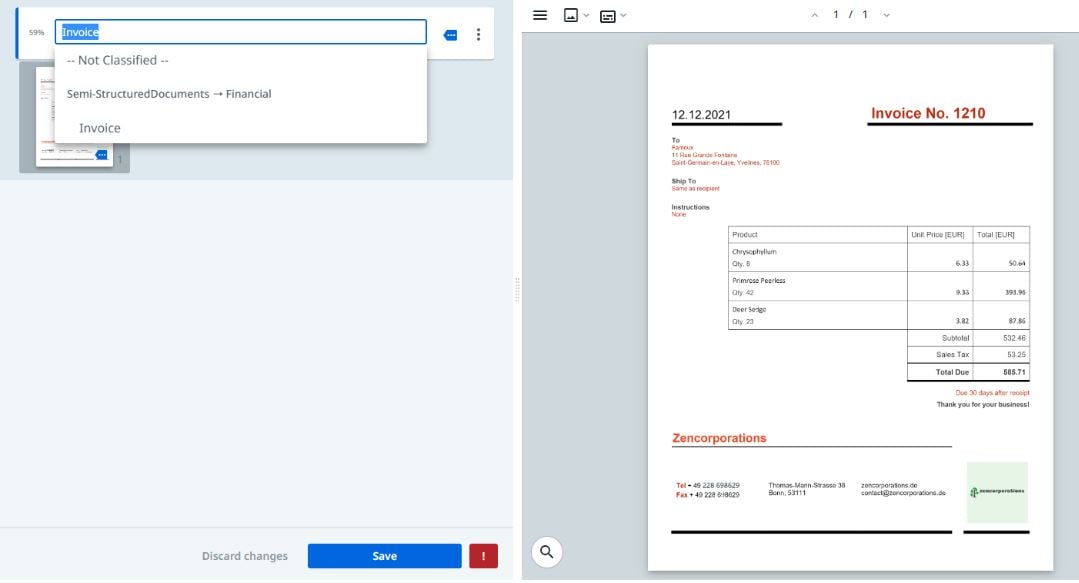
Currently, the framework is configured to detect generic invoices, but it can be extended to support more document types, or even multiple types of invoices.
The Document Classification template contains the following configuration files with some examples of data configuration
Main-ActionCenter.xaml - Entry Point of the Unattended Version of the process. This Process retrieves the next queue item from the Invoices queue, runs the Document through the Digitization, Classification, and Extraction steps, then Exports the data to be used by the PO Matching/Performer Processes.
If the queue should be bypassed and a new file should be processed instead, the inUseQueue parameter should be False and the file path should be passed to the process using inTargetFile argument.

Main-Attended.xaml - Entry Point of the Attended Version of the process. This workflow will follow the same general flow as Main-ActionCenter.xaml
00_ReadConfigFile.xaml - Initialize, populate, and output a configuration dictionary to be used throughout the project. Only reads the Settings from the local configuration file.
10InitializeProcess.xaml - Reads Assets from configuration file, loads the taxonomy for Document Understanding activities, and retrieves assets from Orchestrator. This workflow also replaces the values in the Payment Terms taxonomy field with values from the Document UnderstandingPaymentTermsSetValues asset. Depending on your use case, this workflow can be extended to perform this step for other fields, too.
15_GetTransactionItem.xaml - Gets the next transaction Item.
20_Digitize.xaml - Digitizes the specified file. OCR engine is process-dependent and should be further configured or changed depending on your specific data set and use case.

30_Classify.xaml - Classification workflow. Classifiers are process-dependant and this workflow should be further customized depending on your specific usecase.
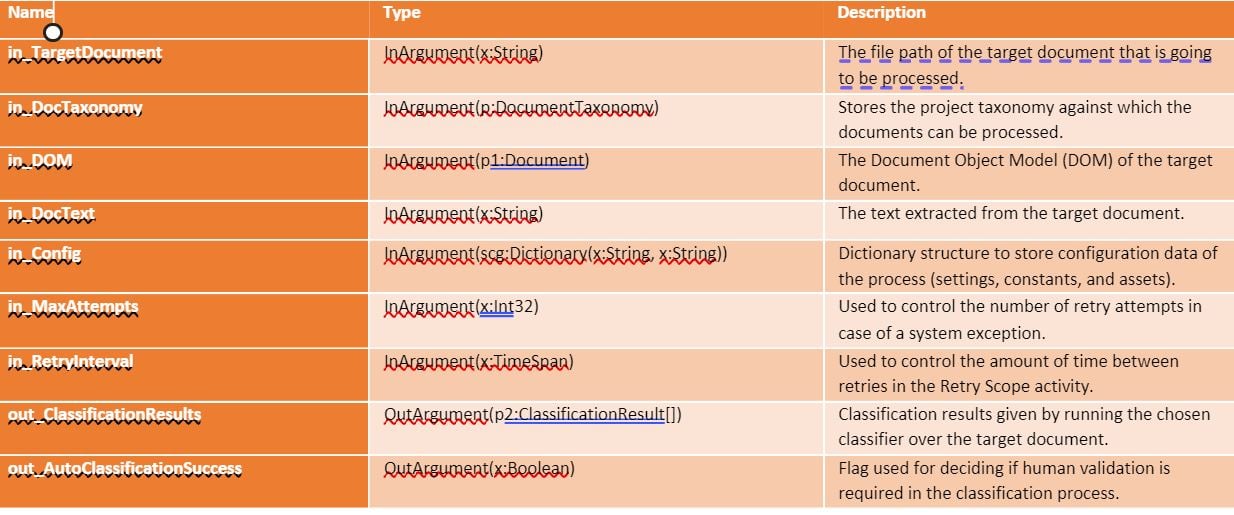
35ClassificationBusinessRuleValidation.xaml - flowchart used to determine whether the automatic classification done by workflow 30Classify.xaml should be validated manually.
40_TrainClassifiers.xaml - workflow used to train the classifier using data from the Manual Validation step. This workflow should be further customized depending on your specific use case and classifiers used.
50_Extract.xaml - workflow where pre-extraction steps should be added and where the data extraction occurs. Extractors are process-dependent, so this workflow should be further customized depending on your specific use case.
Note: This step is performed for every Invoice identified during the classification step.
55_ExtractionBussinessRuleValidation.xaml - flowchart for the business rule validation after the extraction process has been completed. It will determine if the data extracted for the current document should be reviewed manually (use InvoicePostProcessing.xaml to check that the data passes all business logic validations).
Depending on your specific use case, this workflow might need additional work, especially if you plan to process multiple types of documents.
In the case of manually validating an invoice, this step is also re-executed after the user submits the validation data. This is done to ensure there was no incorrect information submitted accidentally by the user.
60_TrainExtractors.xaml - workflow used to train the extractor using data from the Manual Validation step. This workflow should be further customized depending on your specific use case and extractors used.
70_Export.xaml - workflow that contains all of our post-extraction logic. It will create an AP Invoice Data Service Record for the current invoice and an AP Invoice Data Line Item Record for each line item belonging to the invoice.
Note: If the current execution is not processing a queue item, this workflow will also upload the file to the Storage Bucket.
The workflow uses 75ChooseProcessingApproach.xaml to determine where a queue item should be created for the current Invoice. Afterwards, a queue item containing the newly created record’s ID is created in the appropriate queue. If an invoice is processed successfully, it will be added to the ioFullyProcessedInvoices list.
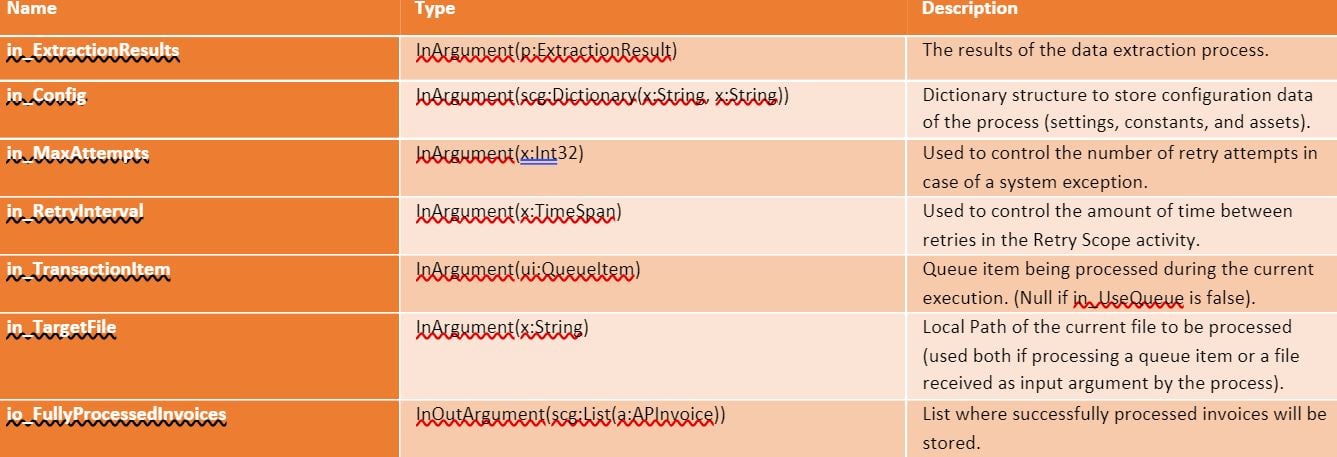
75_ChooseProcessingApproach.xaml - workflow containing logic used to decide if the Invoice should be passed to the PO Matching Processor directly to the Performer Process.
80_EndProcess.xaml - workflow containing any cleanup needed after all the invoices in the current file have been successfully processed.
Currently, the following behavior is implemented:
If we received exceptions in the Invoice Extraction phase, but no Invoices were successfully processed, we will throw an exception that will be handled in the Main workflow. OR
If we received exceptions in the Invoice Extraction phase, but some Invoices were successfully processed, we will send a notification via email (if the process is running in Unattended mode), and still consider the current transaction as Succesful.
ERR_AbortProcess.xaml - workflow executes when the process is aborted due to an exception
If the execution is currently in unattended mode, a notification via email is sent.
ERR_HandleDocumentError.xaml - workflow executes if an exception occurs when processing a classified document.
InvoicePostProcessing.xaml - Contains all of the business-specific rules that validate the extracted data of an invoice.
The following validation steps are currently performed as part of this workflow:
Verify that all Mandatory Fields and Columns are extracted
Verify that all table rows that have a quantity value match the rule: Quantity * Unit Price = Line Amount
Verify that the sum of all Line Amounts = Net Amount
Sum up Net Amount with all the values defined in the Config file under "SubTotalAdditions". Verify that the sum of Net Amount + "SubTotalAdditions" = Total
Verify that Invoice Date and Due Date Format is correct
Verify that the Payment Terms value is part of the accepted values (stored in asset DU_PaymentTermsSetValues)
Verify the extraction confidence of all defined "ConfidenceFields" against their individual confidence thresholds
Verify the extraction confidence of all the other fields against the "other-Confidence" threshold
Note: We strongly recommend to adjust these validations to the required ones.
The default implementation uses EN-US culture information. This means '.' is the decimal separator and "," is the thousand separator. (e.g.: 10,000.00).
LockFile.xaml - Mechanism used to “lock” the learning file so that only the current process can use it.
UnlockFile.xaml - Mechanism used to revert the “lock” operation of the learning file.
SendExceptionEmail.xaml - This workflow sends an email containing the details of an exception.
SetTransactionProgress.xaml Updates the TransactionProgress. The TransactionItem must exist. This is useful in the case of long-running workflows, as processing a single transaction can take a long time and updating the progress will help queue management efforts.
SetTransactionStatus.xaml - Set and log the transaction's status along with extra log fields. There can be three statuses: Success, Business Exception and System Exception.
That is all for our first tutorial series on the two-way match Solution Accelerators. Make sure you don’t miss the next part and in the meantime, try Solution Accelerators.
Topics:
SAP AutomationGet articles from automation experts in your inbox
SubscribeGet articles from automation experts in your inbox
Sign up today and we'll email you the newest articles every week.
Thank you for subscribing!
Thank you for subscribing! Each week, we'll send the best automation blog posts straight to your inbox.


